Running your business with
LedgerSMB 1.10
DRAFT / WORK IN PROGRESS
Preface
The current development goal for the book is to get the content current and accurate, not necessarily perfect structure and grammar.
You will find many incomplete sections which should be regarded as an outline for the finished book. However, some sections are nearly complete.
Because LedgerSMB is undergoing active infrastructure and API changes in 2023, some portions of this book will not be written until those changes are nearing completion.
Intended audience
The book has been split up into several parts intended for starting entrepreneurs, (potential) users, application integration developers and administrators, it offers something for everybody who works with or considers working with LedgerSMB.
Organization of the book
The first part (‘Overview’) is intended for everybody who tries to get an impression of LedgerSMB, with chapters on technology, features, licensing and a bit of project history.
The second part (‘Getting started’) leads new users and especially new entrepreneurs step by step through the application using a tutorial format. This part also contains additional explanations on good business and accounting processes.
The third part (‘Configuration’) describes system wide configuration settings such as the LedgerSMB configuration file and those required for dependencies like PostgreSQL. Additionally it describes the company specific settings within the application, such as audit control settings and required special accounts. This part is required material for anybody who wants to set up a LedgerSMB instance.
The fourth part (‘Administration’) discusses the different topics regarding application administration such as user management, product definition, taxes and etc. Anybody responsible for maintaining application instances in good health should read this part.
The fifth part (‘Business processes’) discusses LedgerSMB’s best practices. This part is highly advised reading for everybody who is a LedgerSMB user and should be considered required reading for ’business architects’: those in the company who decide about process design and execution.
The sixth part (‘Customization’) discusses how to customize the application. This part is intended for developers of custom extensions (such as company specific integrations), add-ons and plug-ins.
The last part (‘Appendices‘) contain supplemental reference information on various subjects, such as a listing and description of the authorization roles in the application as well as information on migration to or upgrading of LedgerSMB versions.
Comments and questions
The sources of this book are being developed in the ledgersmb-book Github project at
https://github.com/ehuelsmann/ledgersmb-book.
Comments and enhancement ideas can be filed
in the ticket tracker of the project. Additionally, discussion about the content of the book
can be organized on the mail list or chat channels listed at https://ledgersmb.org/topics/support.
Finally, up-to-date versions of this book in both PDF and HTML formats can be found on the book website at https://book.ledgersmb.org.
Acknowledgments
Håvard Sørli for his efforts to help develop the original book outline.
Members of the https://app.element.io/#/room/#ledgersmb:matrix.org chat room.
Part I Overview
Chapter 1 What is LedgerSMB
1.1 Introduction
LedgerSMB is an open source, web based Enterprise Resource Planning system (ERP system). An Enterprise Resource Planning (ERP) is a system which supports business processes of all disciplines throughout the organization, automating as much of those processes as possible. To illustrate this, consider the process of selling goods to a customer in a trade company. Typically, a customer will request a quote, which Sales will provide. When satisfied he or she will convert the quote to an order. Sales will register the order, leading to order-pickers to collect one or more shipments. Upon completion, Finance sends out an invoice and records the customer’s payment. LedgerSMB supports this process by automating the conversion from quotation to order, order to shipment and shipment to invoice, as well as providing pack lists and other production related documents.
LedgerSMB includes a powerful framework which supports building your own extensions and integrations with other applications. Through this philosophy, it aspires to be the (open source) integrated administration system.
The software is being developed by the LedgerSMB project with its homepage at https://ledgersmb.org/. However, the actual project activity can be witnessed at the Github project site hosted at https://github.com/ledgersmb/LedgerSMB and on the mailing lists or chat channel listed at https://ledgersmb.org/topics/support
Its open source nature allows you to download LedgerSMB and use it with any infrastructure you like. So there’s no vendor lock-in: you can always take your data and set up your system with another hardware vendor or set up your own hardware.
1.2 Supported functionality
As most ERP systems LedgerSMB’s functionalities are grouped into modules. Many modules are integrated parts of the base application. New features can be implemented in separate modules at first to allow evaluation of the feature set. When a it has become sufficiently stable, the new module may be integrated in the base application. As of that time, the existing features will be frozen, meaning that the utmost will be done to prevent it from being changed.
These separate modules - which are called add-ons- have to be installed separately. After installation they become seamless parts of LedgerSMB with no visible difference from the base application. An additional benefit of having add-ons is that they can follow different release schedules and separate maturity levels than the main application.
LedgerSMB 1.10 features the following integrated modules:
-
•
General ledger
-
•
Payment and Accounts payable
-
•
Invoicing and Accounts receivable
-
•
Fixed asset accounting
-
•
Time registration and invoicing
-
•
Point of Sale
-
•
Quotation and Order management
-
•
Manufacturing
-
•
Inventory (warehousing) and shipping management
-
•
VAT reporting
-
•
Controlling
-
–
Project accounting
-
–
Department accounting
-
–
-
•
Application administration
There are no known add-ons available at this time.
With this list of modules and add-ons LedgerSMB has been successfully implemented in a wide range of companies of varying types and sizes: shops, manufacturing companies and service oriented businesses up to as big as @@TODO million transactions, growing by 50,000 transactions (spread across AR, AP and GL) per month.
1.3 Feature comparison with alternatives
@@@ TODO
Packages to compare to:
-
•
GNUcash
-
•
OSfinancials
-
•
ERP5
-
•
Odoo
-
•
xTuple
1.4 System requirements
The README file which comes with every LedgerSMB software release should be considered the canonical source for system requirements. In summary, the following technical components are required:
-
•
A web server (known working are Nginx, Apache, lighttpd and Varnish)
-
•
Modern Perl 5, with additional modules
-
•
PostgreSQL 13 or higher
-
•
(optional) LaTeX or XeLaTeX from the TeTeX or TeXLive TeX distributions
More information about system requirements for clients and servers is available at https://ledgersmb.org/content/system-requirements.
System requirements such as required RAM and number of CPUs and their speed largely depend on the expected system activity. However, any modern VPS should provide enough memory and storage to satisfy a reasonable number of users.
1.5 Application architecture
Due to its heritage from SQL Ledger and the on-going process of rewriting the inherited code, the architecture differs between parts of the application: the old parts and the ones which have already been rewritten.
Overall, the application consists of five layers:
-
•
The web browser (as the user interface)
-
•
The web server (as a network traffic handler)
-
•
The Perl (web)server process (as an application - Perl Web Server Gateway Interface (PSGI))
-
•
The database (as an application - PL/SQL)
-
•
The database (as storage)
In version 1.10 the user interface is a Single Page Application using a mixture of new (e.g. Vue 3, webpack 5 and Web Components) and old (e.g. Dojo Toolkit) technology.
The web server is an optional component that’s highly recommended for TLS termination and protecting the back end Perl HTTP server from malicious traffic11 1 This setup is an industry-wide accepted best practice for deploying web applications; web servers like Apache or Nginx have been and continue to be extensively security-reviewed. No other implementations can achieve the same level of scrutiny.. It may also be used for serving static page components such as images, style sheets and JavaScript component as an efficiency measure.
Recent releases add separation between business logic and process state with the latter being stored in the database and managed at the Perl layer. Other than that, it’s the Perl layer’s responsibility to forward web requests to the database and presenting the resulting data in response to the user interface. The original goal to reduce the Perl layer to be a “glue” layer between the web server and the database has been abandoned with the introduction of this additional (business process) layer.
At the “database as an application” layer, PL/SQL functions implement business functionality, such as creating cost of goods sold (COGS) accounting entries.
The “database as storage” layer is responsible for storing data with consistency and integrity; to that extent (and much more than in SL) constraints and triggers have been implemented. An additional role for the storage layer is to enforce data access rules; i.e. to protect data from being accessed by unauthorized users.
The main difference between old and new coding paradigms is at the Perl application layer: older code generates HTML fragments while newer code delivers data through web services. As part of the on-going code restructuring, there’s a major effort to create a Representational State Transfer (REST) web service based APIs. The intent here is to facilitate integration with other applications used by businesses (both in the business itself or as provided by customers and vendors).
1.6 License
LedgerSMB is available under the terms of the GNU Public License version 2, in short: GPLv2 22 2 https://opensource.org/license/gpl-2-0/.
The project attaches the following meaning to this license: The copyright holders grant you the right to copy and redistribute the software. In case you make any modifications to the software you’re obligated to publish the changes if you distribute the software. You are always free to provide third party access to the API from your modified software without being required to disclose your changes.
The project considers the API to include:
-
•
Database tables
-
•
URLs with their input and output
-
•
Webservices of any kind
-
•
Function and object calls
The effect of this interpretation is that changes directly to the code base as well as inheritance of classes defined in the software constitute “making modifications”.
Chapter 2 Reasons to use LedgerSMB
Jack finds several tools which suit his requirements to some extent or another. After evaluation of his options he decides to use LedgerSMB for the following reasons:
-
•
Centralized data storage
-
•
Actively developed
-
•
Development team with security focus
-
•
Access to the application requires only a web browser
-
•
Integrated sales, shipping, invoicing, purchasing and accounting
-
•
Open source solution, so no vendor lock in
-
•
The roadmap appeals to him, because it has web services payrolling on it
-
•
There are multiple vendors offering commercial support, including hosted options
-
•
The developers envision building a platform out of it: creating the building blocks required to build a company on
-
•
Own your own data
-
•
Freedom to change
-
–
Support organization
-
–
Developer (organization)
-
–
Data storage provider
-
–
Application service provider
-
–
2.1 Internal control
Internal control11 1 See also https://en.wikipedia.org/wiki/Internal_control helps organizations to prevent and detect fraud by introducing checks and balances to assess effectiveness and validity of transactions in the organization and thereby in its ERP system and accounting system(s).
2.2 Accounting principles
The accounting guidelines International Accounting Standards (IAS) and International Financial Reporting Standards (IFRS) describe requirements to financial statements (reports) and the underlying accounting process 22 2 See also https://en.wikipedia.org/wiki/International_Financial_Reporting_Standards. Said requirements include qualitative characteristics:
-
1.
Relevance
-
2.
Faithful representation
-
3.
Comparability
-
4.
Verifiability
-
5.
Timeliness
-
6.
Understandability
While some - if not most - of these characteristics relate to the process of accounting, the “Verifiability” item clearly has an impact on the underlaying accounting systems: In order to be verifiable, there must be a clear audit trail to show the origin of the figures. To make sure users leave behind the required audit trail, some actions can’t be performed in LedgerSMB, even though it would seem to be a logical requirement to be able to do so - from the perspective of a non-accountant.
2.3 Impact of tight integration
While both the qualitative characteristics from IFRS and the checks and balances from the internal controls are pose restrictions on the accounting process, sometimes these restrictions require support from the underlying accounting software.
One example is the support for creating reliable audit trails by protecting accounting data from deletion. It’s important to realize the scope of accounting data in this respect: because invoices are being registered in the accounts receivable administration - which is summarized in the general ledger - they are part of the data for which the audit trail needs to be recorded.
Another example is separation of duties (also known as the “four eye principle”), where one accountant enters financial transactions and another is responsible for posting them. This procedure protects the company from an accountant single-handedly faking transactions and possibly masking fraud.
The requirements for good accounting processes and internal control have impact on the work flows supported by LedgerSMB. As a consequence some of the work flows described in part V may seem unwieldy; an example being the lack of functionality to delete or correct incorrect invoices (See Section 38.5 on page 38.5 for more details).
Chapter 3 Introduction to accounting
The purpose of an accounting system is to keep track of the company’s financial status. The following reports are used to present it:
- Balance Sheet
-
Provides a snapshot of the financial position of a company, listing its possessions (assets), debts (liabilities) and residual value (equity).
- Income Statement
-
Also known as the “Profit & Loss Statement”, summarizes the income generated over a specific period and the expenses associated with it, resulting in “Net Result”.
- Cashflow Statement11 1 Not currently implemented in LedgerSMB
-
Summarizes the incoming and outgoing cash flows over a specific period, resulting in “Free Cash Flow”.
- Statement of Owner’s Equity2
-
Summarizes the changes in equity over a specific period.
- Trial Balance
-
An intermediate report used for preparing the Balance Sheet and Income Statement, tallies transactions over the reporting period; used to assert that all accounts in the General Journal are balanced.
The accounting system is composed of these parts:
- Journals
-
Contain the company’s transactions with extensive additional data; they are the first point of entry for transactions, ordered by order of entry.
- Ledgers
-
Contain aggregated data from the journals, ordered by date.
- Chart of Accounts
-
The categories by which financial data are classified.
All accounting data ends up summarized in the GL. Transactions may be entered in a different (sub)ledger before ending up in the GL; e.g. the Sales Ledger. With the advent of computerized accounting, the use of journals is in decline: transactions are classified while directly being entered into ledgers.
In addition to the parts mentioned above the following terms are used throughout this document:
- Assets
-
Money and anything that can be converted into money without reducing the net equity of the business. Assets include money owed, money held, goods available for sale, property, etc.
- Liabilities
-
Debts owned by the business such as bank loans and unpaid bills.
- Equity
-
What would be left for the owner if all the assets were converted to money and all the liabilities paid off.
- Revenue
-
Income from business activities.
- Expense
-
Money paid to operate the business.
- Cost of Goods
-
Money that was spent to acquire material and services to build a product being sold.
- Operating Expenses
-
Expenses that are consumed to administer the business.
- Accounts Receivable
-
An asset on the books as a claim for a future payment from a customer.
- Accounts Payable
-
A liability on the books for a future payment to a supplier or vendor.
3.1 Double-entry accounting
The basic concept in double-entry accounting is that every transaction is an exchange. For example, when a business sells goods to a customer, it issues an invoice. The exchange is to provide the goods and receive the right for (future) payment. When the customer later pays the invoice, the right for payment is exchanged for cash.
Each exchange is to have the same value on both sides of the exchange, making sure no transaction is incomplete. This is where the requirement comes from that double-entry transactions need to be balanced. It can occur that a customer’s payment is a bit short of the owed amount. Should the company decide not to pursue payment, the transaction would end up being unbalanced. After all the exchange is not equal-value between the providing and receiving sides. Double-entry accounting accommodates this scenario by explicitly recording the unpaid amount as an expense.
Because every transaction is balanced, so is the balance sheet. Through this approach, double-entry accounting provides strong control over correctness of the numbers: as soon as a transaction is unbalanced (i.e. contains an error), the balance sheet becomes unbalanced – a relatively simple check.
3.2 Cash versus accrual basis
Financial statements, such as the Income Statement and Balance Sheet can be prepared using either a cash or accrual basis.
In cash basis accounting, the income is deemed earned when the business physically receives the customer payment, and the expenses are deemed incurred when the business physically pays them. Cash basis accounting does not require the use of purchase orders, invoices, or long term liabilities.
In accrual basis accounting, income is considered earned when a valid asset is received for services or product provided. The asset is the claim on the customer, by way of the invoice, to collect an amount at a later date. This asset is called Accounts Receivable. An expenses is considered earned when a liability is created, by way of a purchase order, to the supplier or vendor. The liability is the commitment to pay the supplier or vendor at a later date. This liability is called Accounts Payable. Accrual basis accounting requires the use of invoices and purchase orders.
There can be a number of problems with cash basis accounting:
-
•
No visibility in the accounting system regarding your cash commitments leading you to think you have more or less money to spend than you actually have.
-
•
No visibility in the accounting system about unpaid customer debts.
-
•
Your taxing jurisdiction may limit businesses that can use cash basis accounting. For example in the United States, if you sell products or services on credit, have gross receipts higher that allowed, or need inventory to account for income.
-
•
Because cash basis accounting isn’t part of any accounting standards, there are varying expectations of what a cash balance or income statement looks like.
3.3 Valuation of inventory
@@@ TODO Need why is this important paragraph?
The cost of inventory, in theory, includes all costs incurred to acquire the goods and make them ready for sale. This theoretical cost may include shipping costs, discounts, insurance, receiving costs, handling costs, storage costs, etc.
In practice, the cost used is often limited to the total invoice price for the goods. This formula may or may not include shipping and handling. Other costs are often ignored if they are immaterial to the overall cost of the inventory, if there is no easy way to allocate the costs to the inventory, or they are relatively constant period to period.
Inventory valuation must consider in the following situations:
-
•
When the valuation of inventory varies from purchase to purchase. The costing method determines the valuation. This situation is automatically handled in LedgerSMB using one of the inventory valuation methods discussed below.
-
•
When the valuation of inventory is less that what was paid for it. The inventory must be written down. This is usually a manual calculation that is the result of damage, obsolescence, or decline in the vendor or suppliers selling price.
-
•
When estimates are required, such as when inventory is stolen, destroyed, or when a physical inventory cannot be performed. In this case, a reasonable and consistent manual method must be used to estimate the value.
There are several general automated inventory valuation methods including the following:
-
•
Specific Identification – Each specific inventory item has its cost tracked individually. This method is usually used for large and expensive items that can be tracked by serial number or identification tag. Typically, the specific identification inventory valuation method results an inventory valuation close to value of using the First in, first out (FIFO) method.
-
•
FIFO– This method is similar to selling the oldest product first merchandising policy. In the FIFO method the lastest costs are included in inventory cost and the older costs are charged back to COGS.
FIFO is the preferred method for maintaining accurate historical costs and is less susceptible to income manipulation by the timing of new purchases. Typically FIFO results in the highest inventory value of these methods.
In LedgerSMB the inventory cost is tracked on a FIFO basis. When a part is purchased, its cost is added to the inventory asset account. When the part is sold, the cost of the item is moved to the cost of goods sold account.
@@@TODO Is this paragraph redundant?
@@@TODO What sold cost is used; oldest, newest, average?
@@@TODO How is the inventory asset account debited? -
•
Last in, first out (LIFO)– Under LIFO the costs of the last goods purchased are charged against revenues as the COGS and the inventory is composed of the costs of the oldest goods acquired.
LIFO is preferred when prices are rising as it typically results in reducing net income and thereby reducing taxes. However, LIFO allows manipulation of income by simply changing the time at which additional purchases are made and does not represent accurate historical costs. Typically LIFO results in the lowest inventory value.
-
•
Weighted Average – Under the weighted average method, the total number of units purchased plus those on-hand at the beginning of the period is divided by the total costs of purchases plus the cost of the beginning inventory.
Part II Getting started
Chapter 4 Overview
This part of the book will run the reader through the LedgerSMB using an example startup company run by Jack: Example Inc, which starts its life as a computer parts store for the business-to-business market.
4.1 Introduction
Jack just completed incorporation of Example Inc and is ready to start doing business. Before starting his operation Jack was looking for tooling to run his operation efficiently. To that extent he’ll be running LedgerSMB using the domain he acquired for his business: https://example.com/.
The other chapters in this part of the book show you what steps Jack has to go through to get LedgerSMB up and running for Example Inc., as well as the steps he has to take to keep LedgerSMB in good health.
Due to its success Example Inc. will grow, posing new challenges to LedgerSMB and we’ll show you how Jack can change the configuration to adapt to his growing business’s needs.
Jack chooses to use a hosted LedgerSMB, so he doesn’t need to concern himself with the technical details of getting the application up and running. Instead he can start by setting up the company database immediately.
In Chapter 5 starting at page 5 and Chapter 6 starting at page 6 Jack goes through the steps of setting up a basic company. The chapters after that may not apply to every business. Chapter 7 starting at page 7, Chapter 8 starting at page 8 and Chapter 9 starting at page 9 apply to businesses dealing with physical goods: buying, selling and shipping. Chapter 38 starting at page 38 discusses how to handle invoicing from LedgerSMB. Chapter 11 starting at page 11, Chapter 12 starting at page 12 and Chapter 13 starting at page 13 discuss how to manage accounts receivable and payable including arrears monitoring.
Not all chapters may be relevant to the reader, e.g. when he or she is starting up or running a services company in which case the chapter “Building up stock” doesn’t apply. Chapters can be skipped based on relevance both to the type of business and its growth phase.
@@@ more chapters??
Chapter 5 Creating a company database
5.1 Using setup.pl
LedgerSMB comes with a tool called setup.pl. It’s the beginning of a web-based 11 1 There’s also a command line based setup tool called ledgersmb-admin; it’s covered as part of the section ‘Administration’ database administration interface to LedgerSMB. This tool can be used to create company databases as well as backups of existing ones.
Please note that while executing the steps described in this section, it may take a while for the next screen to appear after clicking each button: Some buttons involve a large amount of server processing before the next screen can be presented.
5.1.1 Step 1: setup.pl login
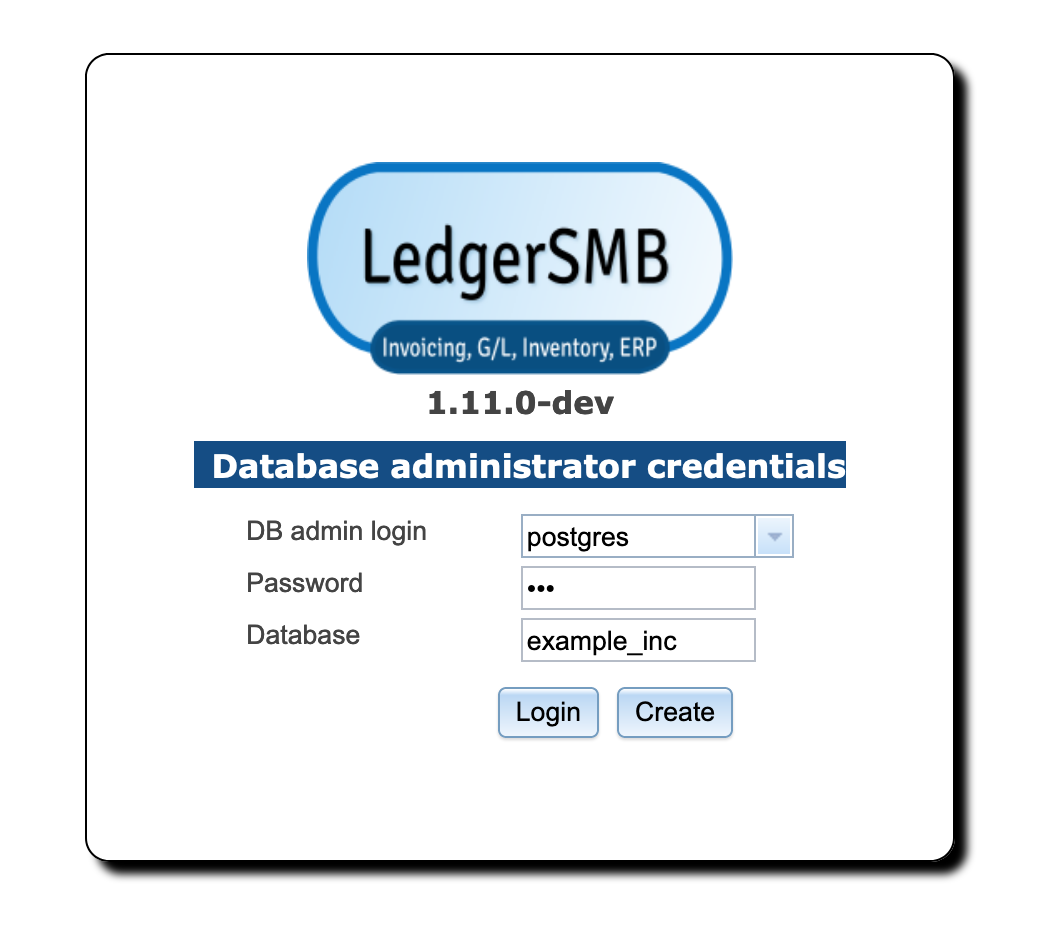
Jack installed LedgerSMB using the default installation instructions, which means the url for his setup.pl is https://example.com/setup.pl. Figure 5.1 on page 5.1 shows the login screen for the tool.
Please note that in version 1.7 and earlier you can’t be logged into the administration tool (setup.pl) and the webapp through the same browser at the same time due to limitations of the implementation.
The login screen shows three fields: (a) a user, (b) a password and (c) a database name.
The user name you use with setup.pl needs to be a PostgreSQL user. The user needs at least the right to create databases and other users; the postgres super user has these rights and more, so it’s generally convenient (but not very secure) to use it.
The password must be the same as that used to log in from the command line using the psql tool or the password you assigned on user creation using the createuser tool 22 2 Most PostgreSQL deployments need configuration changes for this to work, if you’re installing LedgerSMB yourself. See https://ledgersmb.org for installation instructions.. Both psql and createuser are PostgreSQL tools (not LedgerSMB tools).
The third field is the name of the company database to be created. For practical reasons it’s best to use only lower case letters, numbers and the underscore (_).
The “Login” button is used when the company database already exists. The user can then perform some administrative tasks on the existing database.
The “Create” button is used to create a new company.
5.1.2 Step 2: Company creation
When creating a company database, there are a few things that are of importance:
-
•
The name of the company database will be used at login time and hence will be used by all users - a choice of recognizable value is important
-
•
The value entered (and hence the company name) is case-sensitive
-
•
The name can’t be more than 63 characters long
After choosing “example_inc” as his company name, Jack clicks “Create” to create the database and load it with LedgerSMB’s database schema, authorization rules and stored procedures33 3 Parts of the program inside the database.. It may take a while (30 seconds or more) for the next screen to appear44 4 Note that during the creation of the database, logs are kept so that in case of errors these can be reviewed either by the person running the installation or by support personnel. On Linux/Unix systems these are stored, by default, in the “/tmp/ledgersmb/” directory and named “dblog”, “dblog_stderr” and “dblog_stdout”.
5.1.3 Step 3: Selection of a Chart of Accounts
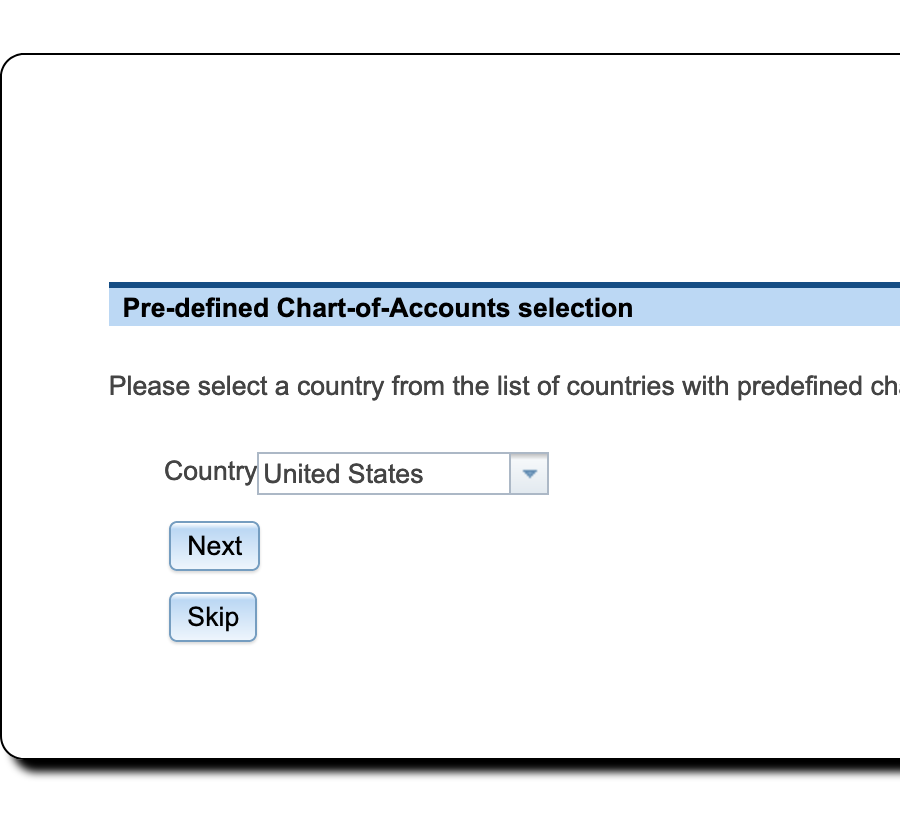
LedgerSMB comes with numerous predefined charts of accounts. These have been grouped per country making the selection of a chart a two-step procedure. setup.pl allows for users wanting to define their own charts by offering a “Skip” button. This button skips the process of loading a chart.
Note that you need to define a chart of accounts before you can meaningfully do anything inside LedgerSMB. If you don’t load a pre-defined one you’ll need to create or upload your own from inside the application once setup has completed.
Figure 5.3 on page 5.3 shows the first screen in the CoA selection procedure. Here you select the country for which you want to use the CoA. Note that charts of accounts are highly country dependent and you may want to consult an accountant if no default chart of accounts is included for your country.
As Jack runs his company in the United States, that’s what he selects.

Figure 5.4 on page 5.4 shows the second screen in the chart of accounts selection procedure. The drop down contains a list of all charts of accounts defined for the selected country.
Jack selects the GeneralHierarchical.xml chart of accounts: that will leave him enough room to specialize the setup later if he has to, but for the time being offers a broadly usable setup.
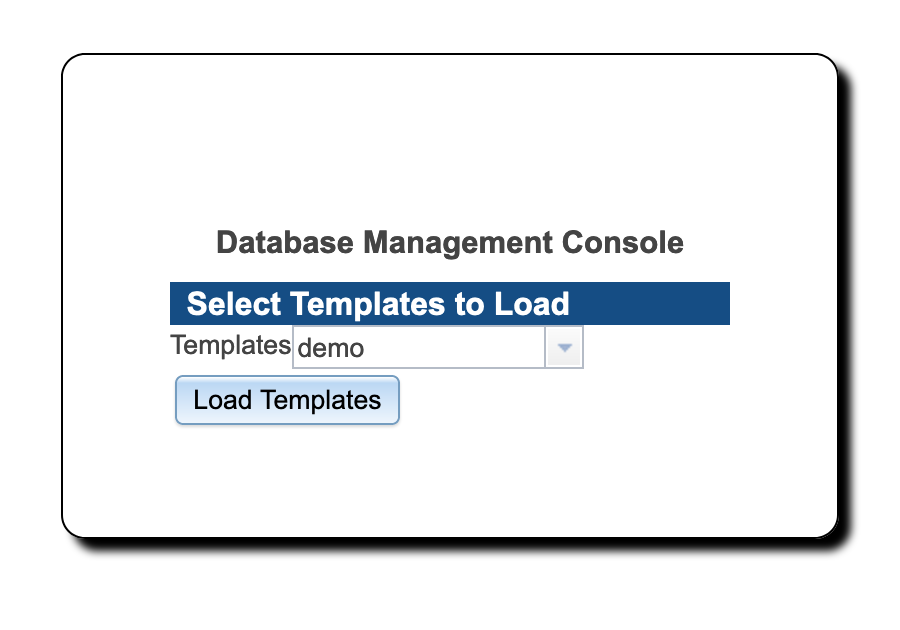
5.1.4 Step 4: Load template
LedgerSMB comes with a set of default reporting templates. These control the formatting of documents like invoices, checks, balance sheet, purchase orders, income statement, etc. Jack is now presented with the screen to load templates. LedgerSMB 1.10 comes with a single choice55 5 Administrators may define extra sets for users to be selected upon company creation; see 48.1:
-
•
demo – Example template set for various output formats including PDF, HTML and Excel
5.1.5 Step 5: Initial user
In the previous step, the technical part of the company creation procedure was completed. However, it’s not possible to log in to the company yet. Figure 5.5 on page 5.5 shows the next step in the setup process: the user creation screen. The fields shown have the same meaning as those discussed as part of user management in Section 24.2 on page 24.2.
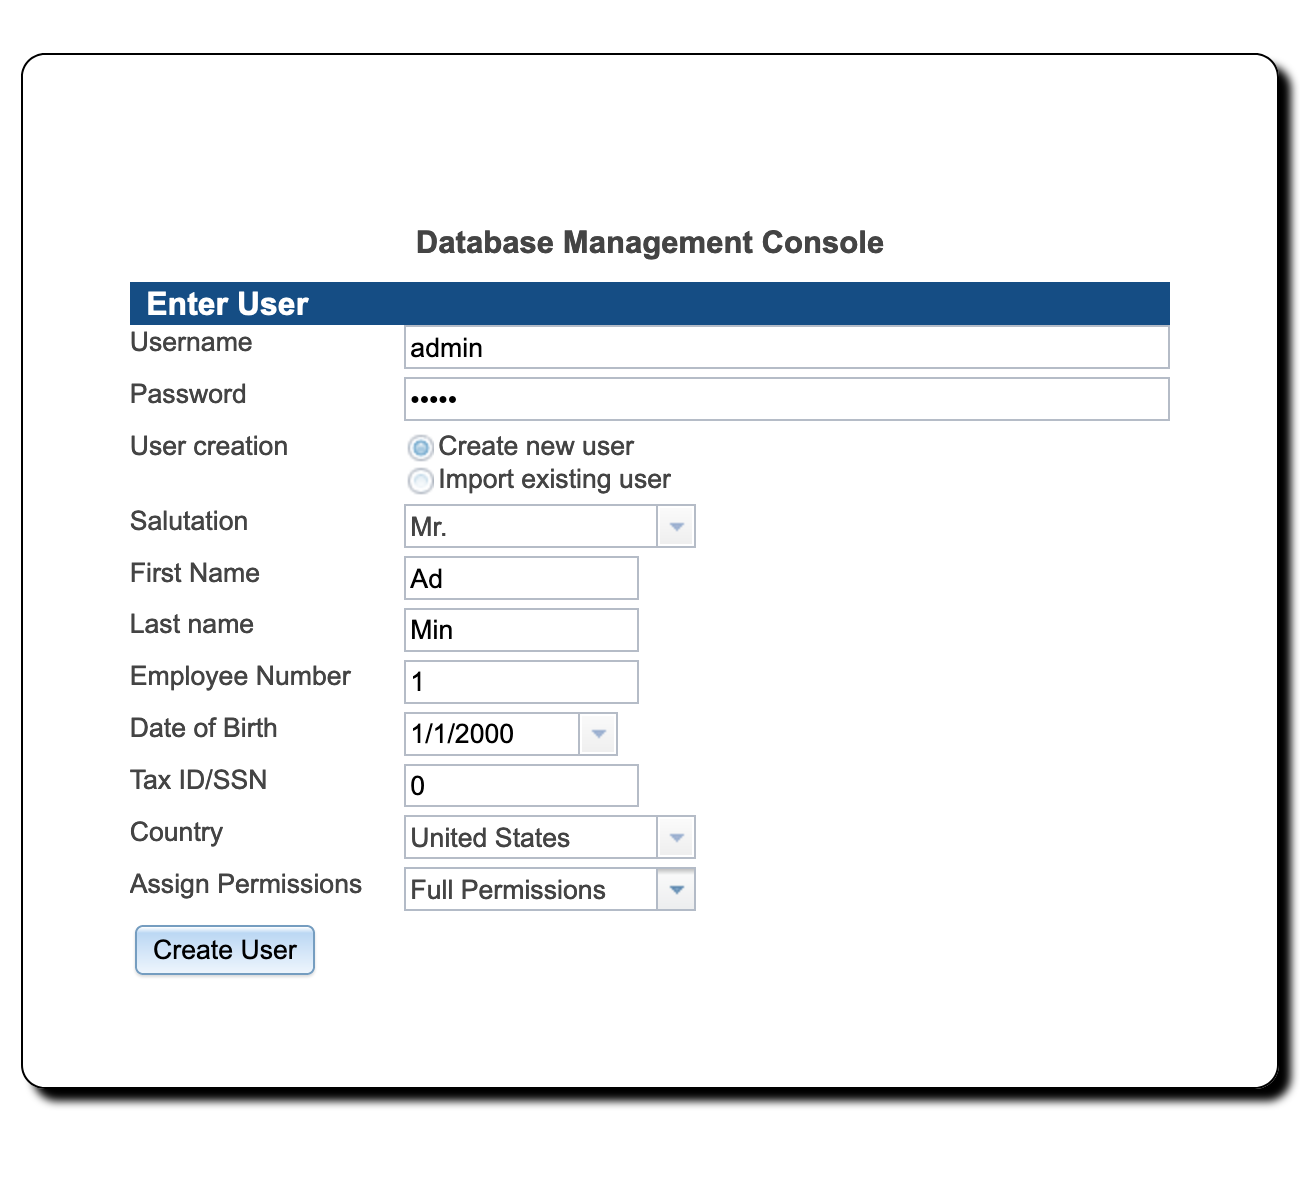
Jack chooses to create an administrative user called admin who will be authorized to do everything in the application. Later on he will also create a user jack who will be authorized to do everything but changing the configuration and doing application administration. He’ll use the latter user to log in for day to day operations. This will help him prevent changing settings by accident.
Note that none of the fields in this screen are optional. If the name of the user being created isn’t already used with other companies, leave the Import option set to No, otherwise please read the chapter on user creation mentioned above.
Note: The password you enter here is a temporary one which will remain in effect for 24 hours only. Be sure to execute the steps in Section 6.2 on page 6.2 before these 24 hours elapse, because the user will be disabled after that.
Jack proceeds to enter the values as follows:
| Field | Value |
Description |
|---|---|---|
| User Name | admin |
The login user name |
| Password | asdfg |
The password to use for your first login |
| Create New User | Checked | |
| Import Existing User | Unchecked |
Only used when the user exists in another database |
| Salutation | Mr. | |
| First Name | Ad |
Used in combination with Last Name to identify the user |
| Last Name | Min | |
| Employee Number | 1 | |
| Date of Birth | 1/1/2000 |
not used by the application |
| Tax ID/SSN | 0 |
Tax or SSN; not used by the application |
| Country | United States | |
| Assign Permissions | Full Permissions |
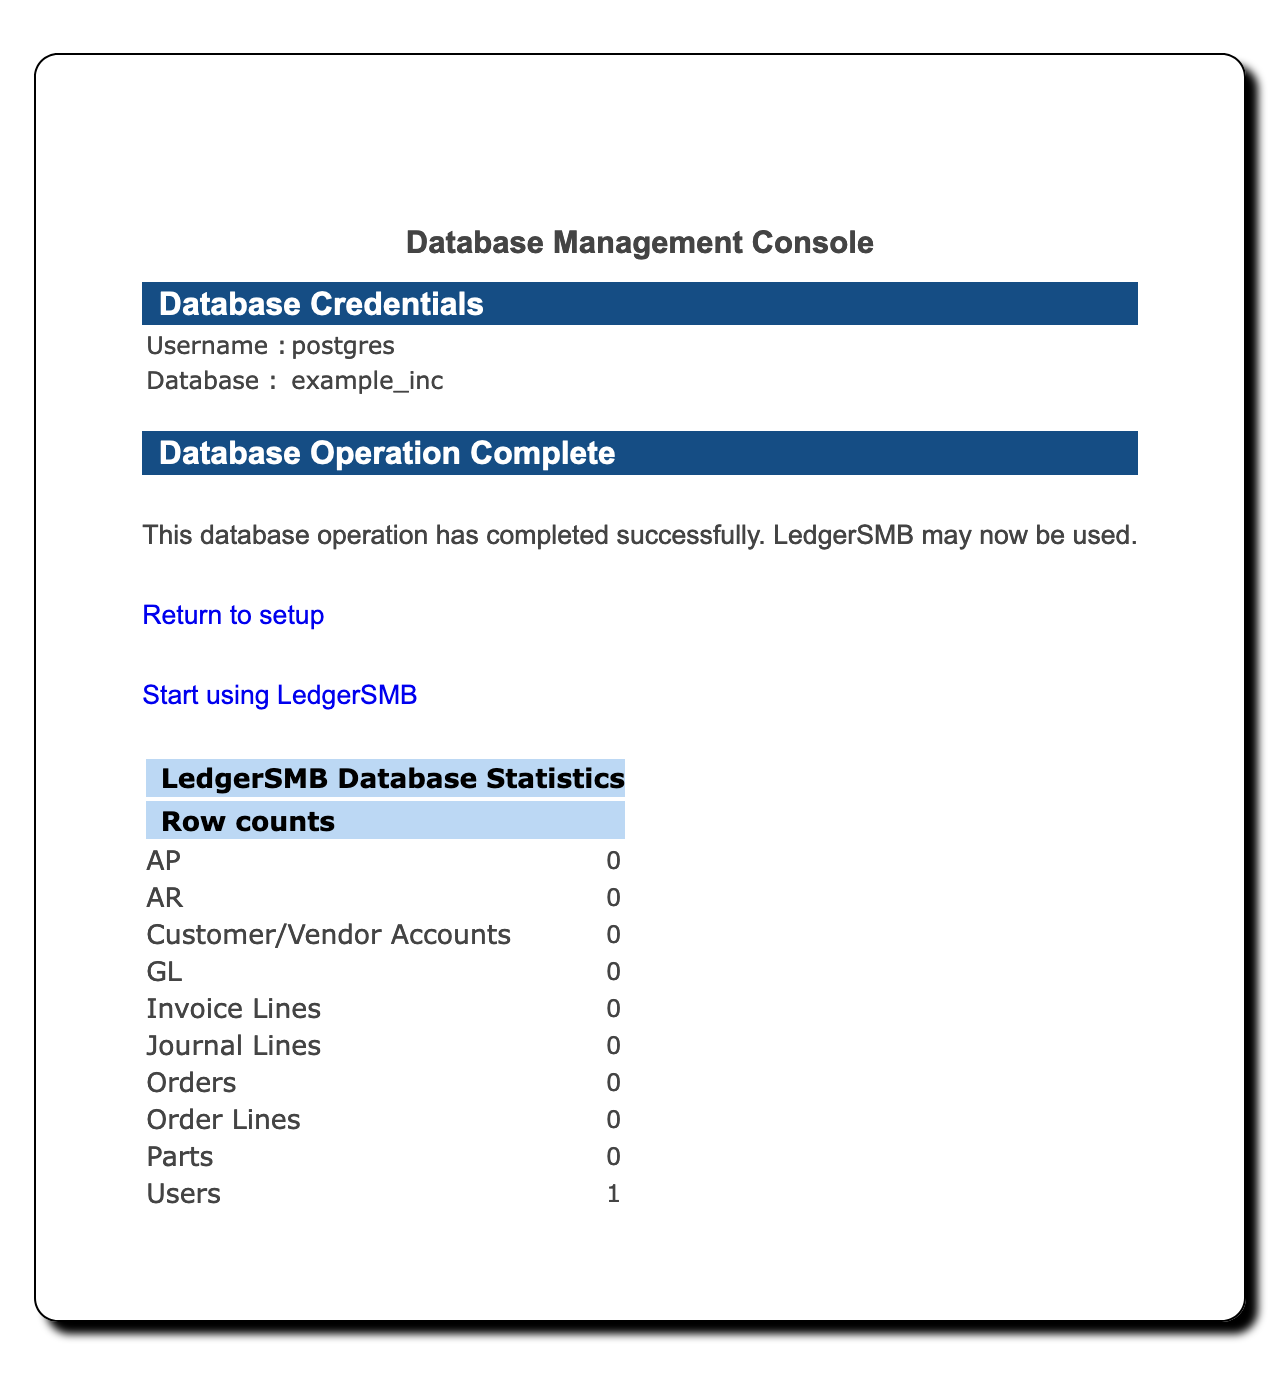
Jack has created his company database and now sees the “Database Management Console” screen as shown in Figure 5.6 on page 5.6.
By selection Start using LedgerSMB in the “Database Operation Complete” section of the screen his story continues in the next chapter “The first login”.
Chapter 6 The first login
6.1 Introduction
After the company database has been created by executing the procedure described in the last chapter it is still an empty shell which needs to be populated. The correct data needs to be entered for things like bank accounts and company contact data to be used on invoices.
These steps have to be completed before LedgerSMB can be used meaningfully: these settings have to be present for many workflows. A major reason is that with LedgerSMB - as most ERP system- financial consequences of events in many workflows are directly reflected in the company’s books. Some accounting related settings have to be completed before LedgerSMB can do so.
This chapter documents the steps to create a basic usable configuration for Example Inc. It assumes that one of the default chart of accounts was selected as shown in Chapter 5 starting at page 5 or that a custom chart of accounts was imported using the instructions in Section 26.2.3 on page 26.2.3. Whatever method was chosen, this chapter assumes that a chart of accounts is available.
6.2 Steps to the first login
If this screen is not shown then Jack navigates to https://example.com/ledgersmb/login.pl to access the login screen.
6.2.1 Login screen

The login screen shows three fields which Jack proceeds to fill in as follows:
| Field | Value |
Description |
|---|---|---|
| Name | admin |
The login user name |
| Password | asdfg |
The password to use for your first login |
| Company | example_inc |
The name of the company database |
After entering all of the information and tapping the Login button Jack will see an alert letting him know that his password will expire today. Jack clicks OK to dismiss the alert.
6.2.2 Selecting a password
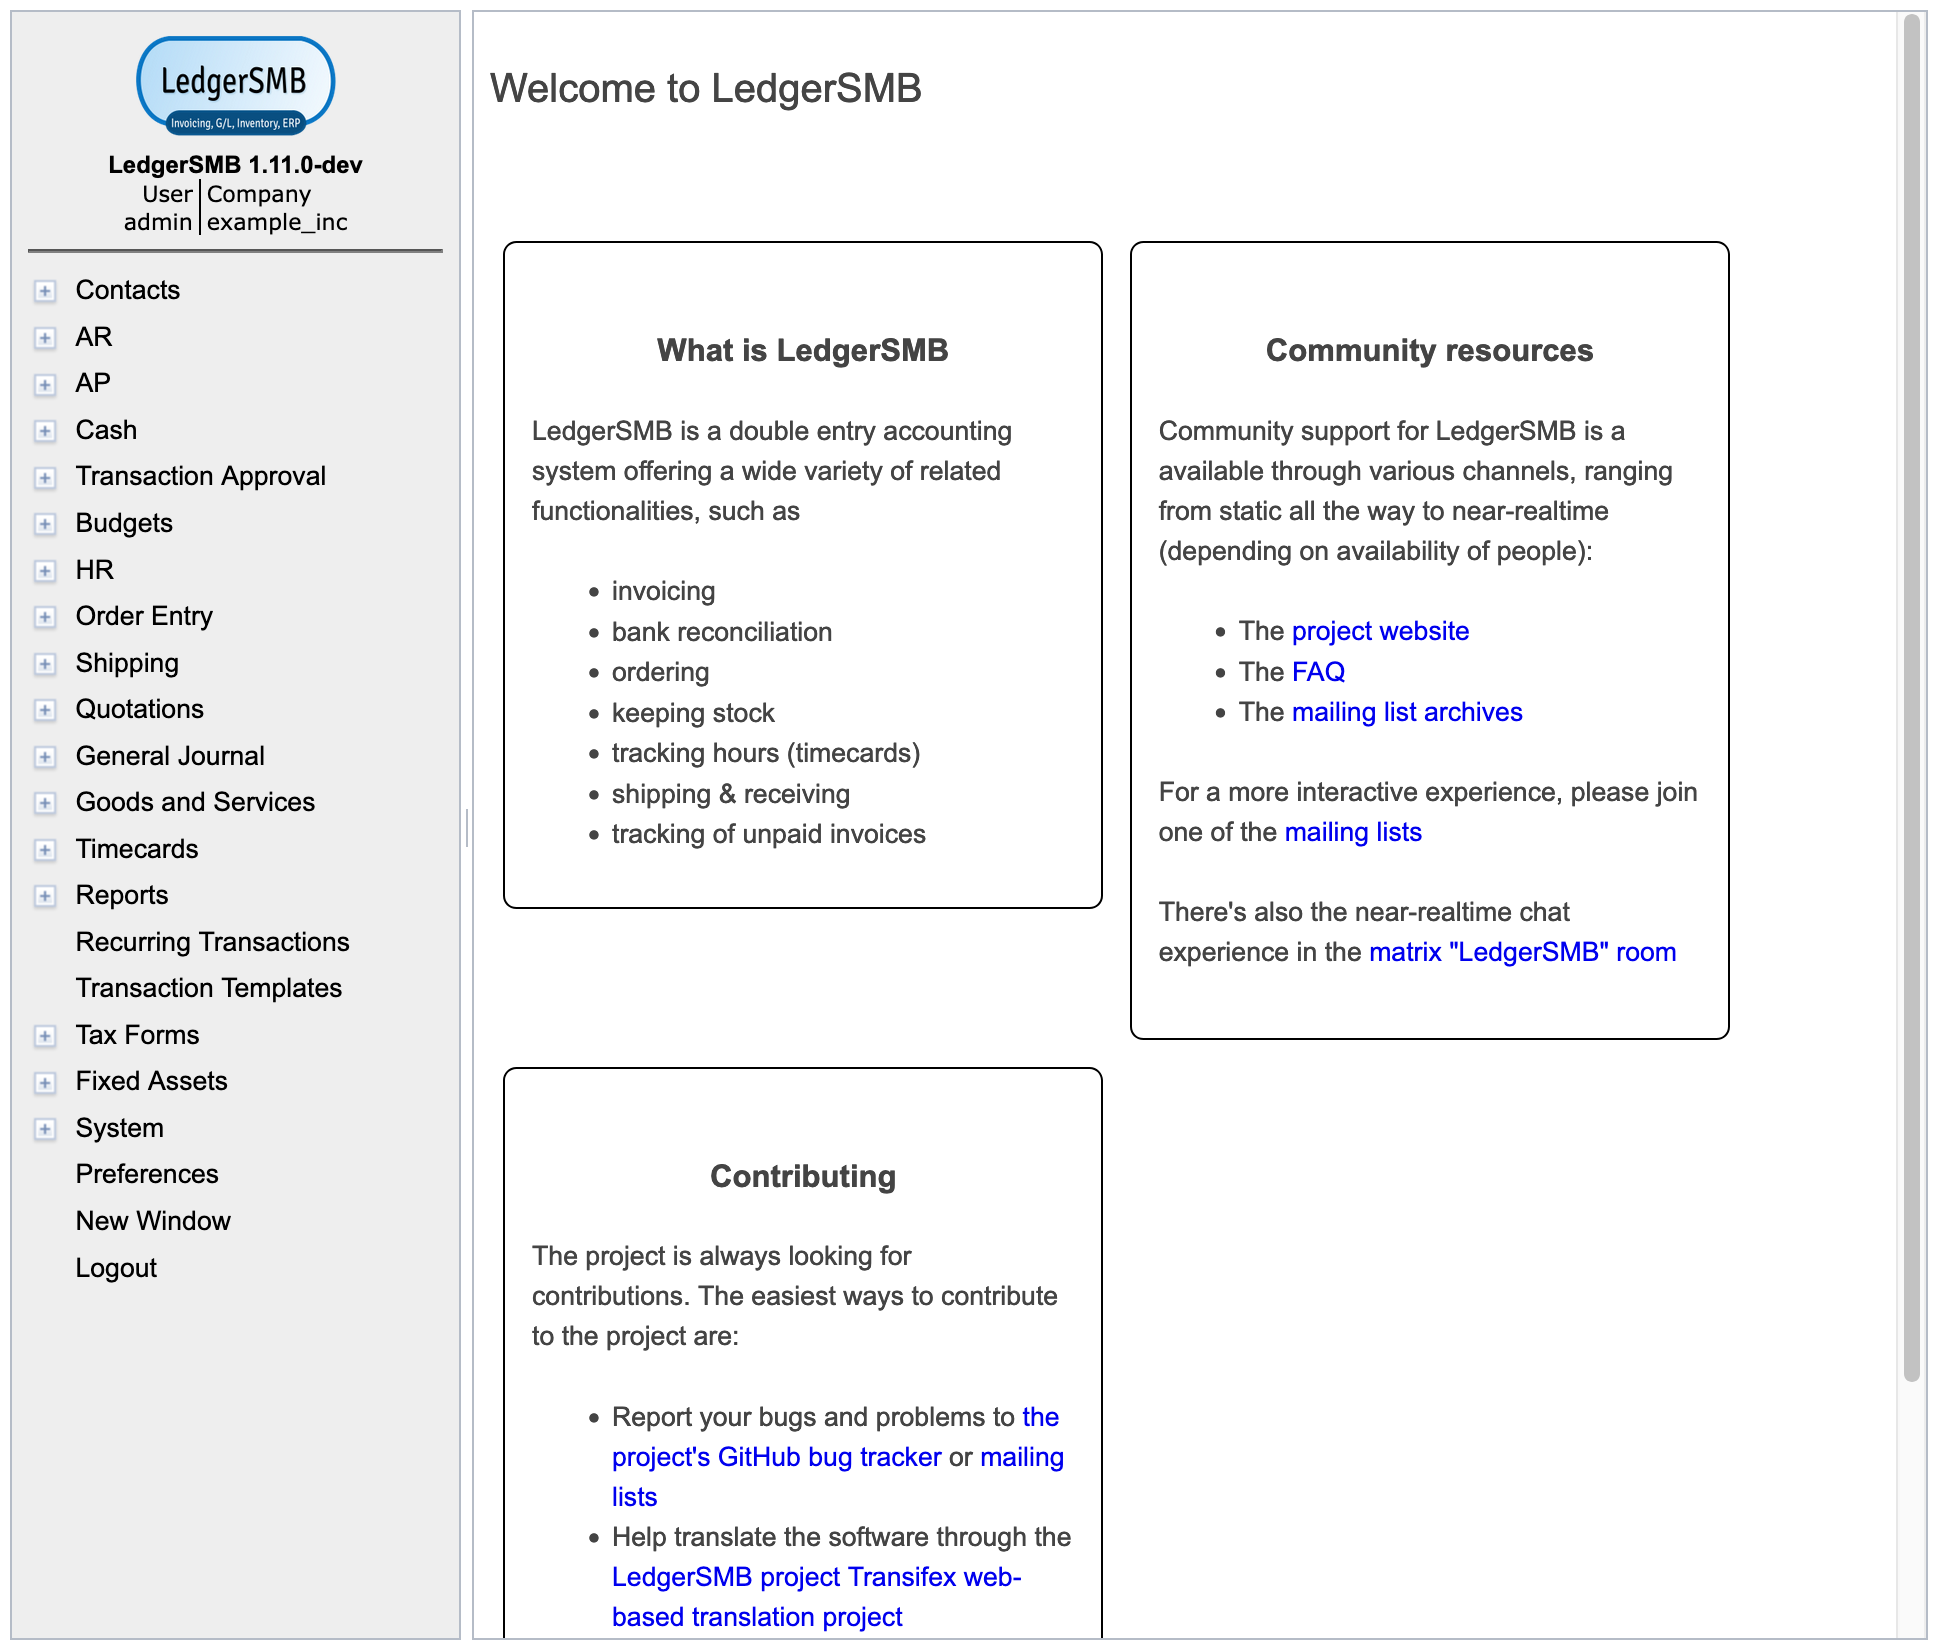
After successful login, the system shows the Welcome to LedgerSMB screen as depicted in Figure 6.2 on page 6.2.
The initial password has a 24-hour validity limit to prevent unused user accounts from posing a security risk.
To set a new password Jack navigates to Preferences Password and sees the screen as depicted in Figure 6.3 on page 6.3.
The new password that Jack chooses will be different than any password used before and different than the temporary password set by the administrator. Not clicking the Save button means the password remains unchanged and the 24-hour limit remains in effect.
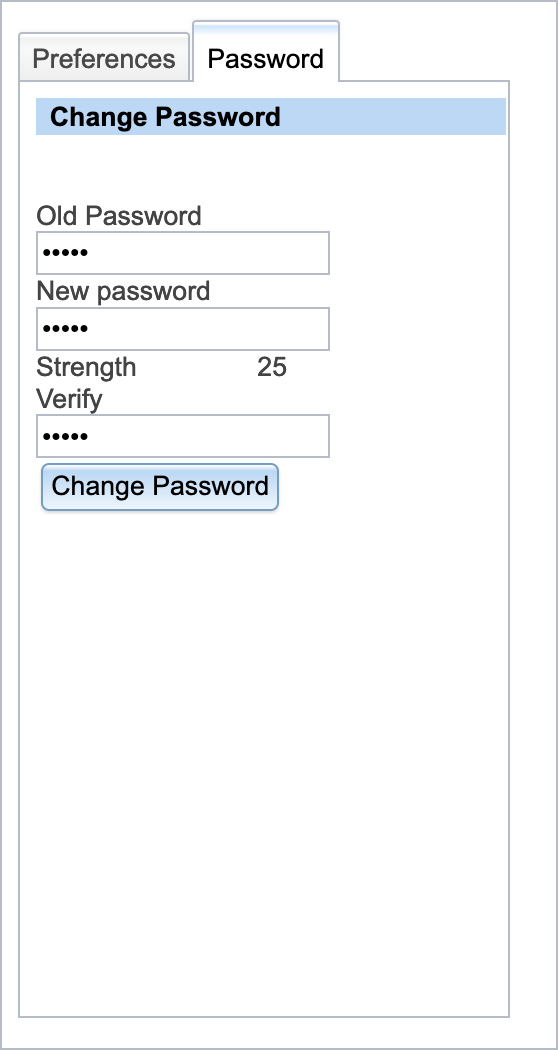
Jack enters the information in the Change Password screen as follows:
| Field | Value |
Description |
|---|---|---|
| Old Password | asdfg |
The old password set by the administrator using setup.pl |
| New Password | lkjhg |
The new password that Jack wants to use for admin |
| Verify | lkjhg |
Repeats the new password that Jack wants to use for admin |
Jack then clicks the Change Password button.
The new password has a validity of determined by the Password Duration setting from the System Defaults screen. User management is discussed is detail in Chapter 24 starting at page 24.
Login will be denied to users with expired passwords; they can request password resets through user admins.
6.2.3 Setting user preferences
Jack clicks on the tab Preferences and the system shows the Preferences screen as depicted in Figure 24.3 on page 24.3
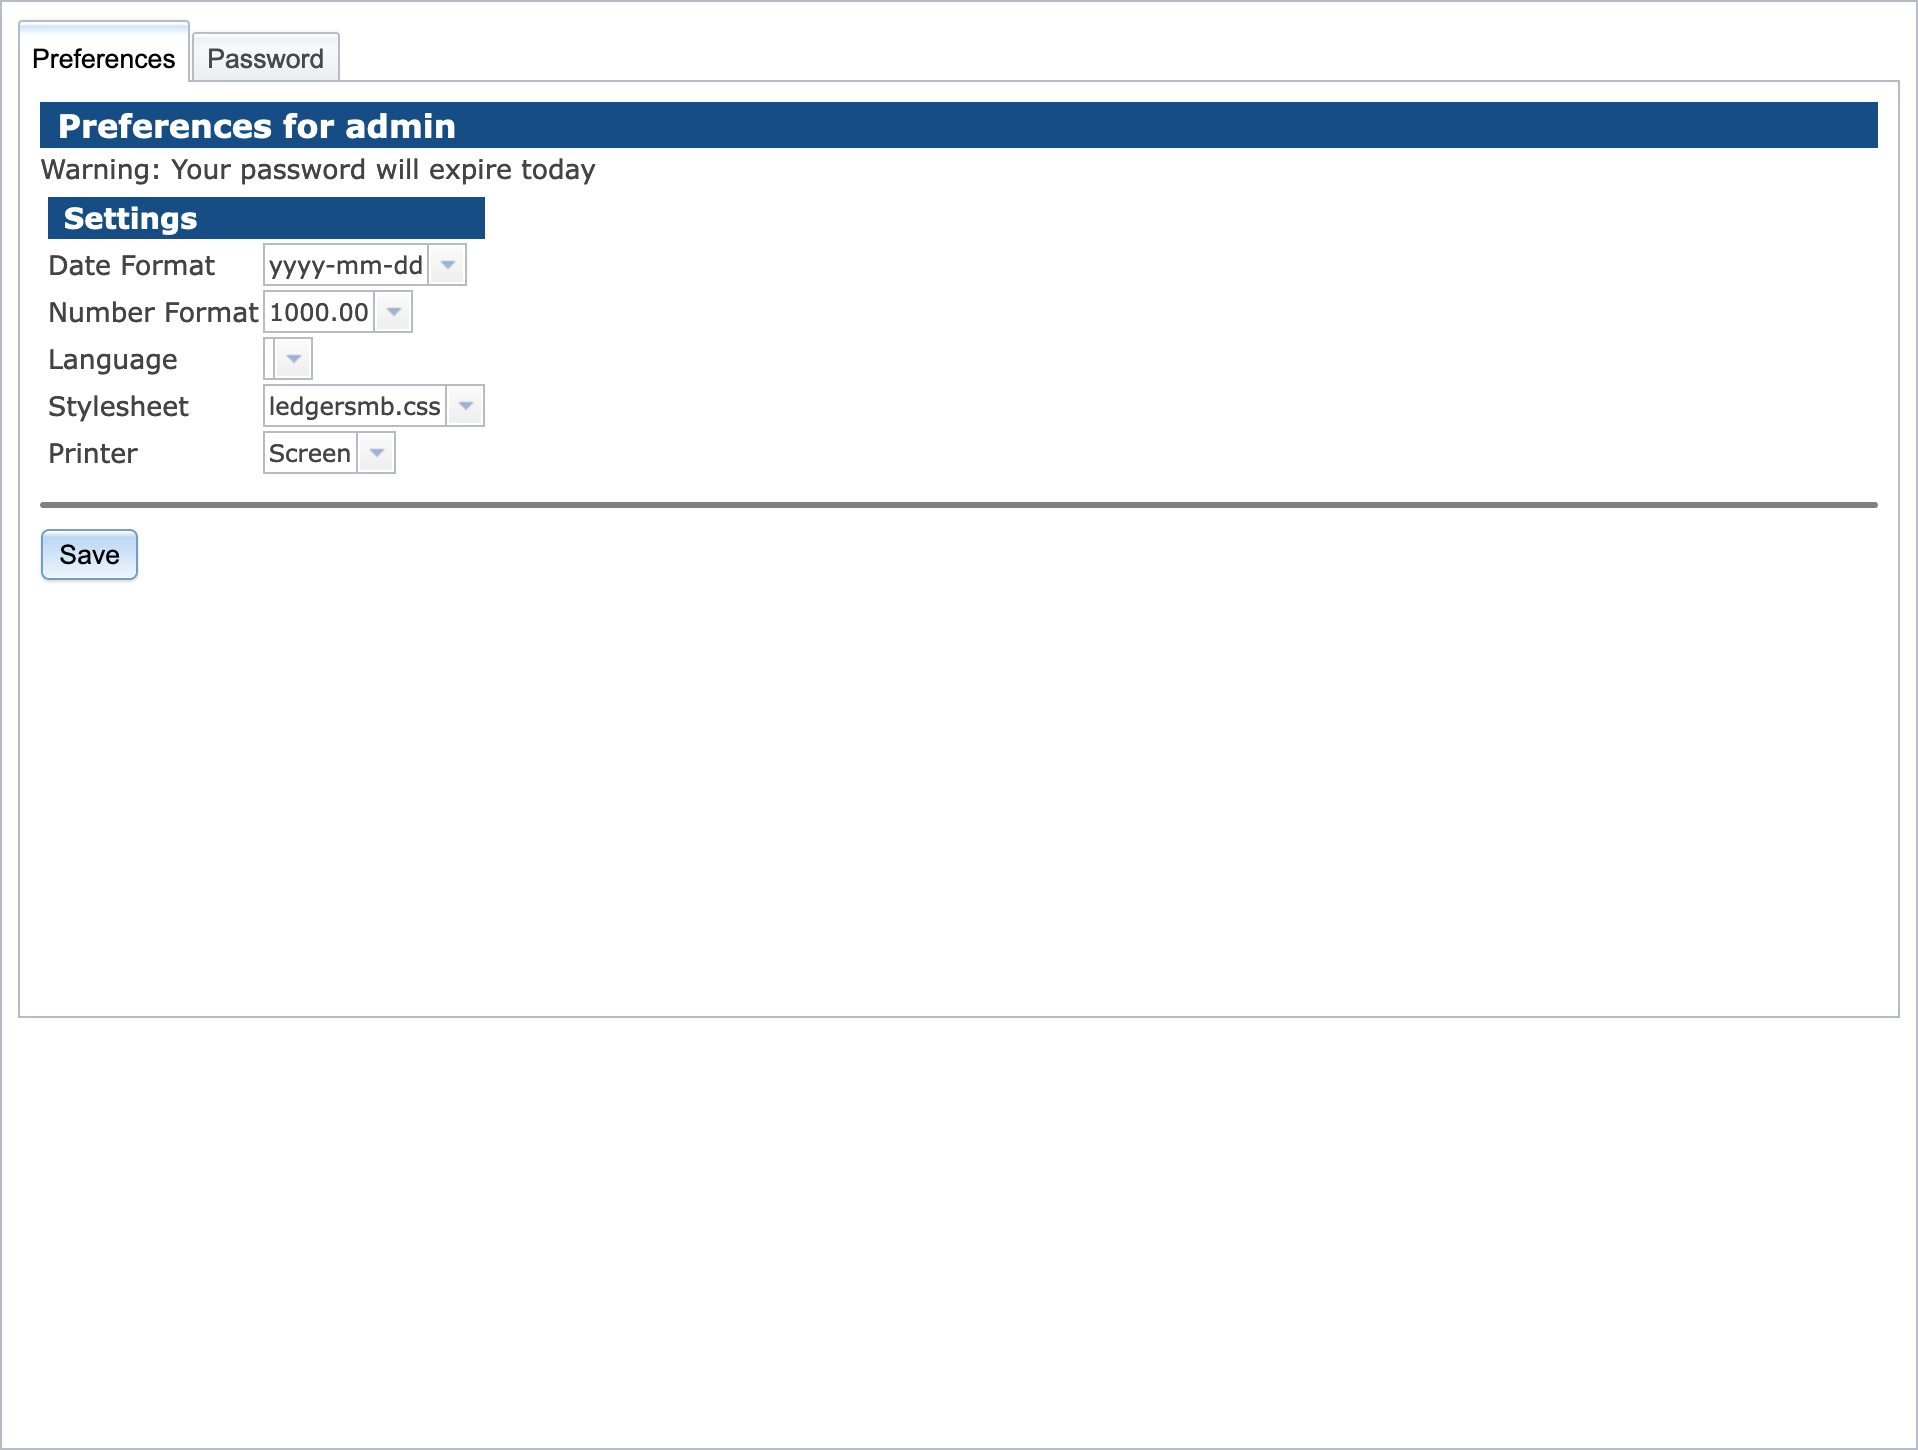
Jack selects his language, in this case American English and clicks Save.
6.2.4 Setting system defaults
Out of the box, LedgerSMB contains reasonable system defaults, but Jack needs to add some specific company information. In order to do so, Jack navigates to System Defaults and sees the screen depicted in Figure 6.5 on page 6.5.

Jack sets the following defaults:
| Field | Value |
Description |
||
|---|---|---|---|---|
| Company Name | Example Inc. | |||
| Company Address |
|
Note the use of the new line |
||
| Company Phone | 555 836 2255 | |||
| Business Number | 12345 |
e.g. Chamber of commerce number |
||
| Default Email From | info@example.com | |||
| Default Country | United States | |||
| Default Language | English (US) | |||
| Password Duration | 180 |
Days |
Then clicks the Save button at the bottom of the screen.
A more elaborate description of the parameters in this screen is provided in subsection 18.4.3.
6.3 Setting up a bank account or credit card
As part of the start up activities of his company, Jack comes to an agreement with the bank for three products:
-
•
A current account with number “C54769”
-
•
Deposit account with number “D54990”
-
•
Credit card with a number ending with “.7734”
Most accounting systems - LedgerSMB included - use separate GL accounts to represent each bank account. This allows easy reconciliation of the ending balance on the bank account with the balance in the books.
Knowing this, Jack looks up the example bank account from his preconfigured US chart of accounts using the General Journal Chart of Accounts menu as shown in Figure 6.6 on page 6.6.
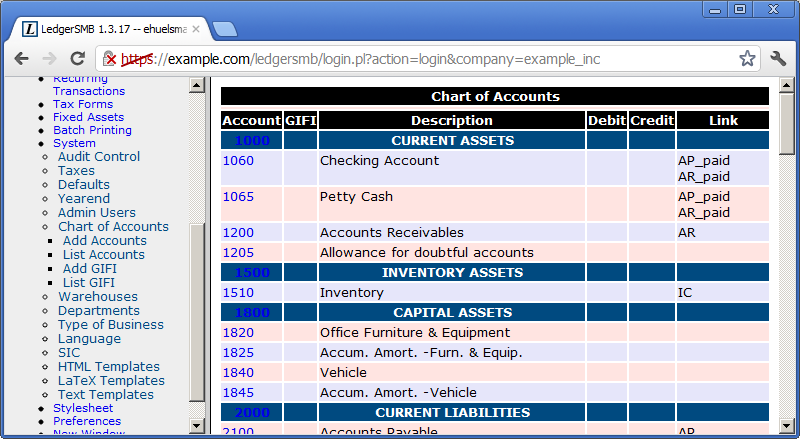
Jack adds the new bank accounts by doing the following:
-
1.
Click on “1060”
- 2.
-
3.
Change the Description “Checking Account” to “Checking Account C54769”
-
4.
Click “Save”
-
5.
In the same screen change the Account Number to “1061”
-
6.
Change the Description to “Cash Deposit Account D54990”
-
7.
Click “Save as new”
-
8.
In the same screen change the Account Number to “1062””
-
9.
Change the description to “Credit Card xxxx.xxxx.7734”
-
10.
Click “Save as new”
Section 26.2.1 on page 26.2.1 discusses the options in detail - for now using the settings as configured for the sample checking account will do.

6.4 Checking and adjusting the chart of accounts
First and foremost the chart of accounts serves to register income, expenses, assets and liabilities in categories which support financial decision making or regulatory requirements. When checking his chart of accounts, this is the first thing Jack checks for.
Many business events in LedgerSMB trigger the creation of financial transactions. If the configuration required for these transactions to be created isn’t in place, users won’t be able to complete their workflows.
6.4.1 Accounts list
Jack wants to make sure his chart of accounts fits his purposes. To perform these checks Jack goes into the General Journal Chart of Accounts page. For now, he finds the ledger to be in order. Although the single Sales account stands out a bit against the numerous expense accounts, it turns out that there is also a single Purchases account on which all the expenses for parts purchases are going to be booked.
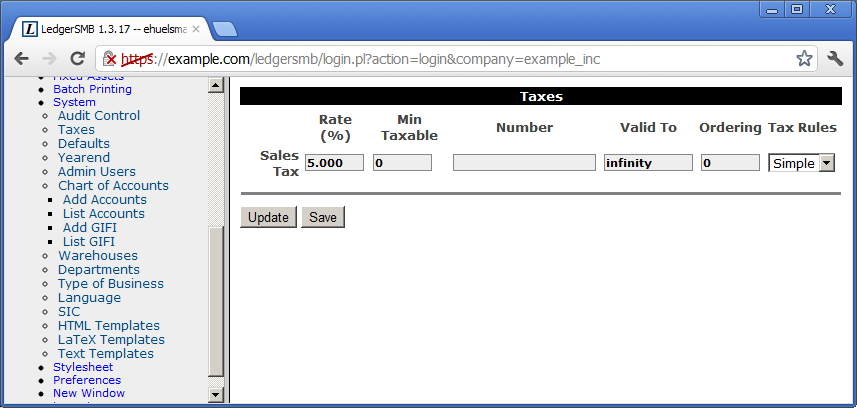
6.5 Checking sales tax rates
First off, Jack asserts that a sales tax22 2 Sales tax may be called Value Added Tax (VAT) in some jurisdictions. account has been provisioned. He finds it in the Current Liabilities section of his chart of accounts (CoA). In his jurisdiction there is only one sales tax rate applicable at any one time, which means this single account will suit his needs just fine. If he had been in a jurisdiction with multiple tax rates applicable, e.g. different rates for different types of goods, he would have been required to create more accounts.
The procedure to create more sales tax accounts is the same as the one used in Section 6.3 on page 6.3, with the notable difference that this time the base account to be used is the sales tax account.
With the accounts in place, the tax rates have to be checked and possibly adjusted. To do so, Jack navigates to the System Taxes page as shown in Figure 6.8 on page 6.8.
Chapter 7 Building up stock
7.1 Overview
In this chapter Jack goes through the process of setting up LedgerSMB for his trade activities in computer parts, which includes deciding which parts he wants to resell. From there on he goes to contact a vendor to request a quotation, convert that to an order and receive goods into inventory and invoices into accounts payable.
To prepare LedgerSMB for his parts sales and purchases, Jack needs to configure Parts. The system records inventory for parts and assemblies. Jack won’t use them for his business. There’s more on assemblies in Section 25.1.3 on page 25.1.3.
Once set up, Jack is ready to execute the ordering process. Even though the process is described here from a purchasing perspective, sales work the same way with the roles reversed (Jack will act as a vendor in the sales process).
To start his purchase, Jack creates a Request for quotation (RFQ) document which he sends one or multiple vendors to let them know he’s interested in their products.
The vendor responds to Jack’s request by issuing a Quotation. From a legal perspective a quotation is a document which promises to deliver the requested goods or services at a certain rate - subject to conditions specifically mentioned. If Jack accepts the quotation and meets the conditions, the vendor is obligated to deliver.
In response to the quotation, Jack will place an order with the vendor to indicate acceptance of the quotation (or he can let the it expire). When he places the order, that legally means he agrees to the terms and conditions in the quotation. If the vendor delivers the goods or services as per the order, Jack has accepted the legal obligation to pay.
The vendor responds to the order by shipping the goods and services as well as sending an invoice. The invoice legally means the vendor considers to have a claim on the assets of Jack’s company. Jack creates a vendor invoice in his system to record the claim on his company by the vendor and the vendor creates a sales invoice in their system to do the same.
As a result of the above it’s considered bad practice to delete or change invoices once created. The accepted process to adjust invoices is to generate a debit invoice (for purchases) or a credit invoice (for sales) to “undo” the effects of the invoice and letting the other party know about it. Then a new invoice can be generated with the appropriate content. However, when the order process is correctly followed from order to invoice chances of sending the wrong invoice are greatly reduced.
7.2 Defining parts
Jack needs to enter a large number of items he’ll be offering in his new shop. He starts out with the easy ones: the ones which will be sold as single items.
7.2.1 Single items
Jack chooses a 5TB hard drive by Samsung to be entered into the system as the first item. To do so, he goes to the Goods and Services Add part page from the menu as shown in Figure 7.1 on page 7.1.
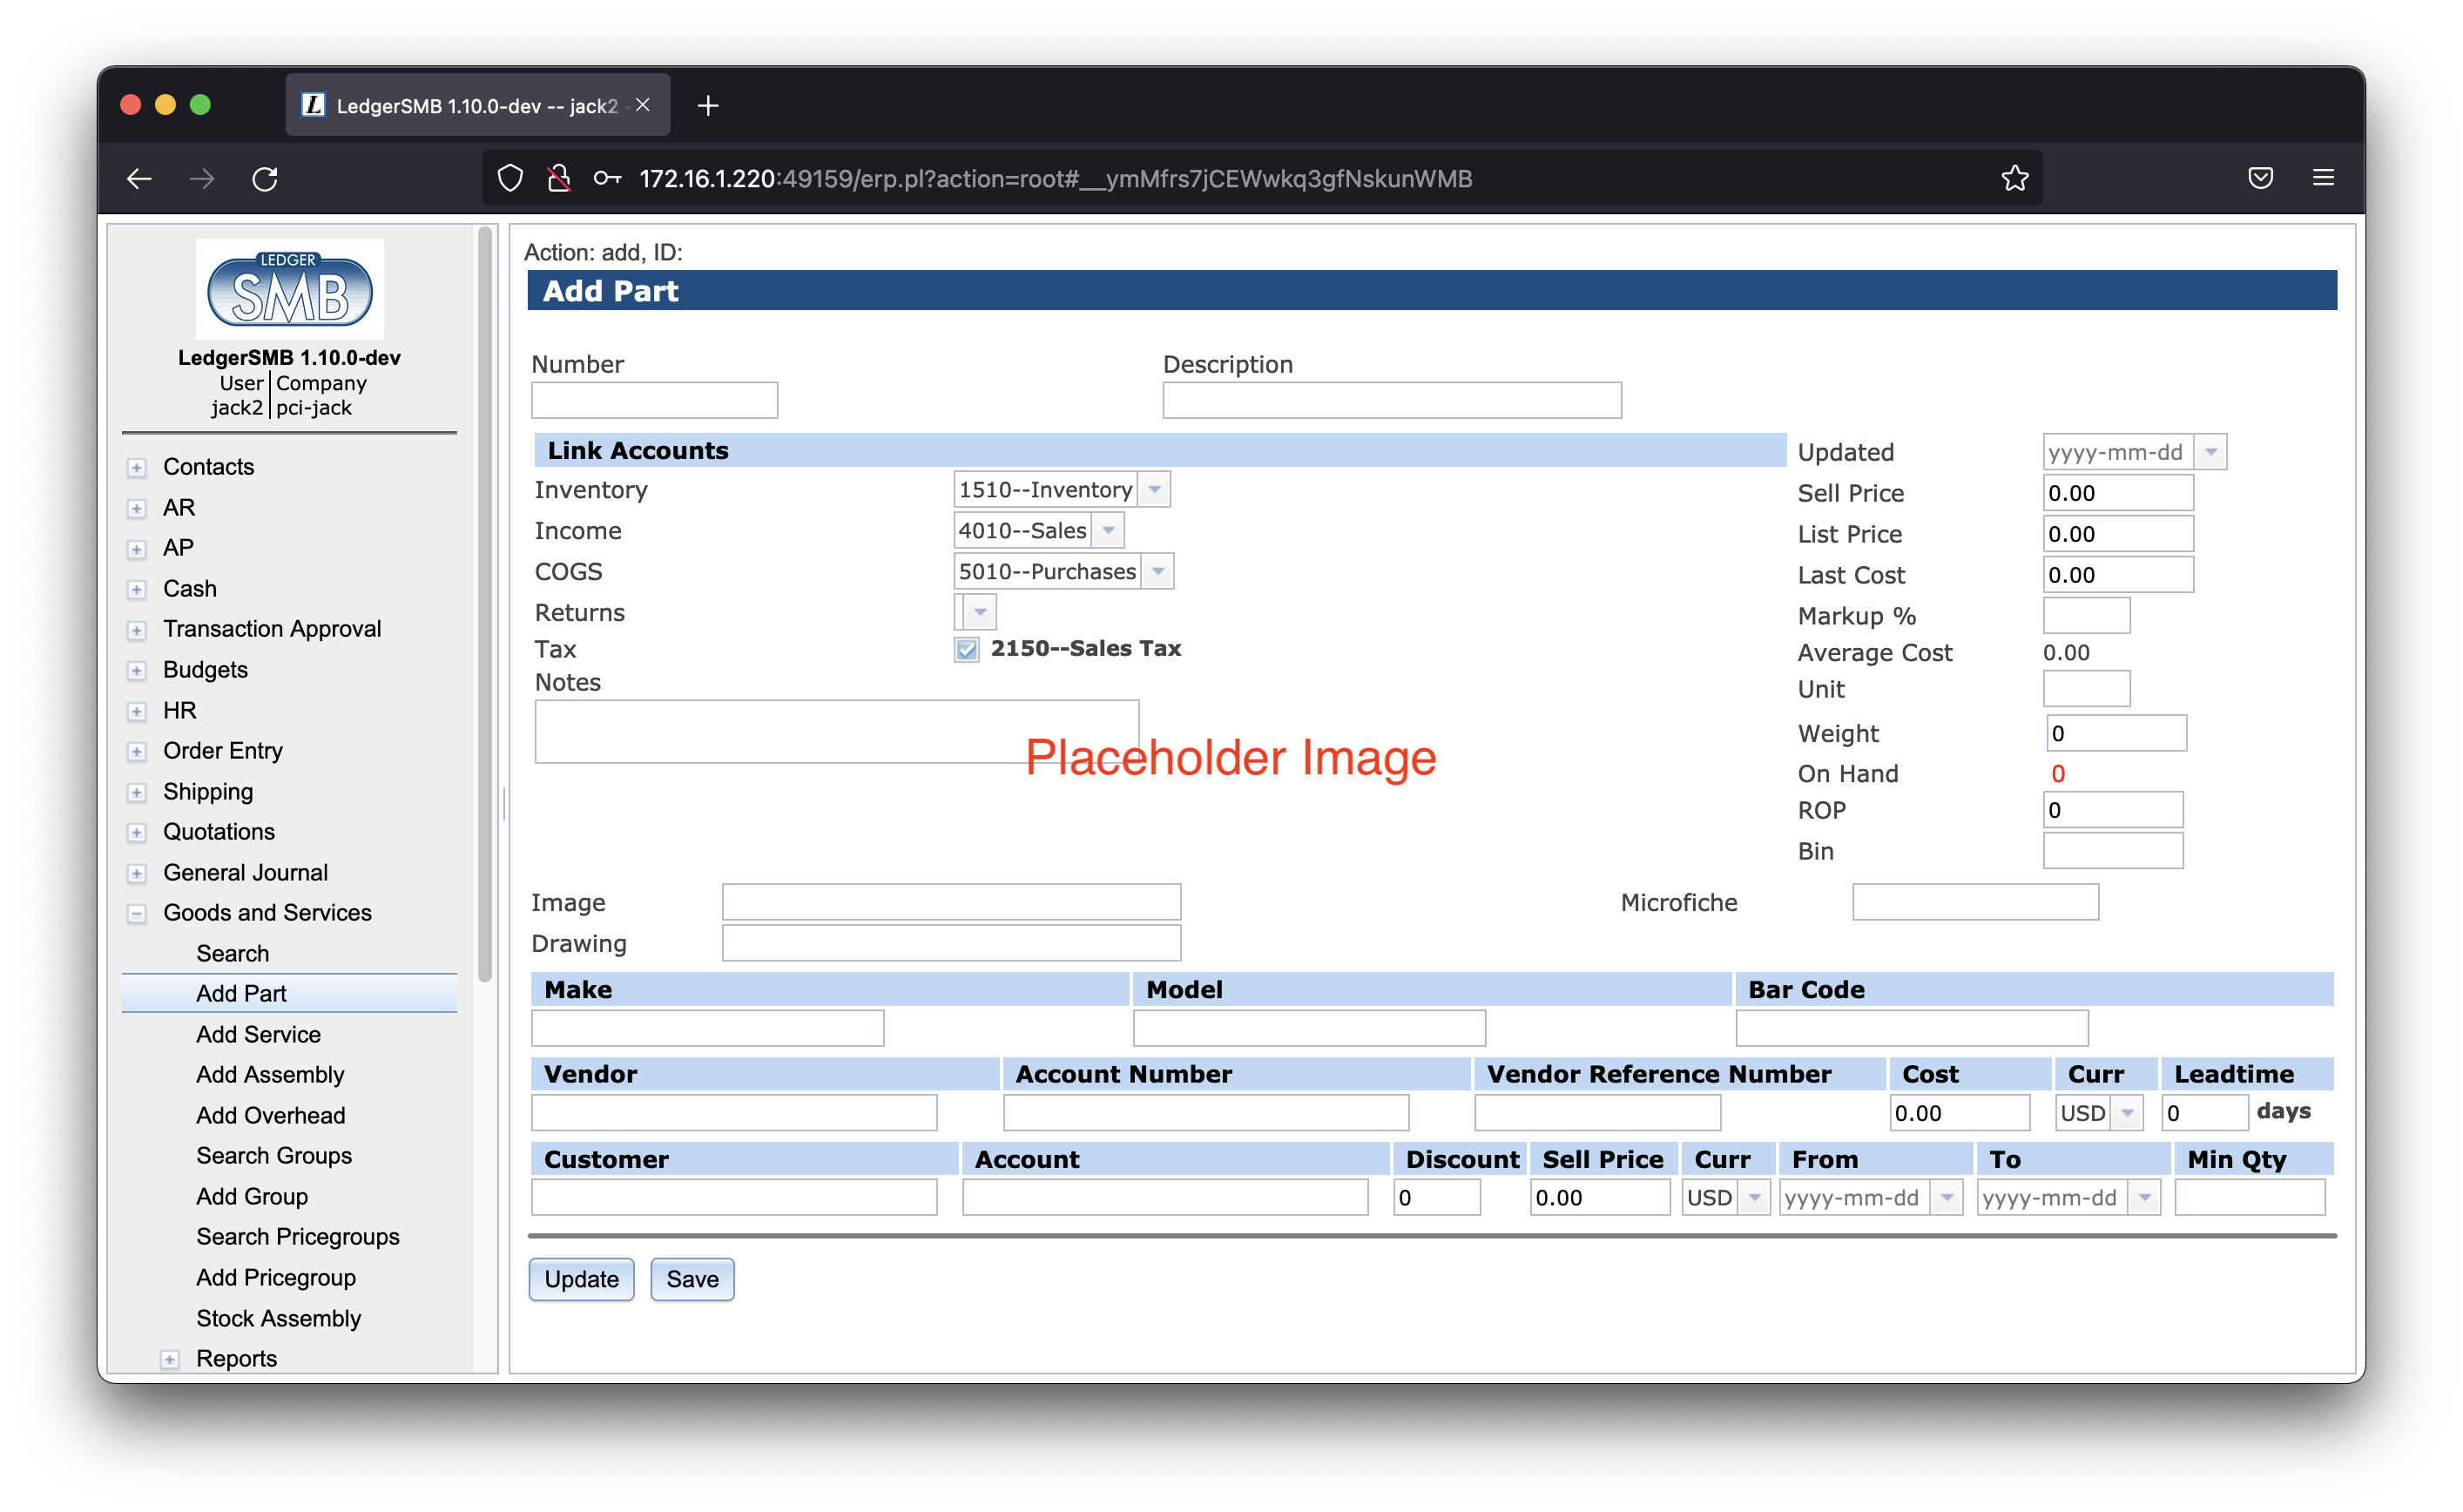
Based on his reading from Section 25.1.1 on page 25.1.1, Jack decides to enter the hard drive with the following data:
| Field | Value |
| Number | SAM1TB |
| Description | SAMSUNG 980 PRO 1TB PCIe NVMe Gen4 SSD |
| Inventory account | 1510 - Inventory |
| Income account | 4010 - Sales |
| COGS account | 5010 - Purchases |
| Sell price | 175.00 |
After entering the data Jack clicks Save.
He decides not to include make/model information, drawings or images yet and since he hasn’t entered vendors or customers in his system yet, he decides to leave those sections blank as well.
7.2.2 Combining single-item and “multi-item pre-packaged” sales
After having finished setting up the solid state drive, Jack now wants to enter the memory modules he’s going to sell. The problem is that they usually go in pairs, since that’s what the systems consuming them need. However, he expects them to be sold as single items as well and he wants to be able to set a separate price for those occasions.
From his reading of Section 25.1.5 on page 25.1.5, it should be possible to support this scenario with a small work around11 1 It’s planned to directly support this use-case in some version higher than 1.3. From the two solutions available, he chooses option (b): to create a part and an assembly and regularly restock the assembly to 0 (zero) in order to remove the stock from the single item.
7.3 Defining part groups
As Jack continues to enter more parts into the system, he wonders how he’s going to look up the parts efficiently later on. Returning his reading to Section 25.1.1 on page 25.1.1, he understands that ’part groups’ are the solution to that problem.
He decides to create the part groups by navigating to:
Goods and Services Add Group.
For each group in the list below Jack enters the group name and clicks Save after each one:
| Field | Value |
| Group | Storage |
| Group | Monitors |
| Group | Input devices |
| Group | Printers |
After creating these part groups, the “Group” drop down appears on the parts entry screen, allowing him to assign each of his parts to one of these groups.
Since he doesn’t expect to be running more than one or two types of CPUs, he decides not to create a separate group for those and leaves these two parts unassigned.
7.4 Defining vendors
Jack selects “ABC Parts” to purchase the inventory he needs to run his company. In order to start buying inventory, ABC Parts needs to be entered as a Vendor to LedgerSMB.
Using the work flow detailed in Section 34.2 on page 34.2 Jack starts to do so by going through the menu Contacts Add Contact Company. He fills out the Company creation form by clicking the Generate control code button and adding the data as shown in Figure 7.2 on page 7.2.
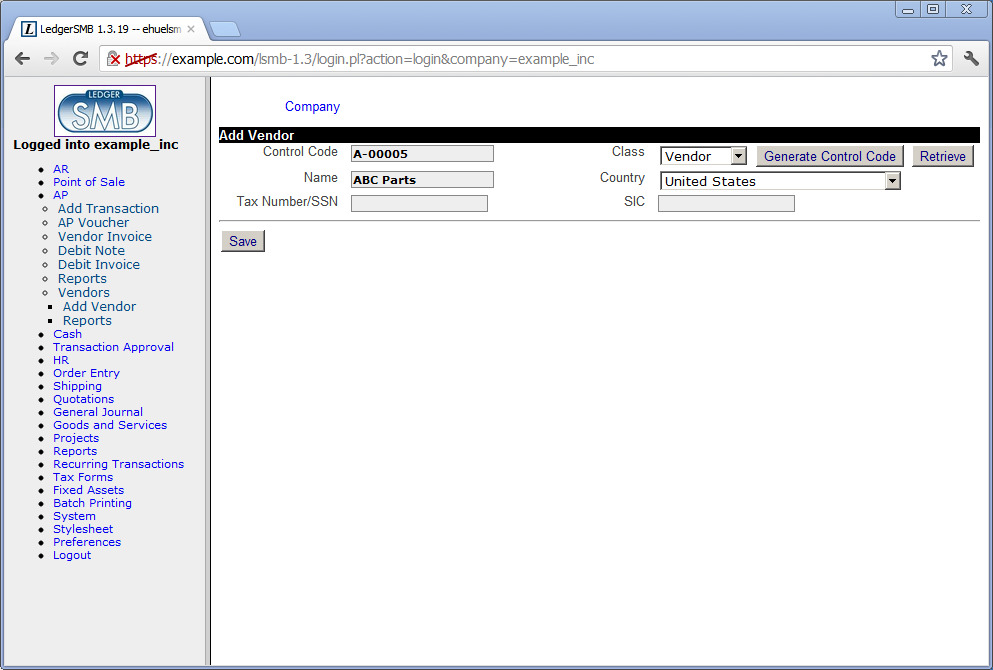
After saving the company data, Jack is presented the account data screen which he fills out as shown in Figure 7.3 on page 7.3.
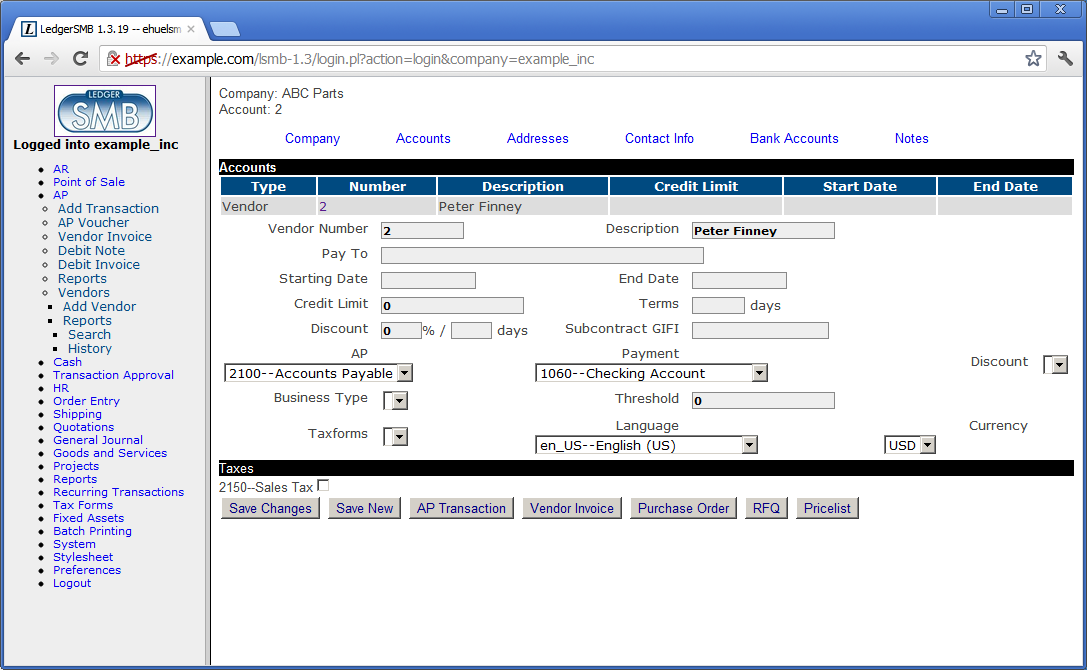
When he’s done filling out and saving the form, he notices the empty “Discount” drop down. Reading more about account configuration check marks in Section 26.2.3 on page 26.2.3 and going back to the checks on his chart of accounts (Section 6.4 on page 6.4), he finds he’s missing the purchase and sales discount accounts. He adds two accounts as follows:
-
4020
Sales discount
-
5020
Purchase discount
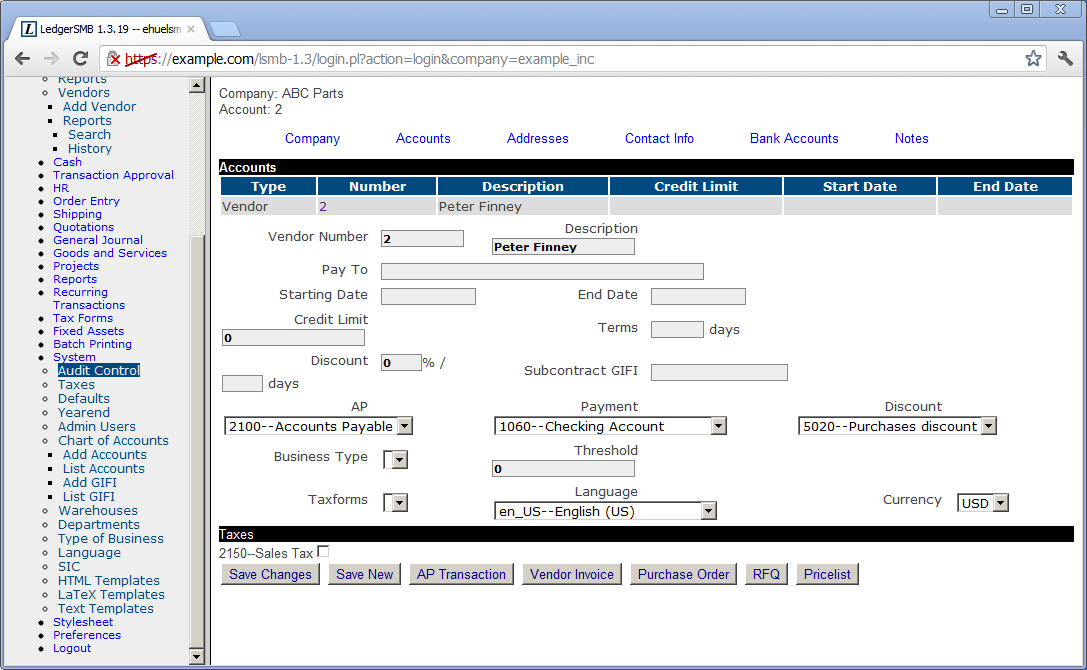
Note the top-left corner stating “Company: ABC Parts” and “Account: 2”. The information entered on the “Addresses”, “Contact Info” and “Bank Accounts” tabs will be attached to the account listed, i.e. account number 2 in this case.
7.5 Requesting quotations
After Jack finishes setting up the parts and vendor information, he decides to use LedgerSMB to draw up a list of items he wants to order from this company. To do so he follows the menu path Quotations RFQ which opens up a screen (shown in Figure 35.1 on page 35.1) for entering a new RFQ.

Remark Note that the RFQ entry screen contains prices; this is misleading at least: the printed output to be sent to the vendor does not. The fact that this screen allows entry of prices could be considered a bug.
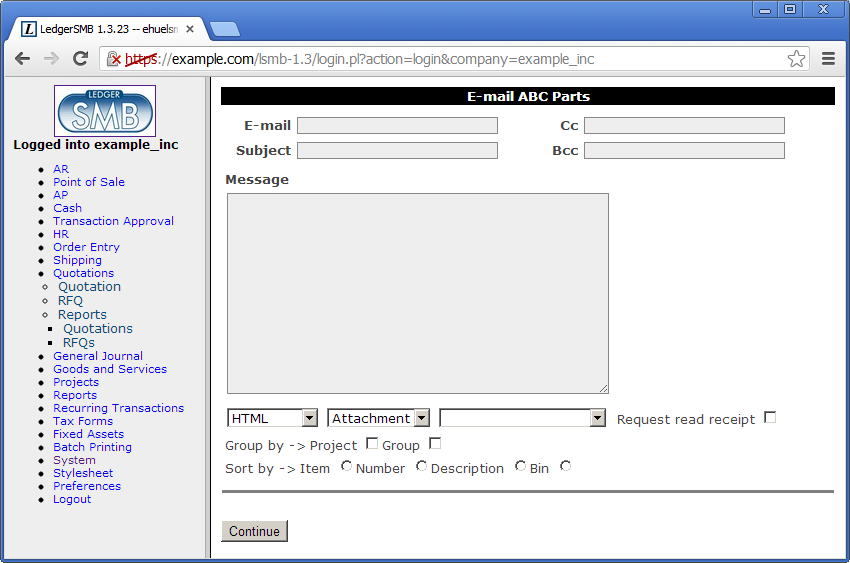
After filling out the form in accordance with the description in Section 35.1 on page 35.1, Jack expedites his RFQ to his vendor through e-mail by clicking the “E-mail” button. He finds himself in the screen shown in Figure 7.6 on page 7.6.
The From field of the e-mail to be sent out will be filled using the “Default From” setting documented in Section 18.4.3 on page 18.4.3. The other address fields can be entered by the user and may be readily populated if the customer account has the right contact info items attached: if there are Email, Cc and/or Bcc contact items set up, those will be used to fill these fields.
At the bottom there are three selection lists. The first allows selection of the format used to send the RFQ. Available options are HTML, CSV, Postscript (PS) and PDF. The last two require Postscript and PDF support to be correctly set up. The last selection list selects the language to be used for the RFQ. If no value is selected the system default language is used.
7.6 Following up on a quotation
Jack’s vendor (ABC Parts) sends him a quotation in response to his RFQ. Jack and his vendor can go back and forth a few times until Jack likes the offer he’s getting, but for the sake of argument let’s assume this is the final quotation.
Since Jack likes the offer, he wants to place an order with his vendor. To do so he looks up the RFQ he sent to the vendor using the menu path Quotations Reports Search. The screen shows additional buttons now that it shows a saved RFQ.

Jack clicks the “Purchase Order” button which creates a new order from the data in the RFQ. He completes it by entering the prices his vendor has quoted and by modifying it to be in accordance with the quotation. See Section 36.2 on page 36.2 for more detail on the order entry screen. When finished he saves the order and mails it to ABC Parts just like he mailed the RFQ in the previous section.
7.7 Receiving ordered items
Having ordered his inventory, the vendor starts shipping. There’s too much to ship at once so the vendor ships the goods in batches: every week he ships what’s available at the end of that week - he needed to order some of the products with the manufacturer.
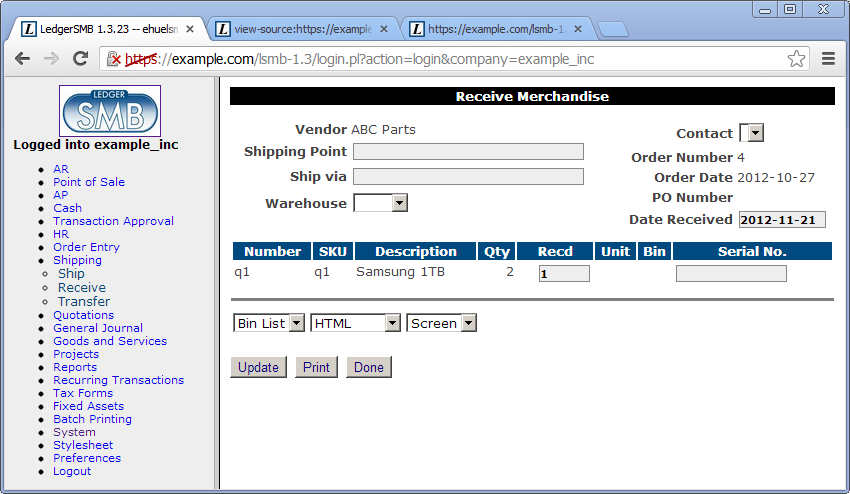
LedgerSMB helps Jack keep track to see if he has received everything he has ordered and that he’s not receiving too much. Jack goes through the menus Shipping Receive. In the search screen, he fills the vendor name (ABC Parts) and clicks “Continue” to be listed all open orders from ABC Parts. By clicking on the order number, the “Receive Merchandise” screen opens as presented in Figure 7.8 on page 7.8. This allows Jack to handle the incoming shipment. LedgerSMB will automatically update inventory based on the amounts entered as received 22 2 To resolve problems in the inventory tracking parts of LedgerSMB (inherited from before the fork), a significant change has been implemented in 1.3.31: inventory changes won’t be recorded until invoices have been posted. .
7.8 Receiving an invoice
7.9 Paying an invoice
Chapter 8 Ramping up to the first sale
8.1 Sending out a quote
8.2 Sending out a sales order
Chapter 9 Shipping sales
Chapter 10 Invoicing
10.1 Handling sales taxes
10.1.1 Invoices with taxes included
10.1.2 Invoices with explicit tax amounts
10.2 Invoice Editing
Posted invoices only have 2 fields that can be edited:
-
1.
Internal notes field
-
2.
Sales person - The Sales Person drop-down is only shown if there are sales people. Sales People are created through Employees and checking the Sales check-mark.
After editing, click the Save Info button to save the changes.
Chapter 11 Collecting sales invoice payments
11.1 Customer payments
11.2 Customer payment mismatch
11.2.1 Choosing between pardoning and registering underpayment
11.2.2 Large ones, as in partial payments or largish under/over payments
11.2.3 Pardoning small mismatches
Chapter 12 Paying vendor invoices
12.1 Handling vendors who match amounts to exact invoices
12.2 Handling vendors with running balances
12.3 Handling bounced checks
12.3.1 Voiding checks to undo payments of vendor invoices relating to bounced checks
Chapter 13 Monitoring arrears
13.1 Handling interest on arrears
Chapter 14 Branching out: services
14.1 Creation / assignment to different accounts
14.2 Recording service hours
14.3 Customer approval on service hours
14.4 Invoicing services
Chapter 15 Branching out II: service subscriptions
Part III Configuration
Chapter 16 Overview
16.1 Introduction
This section of the book describes how to set up LedgerSMB and its components. Configuration is assumed to be mostly one-off and rather technical in nature. To find out which tasks might need to be performed in order to keep the application in good health the reader is referred to the ’Administration Introduction’, Section 19.1 on page 19.1.
Chapter 17 Global configuration
17.1 Apache
Section about installing on Apache 2+
items to be discussed:
- Forwarding of authentication
-
@@@TODO
- PSGI configuration
-
@@@TODO
- performance
-
cgiD configuration: don’t (yet) [but will be supported once all legacy code is gone] @@@TODO
- security
-
suEXEC environment @@@TODO
17.1.1 Differences between Apache 1.3 and 2+
Explain how to use lsmb with 1.3 instead of 2+.
17.2 PostgreSQL
- pg_hba.conf
-
authentication @@@TODO
- security
-
local vs IP connections @@@TODO
17.3 LedgerSMB version numbers
LedgerSMB version numbers are in the form of Major.Minor.Patch-Optional Tag. So for example, the current 1.9 development release is 1.9.28-dev and the production release is 1.9.27
- Major
-
An increment in the major release number can mean significant architectural, Application Programmer Interface (API), functional, or usage changes. It is expected that an upgrade to a new Major version is going to be planned and tested by the user organization before upgrading.
- Minor
-
An increment in the minor release number may indicate changes to APIs , interfaces, user instructions, etc. But these changes are not expected to have major impact and should require minor planning and testing. Often small impact enhancements are back-patched to previous Minor versions as patches.
- Patch
-
Increments in the Patch number represent bug fixes, security improvements, or enhancements that do not break existing functionality, usage, or APIs. These changes are expected to be applied to an installation as soon as possible.
- Optional Tag
-
Common values include dev, beta, or alpha. Typically, these are only used internally by the LedgerSMB developers.
17.4 LedgerSMB Configuration
LedgerSMB configuration using ledgersmb.conf is deprecated as of 1 Jan 2023. New functionality may only available when using ledgersmb.yaml configuration file.
For the time being there is a conversion step that converts the old ’ledgersmb.conf’ to ‘ledgersmb.yaml‘, but the old conf file does not support new functionality.
17.4.1 ledgersmb.yaml
For an example of the default, non debug ledgersmb.yaml see https://github.com/ledgersmb/LedgerSMB/blob/master/doc/conf/ledgersmb.yaml
cookie
@@@TODO
db
@@@TODO
default_locale
@@@TODO
environment_variables
@@@TODO
extra_middleware
@@@TODO
logging
@@@TODO
login_settings
@@@TODO
Email can be configured by selecting which of the three available transports to use. The default ledgersmb.yaml file contains examples for the first two.
-
Email::Sender::Transport::Sendmail – Emails are sent using the local server’s sendmail binary. The configuration parameters are:
-
transport:$class – Email::Sender::Transport::Sendmail
-
transport:path – optionally provide a path to the directory that contains the ’sendmail’ binary.
-
-
LedgerSMB::Mailer::TransportSMTP - Emails are sent using a remote SMTP server. The configuration parameters are:
-
transport:$class – LedgerSMB::Mailer::TransportSMTP
-
transport:host – The required host name of the smtp server.
-
transport:port – The required port number of the smtp server. Note this might vary depending on whether TLS or SSL is used.
-
sasl_username:$class – The required smtp server authentication method. The values can be ‘Authen::SASL‘ or ‘Authen::SASL::SCRAM‘.
-
sasl_username:mechanism – The available mechanism are defined at https://metacpan.org/dist/Authen-SASL or https://metacpan.org/dist/Authen-SASL-SCRAM depending on the selected ‘$class‘.
-
sasl_username:callback:user – The required SMTP user name. ’the-user’ in the default file is a place holder and must be replaced.
-
sasl_username:callback:pass – The required SMTP password. ’SECURITY-FIRST’ in the default file is a place holder and must be replaced.
-
-
Email::Sender::Transport::DevNull - Emails are sent to /dev/null, in other words emails are not sent anyplace. This prevents errors in the user interface, but throws away any mail. There is only one configuration parameter. This is not a recommended production configuration. It is usually used for testing.
-
transport:$class – Email::Sender::Transport::DevNull
-
miscellaneous
@@@TODO
output_formatter
@@@TODO I really don’t have a good way to format lists explanations. See below at paths:config:workflows for an example. Guidance welcome.
paths
This section configures the various paths used by LedgerSMB. The configuration parameters are:
-
config:locale – Path to locale files. Defaults to locale/po.
-
config:sql – Path to the SQL schema definition files.
-
config:sql_data – Path to the reference and initial SQL database load files. For example, the names of the countries.
-
config:templates – Path to the templates base directory. Typically set to templates.
-
config:UI – Path to the UI HTML files. Defaults to ./UI/
-
config:UI_cache – Path to the location of the UI template cache . These are cached after they have been parsed and translated. This improves performance.
-
config:workflows – A list of the Directories where workflow files are stored. Contains the default and custom workflows. Custom workflows are used to override behavior of the default workflows by providing actions, conditions, etc. with the same name and type or by providing workflows of the same type with additional states and actions. Default workflows defaults to workflows. Custom workflows defaults to custom_workflows. Default workflow path must precede all the custom workflow paths. @@@TODO is the last statement correct? Can there be more than 2 paths?
printers
This section contains a list of printers and their definition.
The default ledgersmb.yaml file shows two printers named ’Laser’ and ’Epson’ with the printers defined using the linux lpr command and its arguments.
This default definition will provide for the selection of the printers named ’Laser’ and ’Epson’ in the LedgerSMB user interface.
For more information search the internet for ’linux lpr command’ or use man lpr at the linux command line.
reconciliation_importer
@@@TODO
setup_settings
@@@TODO
ui
@@@TODO
workflows
@@@TODO
Chapter 18 Per company configuration
18.1 Matching your business processes
By default, LedgerSMB operates such that all optional functionality is available and the user decides to use it or not based on which menu items they select, what fields they enter data into, and what buttons they click.
Removing application roles (see Appendix D starting at page D) can limit the visibility of menu items, data fields, and buttons. This will simplify the users view of the system, reduce training, and better configure LedgerSMB to your business requirements.
Outside of application roles, the only other enforced business process configuration is whether the same person can both create and post transactions. It is called ’separation of duties’ and is defined in Section 18.4.3 on page 18.4.3.
LedgerSMB is configured to adjust inventory when a Sales or Purchase Invoice is posted. This closely matches retail business processes where the customer walks out of the establishment with the product and an invoice (or receipt). This functionality can also be used for wholesale shipping applications because LedgerSMB can also produce picking and shipping documents, just remember that the inventory transaction happens when an invoice is posted.
LedgerSMB uses FIFO for COGS and inventory calculations. There are provisions for alternatives, but the code is not yet complete. See Section 3.3 on page 3.3 for a detailed explanation of FIFO calculations.
In addition to the above, LedgerSMB has configurable Workflows . These are not user configurable but your technical support staff should be able to create and edit them. See Chapter VIII starting at page VIII.
Contact the development team for other business process customizations. In most cases the need for more flexible matching of LedgerSMB to your business processes is understood, but the project has not not yet had any customer requests or development volunteers.
18.2 Administrative user
18.3 Chart of accounts
@@@ Should refer to the ’administration’ section???
18.3.1 Special accounts
-
•
AR/AP summary accounts
-
•
5 other special purpose accounts, see “Defaults” screen discussion
-
•
sales tax accounts
18.4 System menu settings
This section enumerates the “System” menu’s immediate children. In some cases the functionality is too complex and is referred to a chapter of its own.
18.4.1 Audit control
Enforce transaction reversal for all dates
This is a Yes/No value which affects the actions which can be performed on posted financial transactions.
-
•
No means transactions can be altered or deleted, even after posting them. Note that if a transaction has been posted before the latest closing date, it can never be altered, not even when this value is in effect.
-
•
Yes means transactions can’t be altered after posting. This setting is highly preferred and considered the only correct approach to accounting as it assures visible audit trails and thereby supports fraud detection.
Close books up to
@@@ This item isn’t a system setting; shouldn’t it move to “Transaction approval”?? That way system settings (config) and processes are separated.
@@@ My preference is to remove the setting entirely and rely on year-end workflow. We might add an account checkpoint interface as well at some point –Chris T
It’s advisable to regularly close the books after review. This prevents user error changing reviewed numbers: after closing the books, it’s no longer possible to post in the closed period.
There are also performance benefits to closing the books, because LedgerSMB uses the fact that the figures are known-stable as a performance optimization when calculating account balances.
Activate audit trail
This is a Yes/No value which - when Yes - causes the system to install triggers to register user actions (creation/adjustments/reversals/etc…) executed on financial transactions.
@@@ Once activated, where can we see it the audit trail??
@@@ This setting should go. In 1.3 the audit trails are always enforced via triggers so this setting does nothing. –CT
18.4.2 Taxes
This page lists all accounts which have the “Tax” account option enabled as discussed in Section 26.2.1 on page 26.2.1.
Each account is listed at least once, but can be listed many times, if it has had different settings applied over different time periods. E.g. if one of the current VAT rates is 19%, today but it used to be 17.5% until last month, there will be 2 rows for the applicable VAT account. See Chapter 27 starting at page 27 for further discussion of how taxes work in LedgerSMB and the choices involved when being required to handle changes in tax rates.
Each row lists the following fields:
- Rate (%)
-
The tax rate to be applied when calculating VAT to be posted on this account.
- Number
-
Account number
- Valid To
-
The ending date of the settings in this row. This can apply to the rate as well as the ordering or the tax rules (but usually applies to the rate).
- Ordering
-
This has to do with cumulative taxes. For example if two taxes exist and one has an ordering of 0 and one of 1, then the second tax will be calculated on a basis that includes the first. One place where this used to be used was in Quebec, where GST was taxable under PST.
- Tax rules
18.4.3 Defaults
Business number
This is used to store an arbitrary identification number for the business. It could be used to store a business license number or anything similar.
Weight unit
The unit of measurement for weights. @@@ why don’t we have a unit of measurement for distance as well??? And maybe a unit of measurement for content?
Separation of duties
Separation of duties is a method to help reduce fraud where one employee can’t modify the accounting ledger without another employee’s approval.
Select ”Yes” if you want to activate separation of duties or ”No” if you don’t want to activate it.
In order for separation of duties to be enforced, user roles have to be set differently for each user. This is done by removing the draft_post role from the users that cannot post and making sure that the users that can post have the role enabled. See Section 24.3 on page 24.3 for more details about changing and setting User Roles.
Default accounts
This setting will be used to preselect an account in the listings of the three categories listed below:
-
•
Inventory
-
•
Income
-
•
Expense
Foreign exchange gain and loss accounts
When working with foreign currencies, the system needs two special purpose accounts. One to post the gains onto which are caused by foreign currencies increasing in value; the other to post the losses onto which are caused by foreign currencies decreasing in value.
Default country
This setting indicates which country needs to be pre-selected in country selection lists.
Default language
The language to be used when no other language has been selected. Several parts of the application require language selection, such as customer, vendor and employee entry screens.
Templates directory
This setting indicates which set of templates - stored in the templates/ directory - should be used. In a standard installation, the drop down lists two items:
- demo
-
which contains templates based on LATEX, which is more commonly installed but has issues dealing with accented characters
List of currencies & default currency
Enter a list of all currencies you want to use in your company, identified by their 3-letter codes separated by a colon; i.e. “USD:EUR:CHF”. To ensure correct operation of the application, at least one currency (the company default currency) must be listed. In case of multiple currencies the first is used as the company default currency.
Company data (name /address)
The fields “Company Name”, “Company Address”, “Company Phone” and “Company Fax” will be used on printed/e-mailed invoices.
Password duration
This is an integer value field measuring the validity period in days for passwords set through the user’s Preferences screen. If this field is empty, passwords set through that method won’t expire.
A user will receive password expiration reminders upon logging starting a week before password expiry. When not acted upon, starting two days before expiry an hourly popup will appear requesting the user to change the password.
The application behaves this way because users with expired passwords won’t be able to log in: their password will need to be reset by a user admin.
Note that passwords set by admins for other users expire within 24 hours after setting them. This value is hard coded and can’t be overruled. This is a security measure taken to make sure as few unused accounts as possible exist: Existence of such accounts could open up security holes.
Default E-mail addresses
These addresses will be used to send e-mails from the system. Note that the “Default Email From” address should be configured in order to make sure e-mail doesn’t look like it’s coming from your webserver. The format to be used is ‘‘Name’’ <e-mail address> where the e-mail address should be inserted between the “” and “”.
Max per dropdown
Some elements in the screens may present a drop down. However, drop downs are relatively unwieldy to work with when used to present a large number of values to choose from.
This configuration option sets an upper limit on the number of records to be presented as drop down. When the number is exceeded, no drop down is used. Instead, a multi-step selection procedure will be used.
Item numbering
Many items in the system have sequence numbers: invoices, parts, etc. These can be just a number (i.e. 1 or 37) or they can also be both prefixed and suffixed. For example, INV0001 for invoices and EMP001 for employees or YOU-0001TOO, in which case the next item will be YOU-0002TOO.
You can only issue every number in the sequence once, but you can issue Y21-001 and Y22-001 by changing the sequence number format at the beginning of the year.
The numbers shown in the input boxes will be used to generate the next number in the numbering sequence.
- GL Reference number
-
The default reference number for the next GL transaction.
- Sales invoice/ AR Transaction number
-
This number is used to generate an invoice number when none is being filled out by the user.
- Sales order number
-
Same as Sales invoice number, except that it’s used for sales orders @@@ layout issue: the label is too big to fit on the page
- Vendor invoice/ AP Transaction number
-
Same as Sales invoice, except that the number is used for accounts payable transactions. @@@ layout issue: the label is too big to fit on the page
- Sales quotation number
-
Same as sales order number, except that it’s used for quotations.
- RFQ number
-
Request for quotation number is like the sales quotation number, except that it is used to track which vendors have been asked for quotes.
- Part number
-
All parts, services and assemblies are identified by a unique number. When an item is created and no number is entered by the user, a number is generated from this sequence.
- Job/project number
-
Used when creating new projects.
- Employee number
-
Same as the sales invoice number, used by new employee entry.
- Customer number
-
@@@ is this the control code number? or is this meta_number?? – Meta-number (CT)
- Vendor number
-
@@@ same question as customer number
Check prefix
The prefix to use when printing checks. There’s no check sequence number. That sequence number is requested from the check printing interface, because checks can be created outside the application as well, meaning the numbers can get out of sync.
18.4.4 Year end
@@@ Rename “Yearend” in menu interface to “Year end”.
@@@ IMO this section doesn’t belong here, because it’s a process, not config, but does it belong in this menu then? IMO it doesn’t…
18.4.5 Admin users
@@@ Same as Year end; doesn’t belong here…
18.4.6 Chart of accounts
@@@ Chart of accounts isn’t exactly a “process”, but it doesn’t feel like being pure config either. At any rate it’s a fact that the CoA discussion is a full chapter in and of itself - so discussion here isn’t necessary anymore.
18.4.7 Warehouses
Warehouses are stocking locations. They don’t have any properties (in the system) other than that they have a name. Warehouses can be added, modified and deleted from the System Warehouses menu item.
18.4.8 Departments
Departments can be used to divide a company in smaller pieces. LedgerSMB distinguishes two types of departments:
- Profit centers
-
which can be associated with any type of transaction, including AR transactions.
- Cost centers
-
which can be associated with all types of transactions, except AR transactions.
Departments can be created (added), modified or deleted through the System Departments menu item.
18.4.9 Type of business
Types of business are used in sales operations where customers can be assigned a type of business. Based on the type of business assignment, quotations, sales orders and invoices will automatically apply discount rates. For each type of business you enter a description and a discount rate to be applied.
18.4.10 Languages
The language table is the table users can select languages from, both to present the UI of the application as well as the setting for customers to be used to generate documents.
This listing should correspond to the actual translations of the application being available in the program installation directory.
Languages can be added, modified or deleted through the System Language menu item.
18.4.11 Standard Industry Code (SIC)
SI codes feature these three fields:
- Code
- Heading
- Description
When creating a company you can assign that it an SIC code, irrespective of its role (i.e. customer, vendor, lead or anything else). An example of an SI code system is the US’s NAICS11 1 https://www.census.gov/naics/ code. Other countries have their own coding systems such as ANZSIC22 2 https://www.abs.gov.au/statistics/classifications/australian-and-new-zealand-standard-industrial-classification-anzsic/latest-release for Australia and New Zealand and NACE33 3 https://ec.europa.eu/competition/mergers/cases/index/nace_all.html for Europe
The SIC field currently doesn’t support a specific function in the application and is there merely for informational purposes. However in the future its role could be extended to include impact on reports, taxes or other functionalities where type of industry could matter.
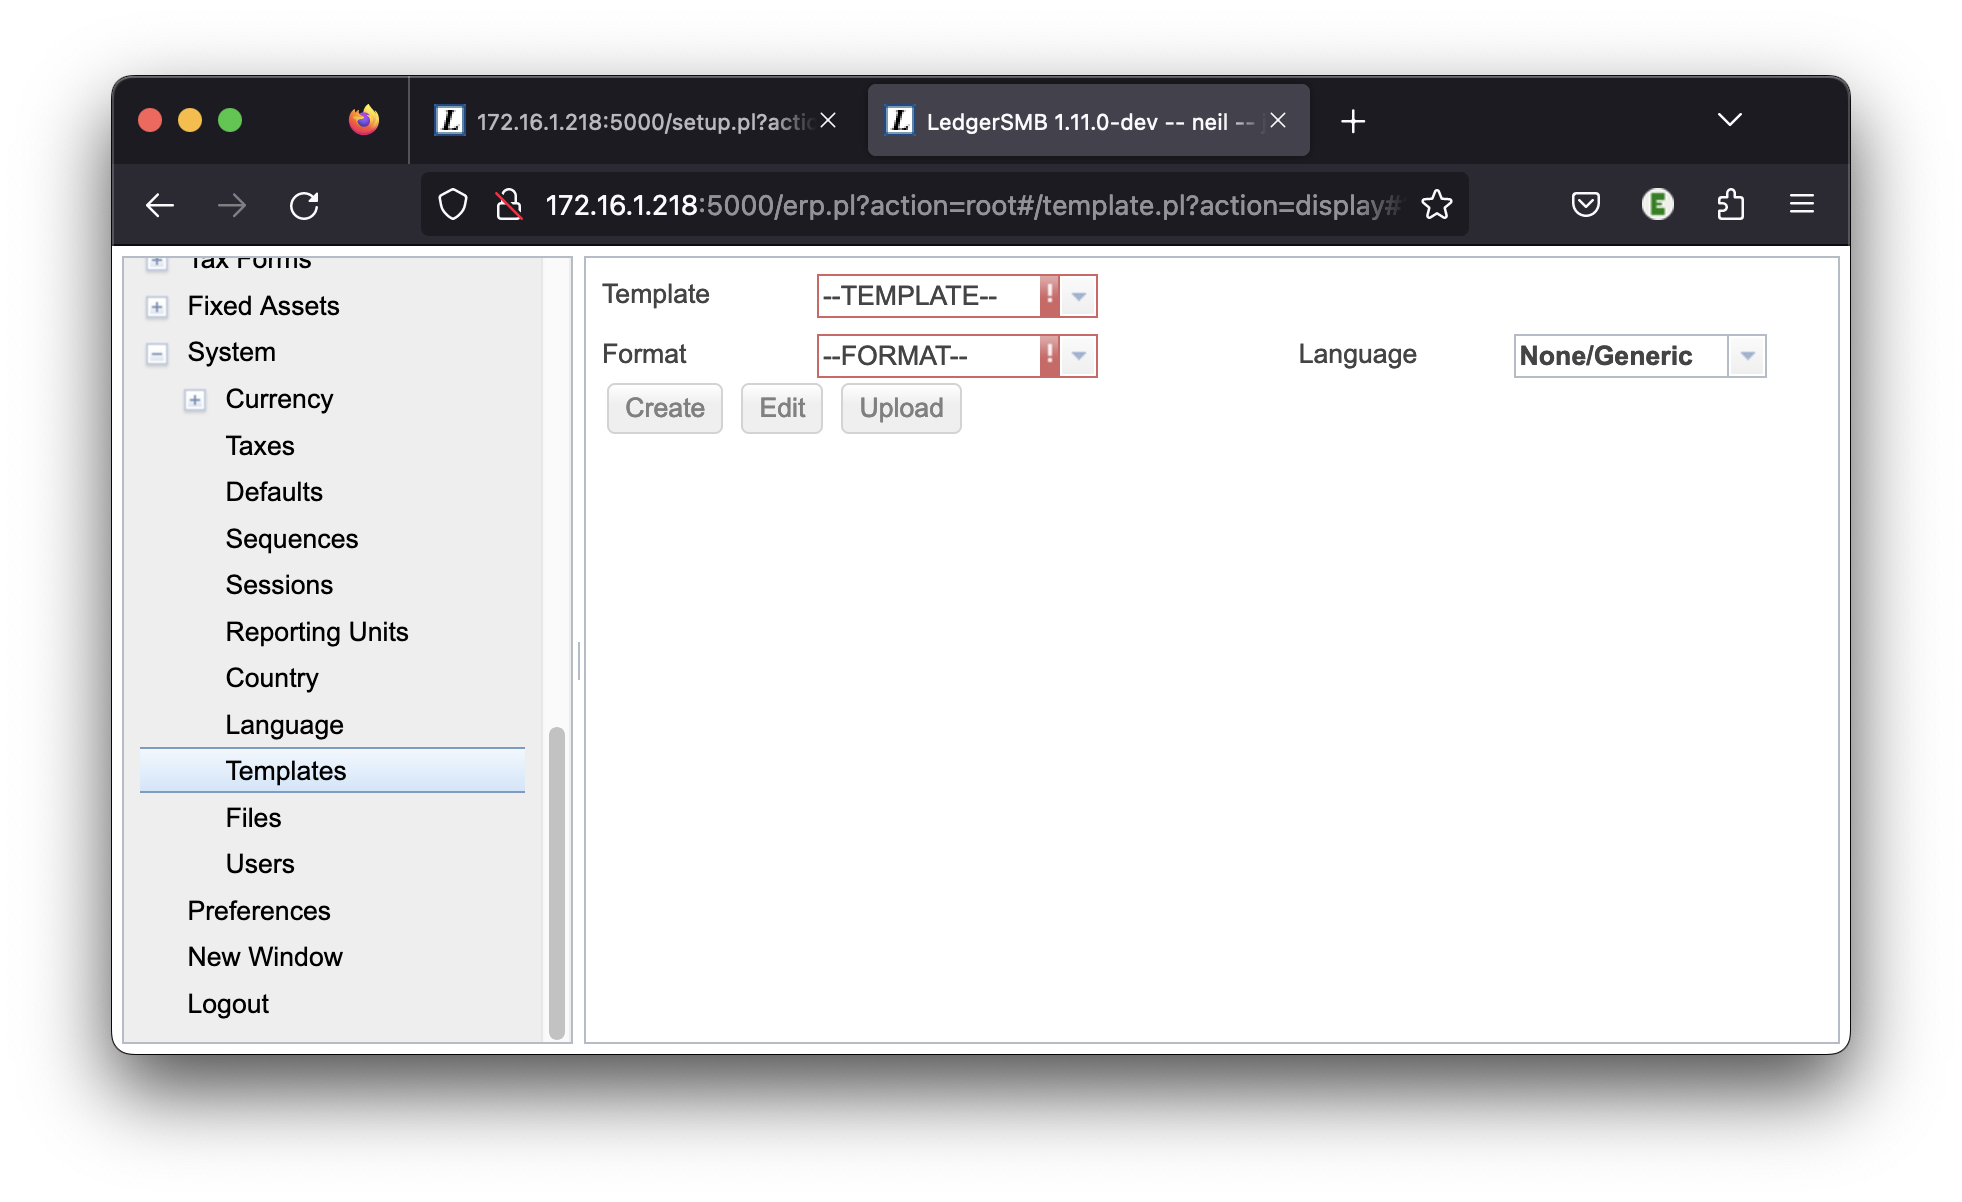
18.4.12 Templates
Templates are available to control the output format of many LedgerSMB outputs including Balance Sheet, Sales Orders, etc.
There are 3 types of templates: LATEX, HTML, and CSV. Templates are accessed by navigating to System Templates. You should see the view shown in Figure 18.1 on page 18.1.
The template you want to change is selected in the ”Template” drop-down. The template format you want to change is selected in the ”Format” drop-down.
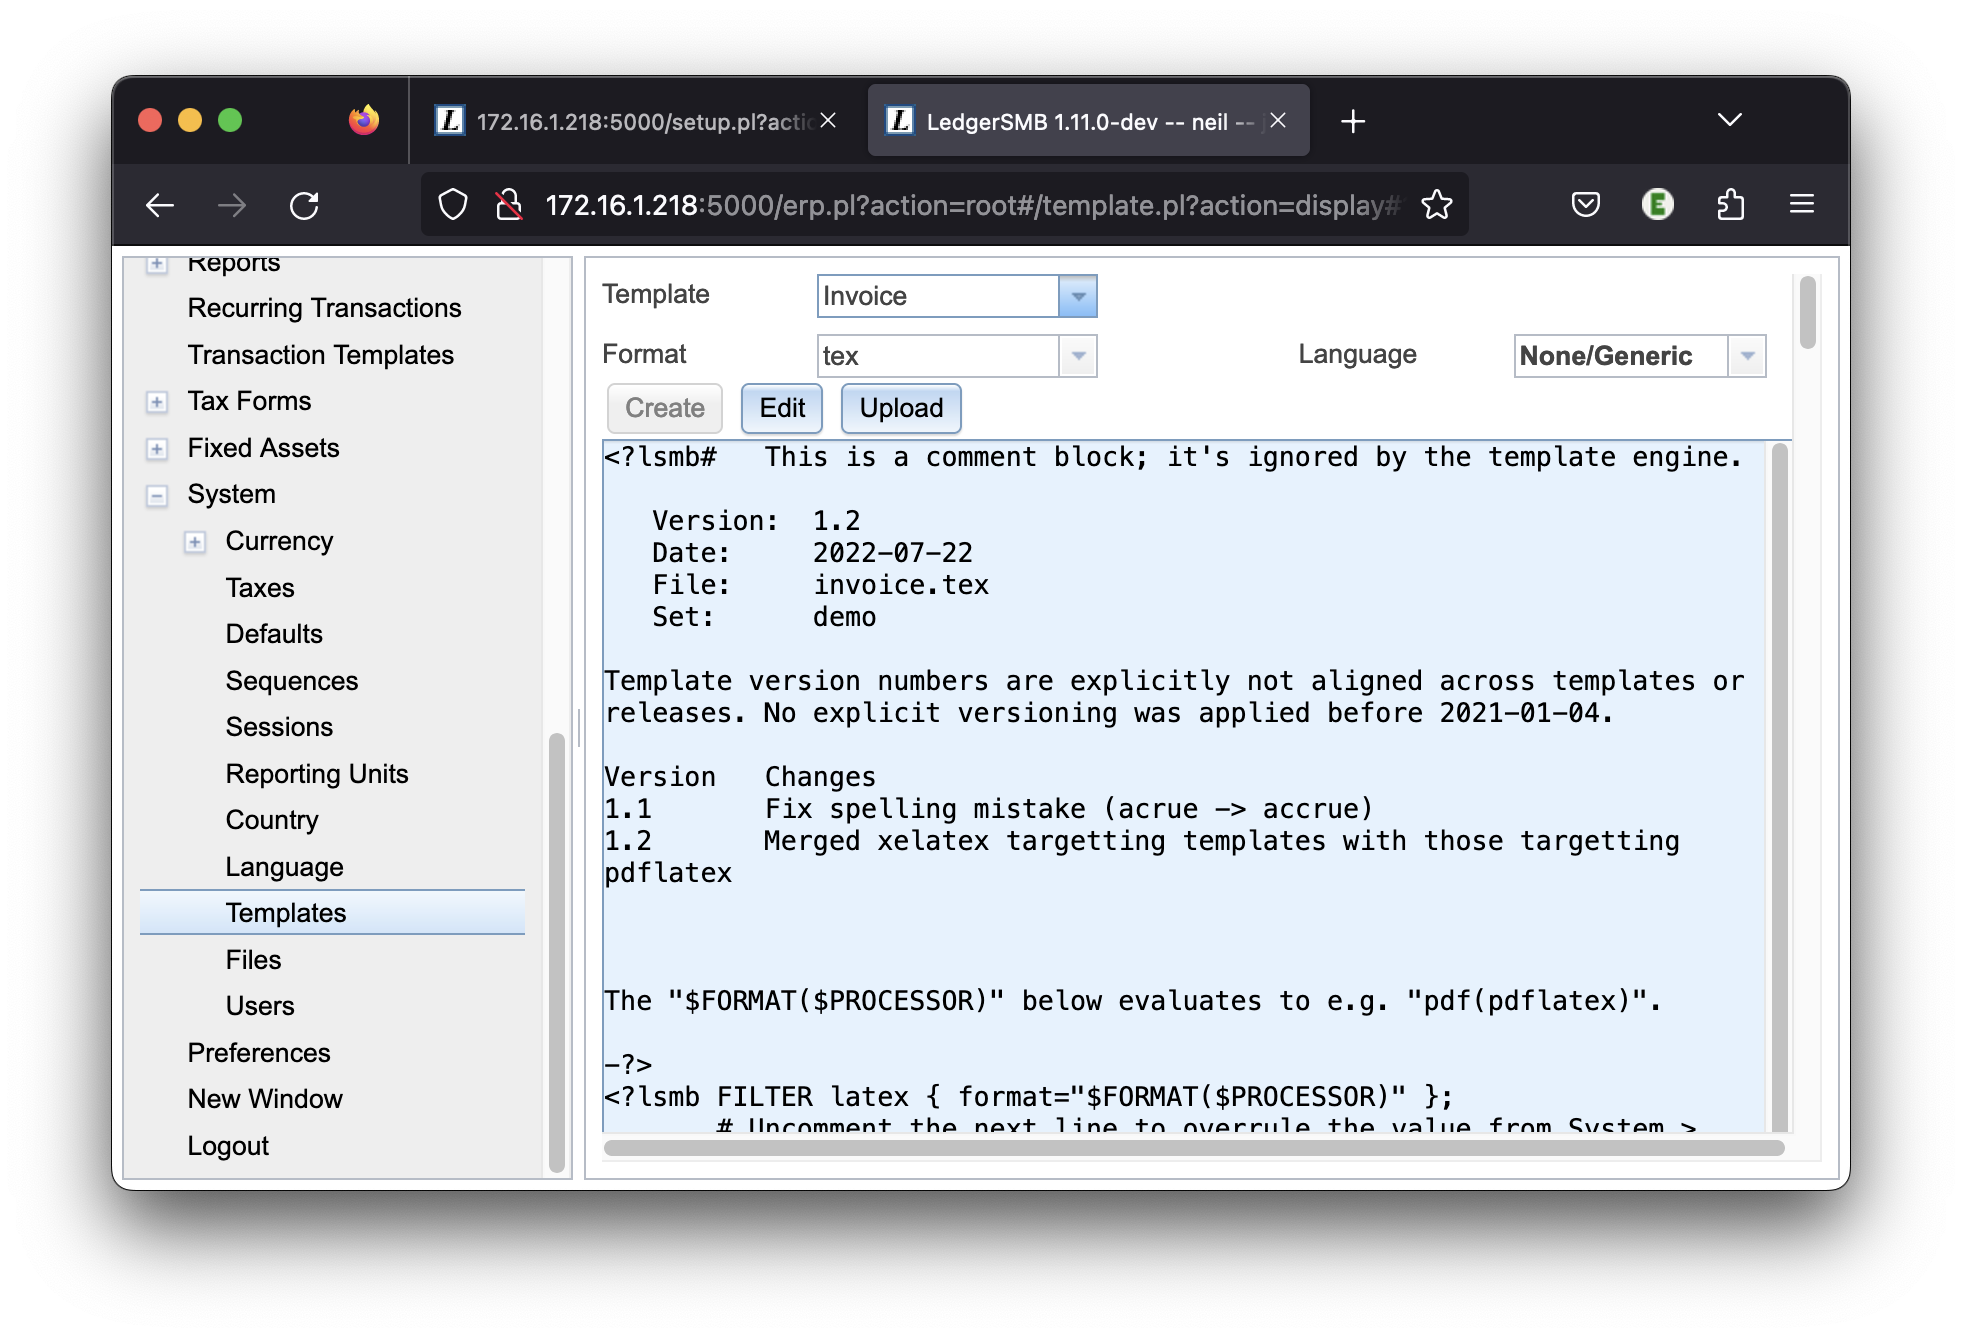
LATEX templates
To change a LATEX template navigate to System Templates. Select, for example, Template ”Invoice” and Format ”tex”, you should see the view shown in Figure 18.2 on page 18.2
To add a file to the latex template, first upload the image file to the database. This can be accomplished by navigating to System Files.
To include this graphic file in your LATEX document, it needs to be retrieved from the database and temporarily stored in a location accessible to the PDF generator. Once the file is in the database, then the function dbfile_path handles that.
For example, If the graphic file is named ”FL_Logo_icon_250x250.png”, then add something like the following to the LATEX template using the Edit button.
\parbox[b]{.1\textwidth}{%
    \includegraphics[scale=0.7]{%
        <?lsmb dbfile_path("FL_Logo_icon_250x250.png")?>}
}
After editing the template must be uploaded to the database using the Upload button.
HTML templates
@@@TODO Add HTML specific template info.
CSV templates
@@@TODO Add CSV specific template information here.
Part IV Administration
Chapter 19 Overview
19.1 Introduction
This part of the book describes the tasks and processes that may need to be carried out on a regular basis in order to keep the application in good health and in line with requirements from end users.
Maintenance may require different types of system access for different types of tasks:
-
1.
Within application tasks, such as user management, require an appropriately authorized application login
-
2.
Database administration tasks, such as creation of backups and application upgrades, require a database level login to be used with (amongst others) ’setup.pl’
-
3.
Other system-level maintenance tasks, such as updating PostgreSQL or Apache, which require user accounts on the server hosting LedgerSMB
Each of the above tasks requires its own type of user account. Creating and managing accounts for the first type of task is the subject of the next chapter.
Chapter 20 New install
This chapter covers the general steps to use when installing LedgerSMB for the first time. If you elected to skip Part II Getting Started of this document then this summary will help you with the main steps normally required after installation to get LedgerSMB up and running.
It is assumed that:
-
•
you have followed the installation instructions and have a working install. if not, then see the install instructions at @@@TODO.
-
•
you have setup the company database using setup.pl. if not, then see the instructions at @@@TODO.
-
•
you have created an admin user with all privileges. if not, then see the instructions at @@@TODO.
The basic accounting system setup steps are:
-
1.
Create a new password for the user using Preferences Password.
-
2.
Setup the company defaults in System Defaults.
-
3.
Edit the Chart of Accounts as necessary using General Journal Chart of Accounts. This includes setting up your bank account.
-
4.
Enter or import customers.
-
5.
Enter or import vendors.
-
6.
Enter or import products or services.
-
7.
Customize Sales Order format.
-
8.
Customize Sales Invoice format.
-
9.
Customize Purchase Quotation format.
-
10.
Customize Purchase Order format.
-
11.
Testing your setup.
Chapter 21 Within-application tasks
@@@TODO
Chapter 22 DBA tasks from setup.pl
@@@TODO
Chapter 23 Outside-application tasks
@@@TODO
Chapter 24 User management
@@@TODO
24.1 Introduction
This chapter deals with management of application level user accounts. This is the first of the three types of system access required to do LedgerSMB administration described in the previous chapter.
24.2 User creation
Users experienced with LedgerSMB 1.2 or before or SQL Ledger (any version) are referred to appendix A.1 to read about the differences with version 1.3.
In order to create users, the current user must be sufficiently authorized. The user created at application set up time is such a user.
Go to the System Admin Users Add User. You’ll be presented the page as shown in figure Figure 24.1 on page 24.1.
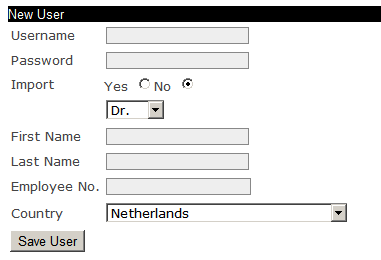
The value entered in the ’Username’ field will cause a database user by that name to be created. Database users are a global resource, meaning that a collision will occur if multiple people try to define the same user in multiple companies. Section 24.5 on page 24.5 describes how to use the same user across multiple companies.
Enter the password to be used for this user into the “Password” field. If you’re importing a user, please leave the field empty – that will prevent the password from being changed. Note that initial passwords (and password resets) are only valid for one day unless the user logs in and changes his/her password.
The “Import” field is discussed in Section 24.5 on page 24.5. To create a new user, leave the setting at “No”.
All of the “First Name”, “Last Name” and “Employee No.” fields are required. However, when no employee number is specified, the system will generate one using the sequence specified in the Defaults screen as documented in Section 18.4.3 on page 18.4.3.
The “Country” field speaks for itself and is required as well.
24.3 User authorization
After filling out all the fields as described in the previous section and clicking “Save user”, you’ll be presented a second screen in the user creation process: the user authorization screen. See Figure 24.2 on page 24.2 for a screenshot of the top of that screen.
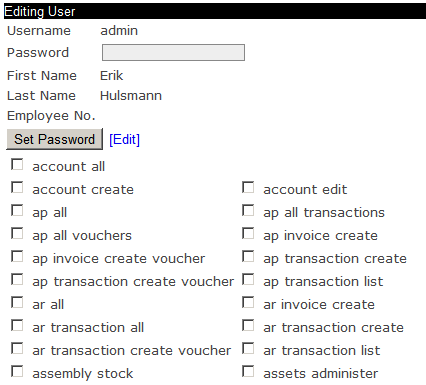
The process of assigning user authorizations is the process by which the granted access to specific parts of the application. One can imagine that - in a moderately sized company - sales should not be editing accounting data and accountants should not be editing sales data. Yet, in order to cooperate, both parties need to be given access to the same application. This is where authorizations come in.
In aforementioned screen, which equals the “Edit user” screen, you have to assign the newly created user his application rights. By default, the user doesn’t have any rights. Checking all check marks makes the user an application “super user”, i.e. gives the user all available application rights.
24.4 Maintaining users
24.4.1 Editing user information and authorizations
When the role of a user in the company changes, it may be necessary to assign that user new roles and possibly revoke some other roles. This can be done through user search: System Admin Users Search Users Search [edit] which brings you to the same screen as presented in Figure 24.2 on page 24.2.
Similarly, there may be reasons to change the user information, such as a last name (e.g. upon marriage).
Note that if you reset a password, the new password is valid for one day unless changed. The preferred business process is for the individual with permissions to reset the password, give the new password to the user, they then log in and immediately change it.
24.4.2 Changing user preferences
Each user can change his preferences and password through the Preferences top level menu. See Figure 24.3 on page 24.3.
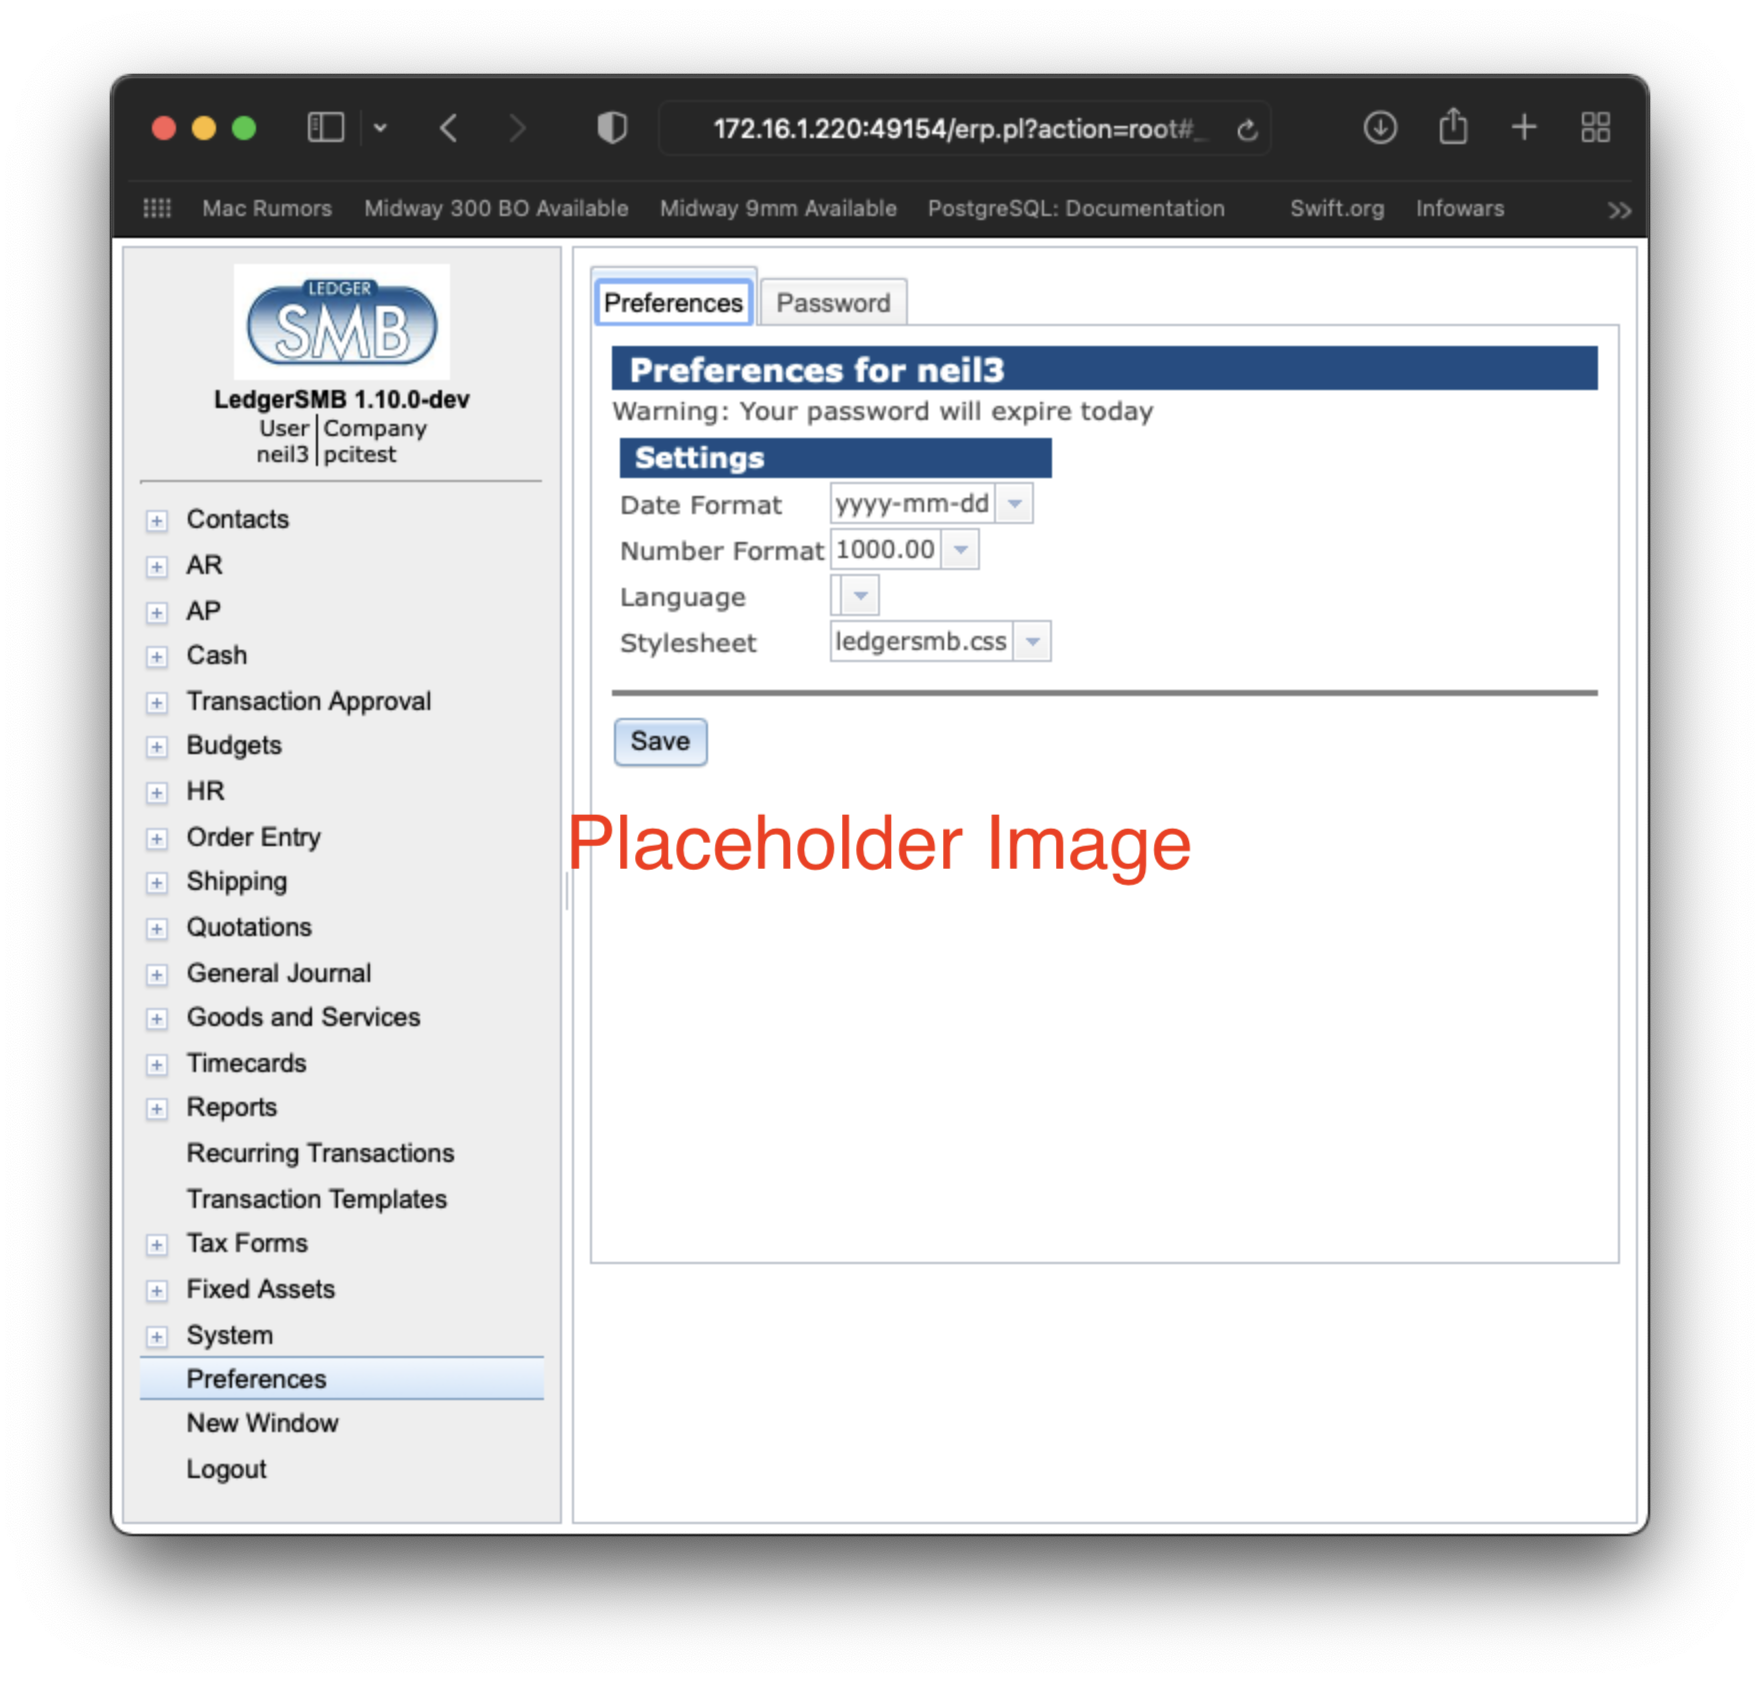
24.4.3 Deleting users
From the “User search” result screen, users can be “deleted” from the company: they have their access to the current company revoked.
Note that the user is only revoked access to the current company; the login remains a valid login for the database cluster. Administrators wanting to remove user accounts at the database level need to take additional action.
24.5 User imports
If a database user already exists, e.g. because this user was created to be used with another LedgerSMB company, it can’t be created a second time. In order to be able to use that user with the current company, it needs to be “imported” instead.
The difference between creating a new user and importing one is that the “Import” radio button should be set to “Yes” and that you should not fill out a password. If you do, the password of that user will be overwritten for all companies.
All other fields are still applicable: the data entered for other companies isn’t copied to the current company.
24.6 setup.pl users
As mentioned in the introduction, users created through the process documented above don’t have rights to execute work with the setup.pl database administration tool. Note that this is on purpose. You will need access to the server to create such users, or request one from your application service provider (ASP) if you use a hosted solution.
During the set up process such a user is normally being created. This user can later be used to manage the database from the database administration tool setup.pl.
Chapter 25 Definition of goods and services
25.1 Definition of goods
Structure of products in the system.
25.1.1 Definition of parts
The part entry screen consists of four parts:
-
1.
Part information
-
2.
Vendor information
-
3.
Customer information
-
4.
File attachments
The paragraphs below discuss each of the four sections. The part definition section contains both required and optional fields. The information in the remaining three sections is entirely optional.
Part information
Every part requires the following fields to be entered:
- Number
-
The (alphanumeric) code the company uses to identify the item
- Description
-
The (native language) description of the item, used as the default description on sales invoices
- Inventory account
-
The asset account used to maintain the monetary equivalent of the inventory amount
- Income account
-
The P&L (income) account to post the sales revenues on
- COGS account
-
The P&L (expense) Cost of Goods Sold (COGS) account to use to post cost of sold items on
- Sell price
-
The default selling price used on sales invoices
The other fields in this section of the screen are optional:
- List price
-
Informational; can be used for any (monetary) purpose
- Last cost
-
Last buying price, updated when a vendor invoice listing the current part is posted
- Markup percentage
-
Markup on Last cost to calculate the Sell price
- Image
- Drawing
- Microfiche
- Unit
-
A five-character field shown on the invoice
- Weight
-
Informational; can be used by add-ons or when customizing
- ROP
-
Reorder point - when the inventory drops below this number, the part will show up in “Short parts” reports
- Bin
-
The storage location in the warehouse
Apart from these fields, there are also the Make and Model paired fields. Every part can have as many Make/Model lines as required. They are informational, but can be used when customizing the software.
The Average Cost and On Hand fields are output-only calculated fields. Average Cost is calculated from the historic buying prices. On Hand is the current inventory, which is updated when posting a vendor invoice (increased) or sales invoice (decreased).
Taxation of parts
Right below the accounts selection section, there is the Tax section, which lists all tax accounts with a check mark. Each account corresponds with a certain tax type and rate. E.g. in the Netherlands, there’s one VAT tax type (BTW) which has two rates, one of which applies to every product. This setup requires two accounts. There’s more on the subject of sales taxes in Chapter 27 starting at page 27.
By checking the check mark on an account, the system is signaled to calculate that kind of tax for the part if the customer (or vendor) has the appropriate setup as described in section
Vendor information
This section of the screen lists one or more vendors from which the part can be purchased, with purchasing information for the given vendor:
- Vendor code
-
Code used by the vendor to identify the good, to be used by and future customization and enhancements (currently informational only)
- Lead time
-
Lead time of the part from the vendor in days
- Last cost
-
Last price at which the good was purchased from the vendor
- Currency
-
The currency belonging to the Last cost field
Customer information
The customer information section specifies sell prices per customer or price group where those are required to deviate from the default sell price. This mechanism exists to support the marketing principle of categorizing customers.
- Sell price
-
Price for this part to be used for this customer
- From
-
Start of the applicability window of the price (inclusive)
- To
-
End of the applicability window of the price (inclusive)
File attachments
25.1.2 Definition of part groups
When adding parts, services, or overhead in Goods and Services they can be categorized in ’part groups’ . When searching, the part group can help to limit the number of matches. Currently, this is the only use of ’part groups’.
When no part groups have been defined, the part group assignment field doesn’t show up on any of the goods entry screens. Part groups never show up on the add assembly screen.
There’s no requirement that a good be assigned to any specific part group.
25.1.3 Definition of assemblies
25.1.4 Definition of overhead or labor
25.1.5 The use of parts versus assemblies for multi-item-package sales
Often times, one may want to sell pre-packaged multiples of a single item, such as Jack in Chapter 7 starting at page 7 who wants to sell memory modules in pairs as well as single items, with the price for the pair set separately from the single-item price.
There are basically two use-cases
-
1.
Pre-packaged sales which are separately stocked
-
2.
Single item sales which are achieved by unwrapping the multi-item packages
The former case would be that of a supermarket selling packages of coffee in singles and shrink-wrapped in pairs. These items get stocked, sold and produced separately. Handling these is straight forward: as they are basically separate products from the point of administration and inventory management, they’re handled as separate parts.
The latter case would be Jack’s case where single-item sales is achieved by unwrapping a multi-item package. Basically, there’s a single inventory for both types of packaging. This situation can be handled (a) by creating separate parts or (b) by creating a part and an assembly. To reiterate: The fact that one wants to be able to separately set a pricing strategy for the bundled items is the driver to go look for other solutions than just sell a multiple of the original item.
There is no option which matches the actual practice: one inventory for two parts. The solution always will keeps two separate stocks for the two items, but one may work better in practice than the other.
Option a (separate parts) keeps the inventory of both items strictly separate, meaning there’s no way to convert between the two, other than selling and buying.
Option b (a part and an assembly) mismatches reality in so far that it will require one to stock the single items and update the assembly stock regularly while in practice the multi-item packages are stocked and unwrapped upon single-item sales. This procedure works to have the assembly stock go negative on sales and restock regularly (e.g. daily) to update assembly stock back to 0 (zero). This removes inventory from the single-item stock, allowing for a semi-automated way to convert stock from one type of inventory to another.
25.2 Definition of services
25.2.1 Taxation of services
Chapter 26 Chart of accounts
26.1 Accounts and headers
The system allows ordering accounts into groups by assigning accounts to headers. Headers can themselves be assigned to other headers resulting in trees of account groups.11 1 Although the database structure supports this type of account hierarchy from 1.3, it was not fully in use in reports until 1.4.17. In 1.3 accounts can be assigned a header, but headers can’t be assigned to headers themselves.
26.2 Account configuration
Headers don’t have any configuration, other than their number and description. Accounts also have a number and description, but require additional configuration for the application to work correctly. The settings are described in the sections that follow.
26.2.1 Account options
- Contra
-
This checkmark identifies the account as a contra account, which means that the account is going to hold the opposite of an account it’s associated with. A good example of this kind would be the depreciation account associated with a fixed asset account where the depreciation account contains the credit amount to be added to the original asset (debit) value to get the current asset value.
- Recon
- Tax
26.2.2 Summary accounts
There are currently three types of summary accounts:
-
1.
AR Marking an account as a summary account for AR means that all outstanding receivable amounts will be posted to this account. The Accounts Receivable administration will contain the details of which amount is owed by which customer.
-
2.
AP Same as the AR account, except for amounts owed to vendors.
-
3.
Inventory This account holds the monetary value equal to the items on stock.
26.2.3 Account inclusion in drop down lists
@@@ Add summary
Receivables & payables UI
- Income (AR_amount)
-
This check mark adds the account to the list of accounts in the transaction and invoice screens which are used to post income on.
- Payment (AR_paid)
- Tax (AR_tax)
- Overpayment (AR_overpayment)
- Discount (AR_discount)
-
Adds the account to the customer entry screen’s selection list for accounts to post
The payables UI works the same way as the receivables UI. The difference is that the technical names of the configuration identifiers are prefixed by AP_ instead of AR_.
Tracking Items
The items on this line relate to stocked items, i.e. those tracked for inventory: parts and assemblies.
- Income (IC_sale)
-
Adds the account to the selection list of income accounts on the part and assembly definition screens.
- COGS (IC_cogs)
-
Adds the account to the selection list of COGS @@@ accounts on the part, assembly and overhead definition screen.
- Tax (IC_taxpart)
@@@ Question: Labor/Overhead accounts == inventory accounts??
Non-tracking items
The items on this line relate to untracked (non stocked) items, i.e. services.
- Income (IC_income)
-
Adds the account to the income account selection list in the service definition screen.
- Expense (IC_expense)
-
Adds the account to the expense account selection list in the service definition screen.
- Tax (IC_taxservice)
Fixed assets
- Fixed asset (Fixed_Asset)
-
Marks the account as holding the original asset value for the fixed assets module, for some classes of fixed assets.
- Depreciation (Asset_Dep)
-
Marks the account as holding the cumulative depreciation amount for the fixed assets module, for some classes of fixed assets.
- Expense (asset_expense)
- Gain (asset_gain)
-
Account to hold book value gain upon disposal of a fixed asset.
- Loss (asset_loss)
-
Account to hold book value loss upon disposal of a fixed asset.
Importing chart of accounts
26.3 Alternative accounts (GIFI)
Next to the regular account numbering scheme, LedgerSMB supports a second numbering scheme: GIFI numbering. GIFI is a standardized account coding system used in Canada by the Canada Revenue Agency for processing corporate Tax Returns forms.
Other countries (e.g. France) may have required numbering schemes for corporate accounting as well.
If you use GIFI account numbers, each account is associated with a GIFI account. Multiple accounts may map to a single GIFI account.
Many General Ledger reports exist in two variants: a variant using the normal G/L accounts and one with the GIFI numbering scheme. In the GIFI variant, when a single GIFI has multiple accounts, the total reported under GIFI is the sum of the mapped accounts.
26.3.1 Maintaining GIFI
GIFI accounts should be created before being assigned to a standard G/L account. GIFI accounts can be maintained through the System Chart of accounts Add GIFI and List GIFI menu items. Existing accounts can be edited by selecting them from the List GIFI menu, which opens a page where individual GIFI items can have their number or description adjusted.
26.4 Reporting
As for the general journal being presented in the ”ordered by account” and ”ordered by date”: these are both in the ”General Journal ¿ Search” menu.
Once you run the report, you can sort the lines by date (journal) or by account (which I believe is sorted by date within the account). My accountant either lists ”all transactions for one specific account” or ”all transactions for 202x; all accounts” so usually, sorting by date isn’t much of an issue.
I believe that in the ”General Journal ¿ Search” search options, you may need to check the ”Account” indicator to add the account to the output. This comes in handy when you decide not to filter for a specific account.
@@@ Needs Editing
Chapter 27 Taxes
27.1 Overview
When an account has been marked as a Tax account (see Section 26.2.1 on page 26.2.1, item Tax) several things happen:
-
•
The account will be shown in the customer and vendor account screens with a check mark to mark it “relevant for the customer”
-
•
The account will be shown in the part and service configuration screens with a check mark to mark it “relevant for the part/service item”
-
•
The account will be shown in the tax configuration screen in order to set a tax percentage on the account as discussed in the next section
By marking an account relevant for a customer, taxes will be calculated when creating a sales invoice for the given customer which includes parts which also have the specific account marked as relevant.
27.2 Tax account configuration
The screen (shown in Figure 27.1 on page 27.1) presents a table with the full history of the percentage rates, their dates of applicability and the tax accounts they apply to. An account can show up any number of times, with different Valid To dates.
- Account name
-
The first column; not an input field
- Rate (%)
-
The rate to be applied to the sales amount
- Min Taxable
-
The minimum amount for which the tax is applicable
- Number
-
The tax reporting number to be used for this tax
- Valid To
-
Date until which the tax rate is applicable
- Ordering
-
The meaning of this field is described below
- Tax Rules
To determine which line is applicable at any time, order the lines by their validity date and select the first one for which the validity date is later than the date being checked for. E.g. if you have two lines - one with a Valid To date of 2010-01-01 and one with a Valid To date of “infinity” - the 2010 line would be selected when checking for a date in 2009 while the “infinity” line would be selected for any date later than Jan 1st, 2010. This facilitates advance entry of a new tax rate in case of a rate change if a tax rate changes: the new rate will automatically be selected beyond the validity date of the old rate.
The order field is used to layer taxes, e.g. Canada where the province of Quebec taxes the taxes collected by the national authority, which works like this numerically: National tax with order 0 and rate 10% and Quebec tax with order 1 and rate 5% applied to a 10$ amount charges 1$ of national tax and 0.55$ of Quebec tax (5% of 11$).
Note that - as pointed out in the Overview section of this chapter - the customer related tax calculation on invoices is triggered by the settings in this chapter as well as the customer/vendor settings described in Section 34.2 on page 34.2 and part settings and service settings described in Section 25.1.1 on page 25.1.1 and Section 25.2.1 on page 25.2.1 respectively.
27.3 Tax calculation examples
27.4 Tax calculation plug-ins
The tax calculation system has been designed to handle the most complex tax system thinkable. Because the tax calculation rules for most set ups aren’t really all that complex, LedgerSMB comes with a single tax calculation plug in out of the box: the “Simple” tax calculation rule.
For more complex needs, more complex routines can be developed and plugged into LedgerSMB side-by-side with the simple rule.
27.5 Tax forms
The tax forms facility exists to help file sales tax forms. It’s primarily modelled after the 1099 US tax reporting forms functionality, which means that it’s cash based. The fact that it’s cash based means that invoices will be included in the tax report as soon as cash for the invoice is received. Accrual based reporting means that the tax is reported based on the invoice date instead of the payment date.
This system can only be used in some EU countries and by some companies at that: the country needs to allow cash based reporting and the company needs to have filed for cash based reporting as well.
Before using this functionality be sure to check with an accountant or the tax authorities if cash based reporting is appropriate.
27.5.1 Overview
Tax forms are meant to support tax reporting requirements in the countries where the company has tax reporting obligations. This means that tax forms are country specific: each country for which reporting obligations exist needs to have its own form associated.
In order to be able to collect taxes in a tax form companies need to be linked to it. Section 34.2.2 on page 34.2.2 describes how to do this.
When associations have been set up between companies and tax forms, the “Tax form” check mark can be used in invoices to include (or exclude) invoice lines from the tax form. See Section 38.2.1 on page 38.2.1 for entry of invoices.
Note that there’s a module available for 1.3 which implements accrual based tax reporting by the name of EU VAT reporting. This module replaces the default tax reporting functionality meaning one can only have accrual based or cash based reports in a single company at this time, but not both.
27.5.2 Creating tax forms
Tax forms can be created (or edited) using the menu options available under the “Taxforms” main menu item.
Tax forms have three fields.
- Country
-
Country to which the tax form applies
- Description
-
Name of the tax form to be displayed in drop down lists
- Select by Default
Chapter 28 Pricing
28.1 Introduction
In the application there are four reasons for an invoice to include a discount:
-
1.
Because a discount is entered by the sales person creating the quotation, sales order or sales invoice
-
2.
Because the customer’s payment terms include a discount for paying early
-
3.
Because the customer belongs to a type of business which is entitled to discounts
-
4.
Because the customer has been assigned a price matrix leading to discounts
@@@ types of business are ’old school’; price groups have been introduced to replace types of business with a more fine-grained structure.
28.2 Definition of types of business
Types of business are really straight forward: they feature a description which allows them to be identified in the customer account screen and a discount percentage which is applied across the board. I.e. all invoices to the customer will have that discount applied.
28.3 Definition of price groups / price matrix
Chapter 29 Auditing
There’s an audit-trail table which tracks (and this can’t be disabled) who changed what in the transactions you post. This table isn’t currently visible in the application; it’s not hard to make it visible. However, when we look at what auditing usually means, it is that you’re able to completely demonstrate everything that happened to your books while compiling your accounting data. That is: you can show that the invoices sent to your customers are the same as shown in the system. Also, auditors want to see completeness: that you’ve recorded all invoices sent out in the books and that all work performed has been invoiced.
For completeness, we have ”gap-less numbering” for invoices. That means the system generates invoices with numbers that are always exactly 1 apart. so when a number misses, you know the books have been tampered with.
There’s another thing with LedgerSMB that helps auditability: transactions can’t be deleted or changed once they have been posted. Some people hate that: they find mistakes and it’s a lot of work to correct those. Also, large vendors like Quickbooks, Sage and Xero allow changing transactions after they are recorded in the books (but they have a special ”auditor mode’ which shows the old versions of the same transaction).
@@@ Needs Editing
Chapter 30 Contingency planning
30.1 Backup and restore
30.1.1 Backup using setup.pl
30.1.2 Backup using PostgreSQL administration tools
30.1.3 Restore
30.2 Advanced PostgreSQL: replication
Chapter 31 Software updates
31.1 Introduction
This chapter describes patch release updates. Upgrades from older versions (e.g. 1.1 or 1.2) are covered in Appendix C starting at page C. The same is true for upgrades from SQL Ledger 2.6 or 2.8.
The remainder of the chapter discusses the steps to be executed. Please note that the instructions below mean a window where the application can’t be used during the entire execution of the procedure.
31.2 Backups
-
•
Backup database roles (authorizations)
-
•
Backup database content (structure and data)
-
•
Backup software and settings files
31.3 Software upgrade
@@@ Untar / use package manager
31.4 Database upgrade
@@@ go to setup.pl and “Rebuild”
Chapter 32 Optional Features
As business requirements change sometimes it may be necessary to add or remove some of the optional features of LedgerSMB. This chapter describes how these optional features work, how to troubleshoot them of things go wrong, and how to enable or disable them.
32.1 PDF and Postscript Documents
LedgerSMB can create PDF and Postscript documents for orders, invoices, and more. This is an optional feature and requires some additional software not included with LedgerSMB, including a LATEX distribution and extensions to Perl’s TemplateToolkit framework.
The PDF and PS invoices are generated using a program called LATEX which handles the layout and typesetting. The actual LATEX files are creating using Template Toolkit with extensions for LATEX. These extensions are in the Template::Latex package available from CPAN. The software then generates a LATEX file which is then processed to create a PDF or PS.
Typically the first thing to do is to install a LATEX distribution like TexLive (distributed with many Linux distributions and available for OSX and Windows). This provides LATEX and many of the modules needed. In general I recommend that if your distro has a texlive-extras package that you install this too.
After this is installed, you must then install Template::Latex. This can be done by typing on the command line:
# cpan Template::Latex
This will also install a number of dependencies including LaTeX::Driver, which will need to know where your LaTeX binaries are. It is usually pretty good at finding them.
If things go wrong and you can’t get it to work, the following commands may provide useful diagnostic information when requesting help:
From the LedgerSMB application directory: $ perl -MLedgerSMB::Template::Latex -e print
From the doc/manual directory in the LedgerSMB application directory: # pdflatex LedgerSMB-manual
32.2 Attaching Uploaded Files to PDF Invoices
32.3 OpenDocument Spreadsheet Output
32.4 Microsoft Excel Output
Part V Business processes
Chapter 33 Overview
This part of the document describes how LedgerSMB handles specific business processes. For example, Order Entry, Shipping, etc.
Some of these processes may not apply to your specific use of the software and can be ignored.
Chapter 34 Customers and vendors
34.1 Introduction
When creating a customer or vendor in LedgerSMB, you have to first create a contact. This contact can be created as either a company or person. However, this contact can’t itself be used directly as a vendor or customer. Instead, you have to create a “credit account” which is linked to the contact. A “credit account” can have the role of vendor, customer or both.
LedgerSMB works equally well using a person as a vendor, customer, or both.
A contact can have multiple customer and/or vendor type accounts. Each account has its own language settings, shipping address, contact data and payment conditions. Basically, you will create multiple accounts when you have to record different data for any of the items listed above.
Note that at least as of LedgerSMB 1.9, a contact can only be linked to one bank account. This means that if your contact as a vendor has separate bank accounts from your contact as a customer, you will need to set them up as different contacts.
34.2 Creating customers and vendors
The typical procedure to create customers and vendors works exactly alike:
-
1.
Create the contact as a company
-
2.
Create credit accounts
-
3.
Attach addresses, contact info and notes to the accounts
34.2.1 Creating a Company
To create a company navigate to Main Menu Contacts Add Contact Company Tab.
The company tab has the following fields:
- Control code
-
Code to uniquely identify this entity. This is usually generated by clicking on Generate Control Code button. It is also generated automatically when clicking the Save button.
- Class
- Name
-
Legal name of the company. Required.
- Country
-
Country of incorporation. Required, but defaults to a known value so it needs to be checked.
- Tax number/SSN
-
Tax (VAT/Sales tax) number of the company.
- Sales Tax ID
-
The sales tax reporting number.
- License Number
-
The company operating license number.
The Generate Control Code button generates a new control code upon user request when the user is entering a company which isn’t yet known in the system in any other role.
The Save button creates the account.
34.2.2 Creating a customer account
When a contact of class “Customer” or “Vendor” has been created, accounts of that type can be added. The account entry screen lists the following fields11 1 To simplify the interface if they’re unused, some fields are not shown in case their selection lists are empty:
- Class
- Number
-
Number to identify this account among all other accounts in the company; when left empty, the system will generate one when you click “Save New”
- Description
-
Textual representation of the account, usually a name
- Pay To
-
@@@TODO
- Starting Date
-
Date from which the account is valid
- End date
-
Date until which the account is valid, or empty if there’s no known end date
- Threshold
-
Minimum amount for invoices to be sent out
- Credit limit
- Payment Terms
-
Number of days within which invoices have to be paid
- Discount (conditions)
-
Percentage discount the account is entitled to when payment is within the given number of days
- Discount (account)
-
Account used to post discounts as calculated based on discount conditions
- AR
-
For customers, the Receivables G/L Account used to post created sales invoices on
- AP
-
For vendors the Payables G/L Account used as default to post received purchase order invoices on
- Payment
-
Which bank account to use when receiving or paying funds
- Currency
-
The default currency to be used with the customer or vendor
- Language
-
The language parameter is used to select templates for communication with the customer
- Taxes
34.2.3 Creating a vendor account
34.3 Multiple customers within one company
34.4 Creating vendors from customers
34.5 Maintaining contact information
Chapter 35 Quotations from Vendors and for Customers
35.1 Creating Quotations and RFQs
Remark Note that the RFQ entry screen contains prices; this is misleading at least: the printed output to be sent to the vendor does not. The fact that this screen allows entry of prices could be considered a bug.
The listing below describes the meaning of the per RFQ fields presented in the screen.
- Vendor (Customer)
-
Name of the company the quotation is requested from (issued to)
- Currency
-
Currency for the intended transaction
- Shipping point
-
Address to ship to ???
- Ship via
-
Shipping method ???
- RFQ number
-
The number of the document (automatically generated when left empty)
- Quotation date
-
Date the document is issued
- Required by
-
Date of the intended delivery of the goods and services requested ???
- Notes
-
Notes to be included on the printed RFQ document sent to the vendor
- Internal notes
-
Notes to be kept internal to the company - not disclosed through the RFQ document
The following per item fields are listed.
- Item
-
Order number of the item
- Number
-
Part number of the item to be ordered
- Description
-
Description or name of the item to be ordered
- Qty
-
The number of items to be ordered
- Unit
-
The unit in which the quantity is measured; e.g. ’each’ or ’6pack’
- OH
-
Number of items currently on hand (i.e. in stock)
- Price
-
Item price
- %
-
Discount percentage rate
- Extended
-
Item price after discount
- TaxForm
- SKU
-
Stocking unit - code used to track stock
- Required by
-
Required date of delivery; can be used to specify a different date than the date in the header
- Remarks
-
Item specific remarks
- Group
-
(Not shown in the screen shot) Part group for the item
Note that the quotation entry screen offers a number of extra buttons after the data has been saved.
35.2 Expediting quotations
35.2.1 Printing
35.2.2 Sending by e-mail
35.3 Attaching files to quotations
Chapter 36 Sales and vendor orders
In this chapter the options for creating orders will be discussed. After successful order creation, there are two possible next steps. The first applies to cases where actual goods have to be handled and goes through shipping and receiving as discussed in Chapter 37 starting at page 37. The other skips handling of goods and directly proceeds to invoicing in Chapter 38 starting at page 38.
36.1 Creating new orders
36.2 Creating orders from quotations
36.3 Creating orders from projects
@@@ What about from time sheets??
36.4 Creating purchase orders from sales orders
36.5 Combining orders
36.6 Recurring orders
36.7 Incomplete orders
Orders fully shipped and invoiced are automatically closed. However, this isn’t always an option.
In case an order ends up being partially shipped and parties agree not to ship the remaining items in the order, the order stays open and incomplete. In situations like these, the order needs to be marked “Closed” in the order entry screen. A note stating why the order was manually closed can be put in the “Internal Notes” input box. Clicking the “Save” button stores the changes in the application database.
Chapter 37 Inventory management
37.1 Shipping
37.1.1 Pick lists
@@ Order picking is the work(flow), not the picklist!
37.1.2 Packing list
@@ Order packing is the work(flow), not the packlist!
37.2 Receiving
@@@TODO the role of shipping points in receipts??
Reception of goods into inventory assumes having at least one saved and incomplete purchase order such as shown in Figure 37.1 on page 37.1 stored in the system.
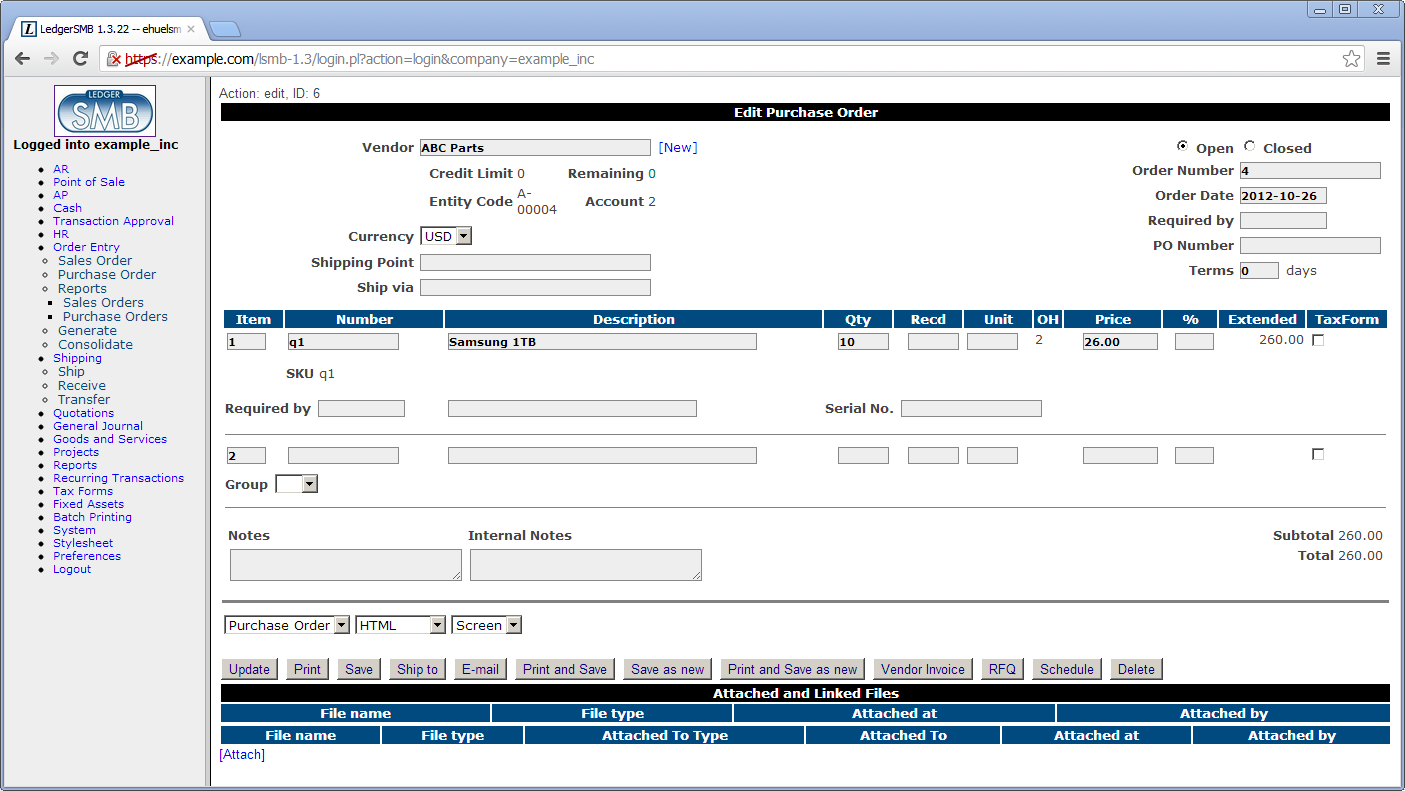
The reception process starts by going through the menu to the “Receive” order lookup screen (Shipping Receive). This will show the order search screen which will help finding any orders which have items available for reception, see Figure 37.2 on page 37.2.
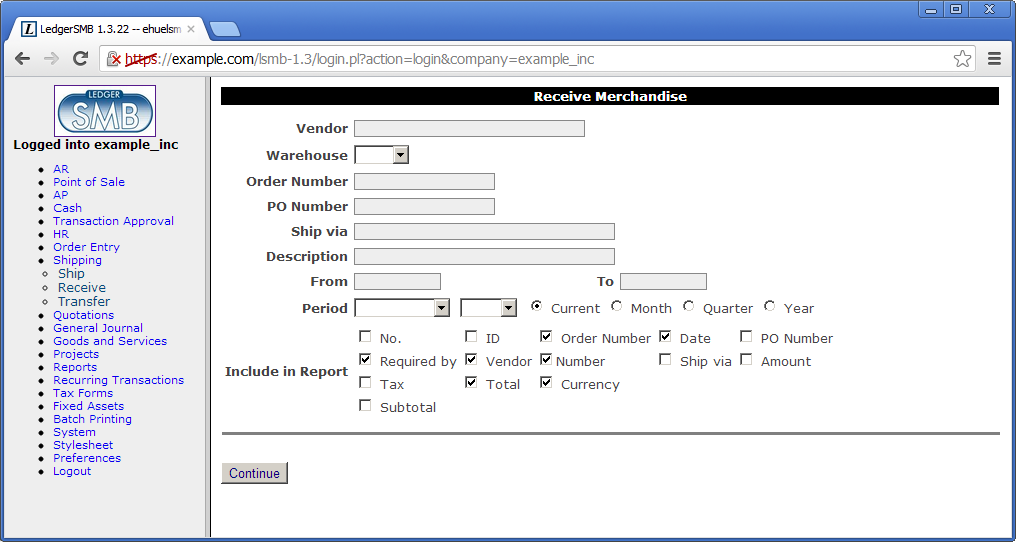
After filling order selection criteria and hitting the “Continue” button (or doing so immediately to see all orders with outstanding items in the system), the system will return a listing of orders with matching the selection criteria as in Figure 37.3 on page 37.3.
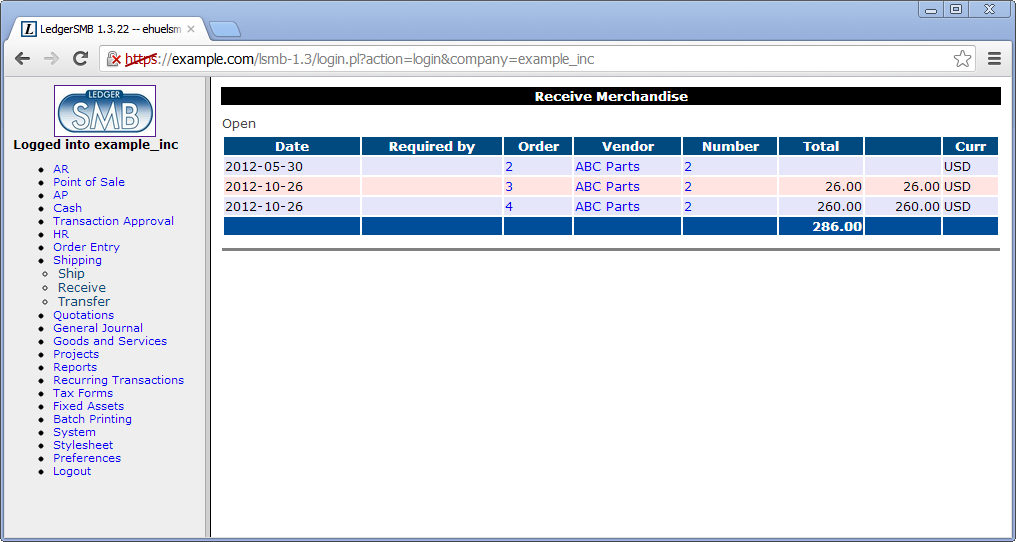
Upon selection of one of the orders by clicking the order number the next screen is loaded as shown in Figure 37.4 on page 37.4. In this screen you can enter the amounts received in the current lot. The entered data is to be confirmed with the “Done” button. After confirmation of the receipt screen, items will be added to inventory.
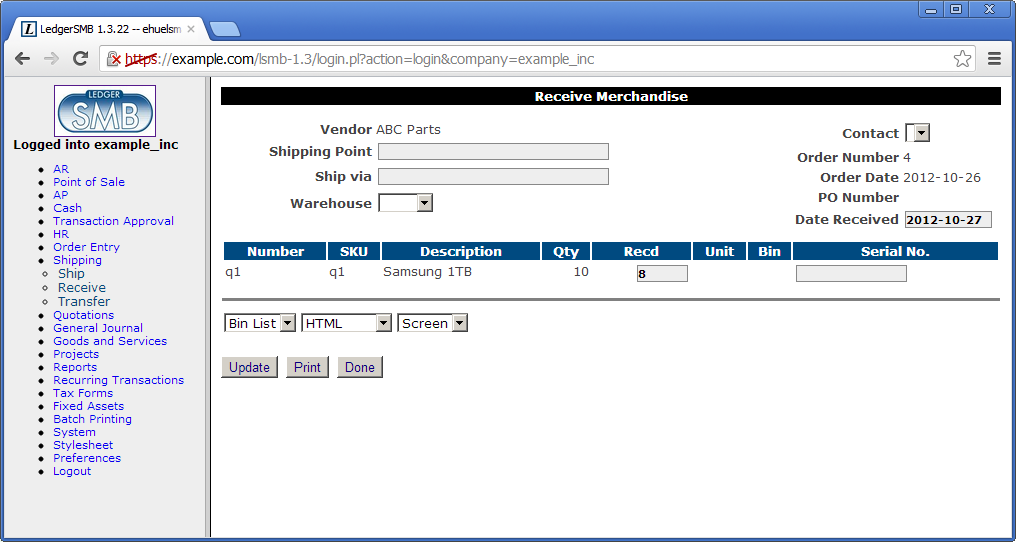
LedgerSMB supports warehouse management on the Receipt screen by offering the ability to print a “Bin List”. This list contains the bin (storage) locations configured for each part.
37.3 Partial shipments or receipts
Both shipping and receiving support partial shipments and per-lot invoicing. If the vendor ships multiple lots to a single order (and charges a single invoice), you can simply call up the order and enter items into inventory on the same order. The outstanding items are automatically decremented by the amounts entered before.
37.4 Handling returns
37.5 Transferring between warehouses
37.6 Inventory reporting
37.6.1 Inventory status report
37.6.2 Inventory activity report
Chapter 38 Sales and vendor invoice handling
Invoices can come from multiple sources. When the quotation and order management functionalities in LedgerSMB aren’t used, they will usually be entered manually. This work flow is covered in Section 38.2. When order management is being used they mostly originate from orders which is covered in Section 38.1.
38.1 Creating invoices from orders
38.2 Creating new invoices
When a business decides not to use the order management as per the previous chapter it may find itself in need to manually enter invoices. But even if it does use order management, it may be necessary to enter an invoice directly.
When creating a transaction to record that the company owes another entity (a vendor invoice) or that it has outstanding receivables, LedgerSMB offers two options:
-
1.
Invoices
-
2.
Transactions
Transactions have very limited functionality: they allow a user to enter a debt owed or owned into the AR and AP subsystems. They also require the user to think how the other side of the transaction should be registered; i.e. which cost account the AP transaction should be posted against, or which income account the AR transaction should be posted against. If there are sales taxes applicable, the user is required to manually calculate and enter them.
Invoices offer a much more clever set of functionalities. First of all, it allows the user to create a document to be sent to the vendor or customer. Second, invoices take advantage of parts and services to automate calculation of sales taxes. Third, invoices update inventory for items held in stock (parts, assemblies). Transactions offer none of this.
38.2.1 Invoices
As mentioned in the previous paragraph, invoices can perform automatic sales tax calculations, maintain inventory and post income (or expense) to the correct GL accounts.
38.2.2 Transactions
Transactions serve an important purpose not handled by invoices: payroll calculations are often too difficult to fit in the simple “amount times price” model offered by invoices. In order to still be able to track which “vendor” was paid which amount such payment obligations can be recorded in the AP subsystem with a transaction.
Likewise it’s often more hassle than it’s worth to create the parts and services required to correctly calculate the utility bill. In such cases the transaction (possibly with a linked document as supporting evidence) offers good per-vendor traceable history records.
38.2.3 Email Invoices
Posted invoices can be emailed from the Edit or Add Sales Invoice screens.
When emailing an invoice , the ’from’ email address will only auto fill when the email address is set in System Defaults Default Email From.
The ’to’ email address will only auto fill if a billing email address is set in the customer. Select the company. Then go to Contact Info tab. Set ’Attach to’ to ’Credit Account’ and ’Type’ to ’Billing Email’, add the email address, then click ’Save Contact’.
38.3 Recurring invoices
38.4 Invalidating invoices
Sometimes, it’s necessary to invalidate an invoice. When an invoice has been posted, this also means derived administrations have been updated, such as inventory for the items on the invoice.
To undo the effects of an invoice, i.e. to reduce the amount outstanding with a customer, use the VOID button on the invoice screen as shown in @@@figref . This creates a new invoice by the same number as the original, except that the new invoice has a suffix -VOID.
38.5 Correcting and deleting invoices
There’s only one way to persist an invoice in LedgerSMB: posting it. This means the invoice becomes part of the accounting information. One of the primary properties of an accounting system is to record full audit trails and help enforce internal controls as detailed in Section 2.2 on page 2.2. Because of that fact there’s no way to delete or edit invoices after they have been posted 11 1 LedgerSMB currently does not support saving an invoice without posting it. This functionality is on the roadmap for addition when the AR/AP functionality is being rewritten - currently 1.5 or 1.6..
The only way to “undo” an invoice is by voiding it. This is important for several reasons:
-
1.
Invoices can’t be deleted (because they’re accounting data)
-
2.
Invoices pose a claim on the assets of a customer
-
3.
@@@ others?
Specifically item 2 is important: when you sent the invoice to your customer, you effectively sent them a claim. When you decide to refrain from pursuing that claim, you should notify them of that fact so they have the documentation to update their accounting system to reflect that fact: they need your documentation to void their vendor invoice, instead of paying it.
For the same reason it’s ill-advised (and no longer supported) to edit invoices: when a customer has multiple invoices, each stating a different amount, all using the same invoice number; how is that customer supposed to document (verifiably) that the claim has been settled satisfactorily by paying the one he did?
See the Remarks section at the end of this chapter for details on how to handle the draft invoice requirement.
38.6 Handling invoice disputes
When an invoice has been sent to a customer it could happen that the customer disagrees with the invoice due to incorrect amounts, discounts, products, etc.
Depending on whether the customer has already paid the invoice there are several options to handle this situation:
@@@ AR Invoices have nothing to do with it! They parallel AR Transactions!!
- Credit invoices
-
The customer has not paid the invoice yet
- Credit notes
-
The customer has paid the invoice and allows offsetting against other (possibly future) invoices
- AR vouchers
-
The customer has paid the invoice and demands repayment
Note that the naming in the listing above applies to AR items but could equally apply to AP items by replacing the word “Credit” by “Debit” and “AR” by “AP”.
38.6.1 Credit and debit invoices
@@@ produce an accounting document to exchange with the customer/vendor
@@@ restock credited parts
@@@ reverse taxes
38.6.2 Credit and debit notes
@@@ generic transaction, not related to orders, inventory or anything else
@@@ amount taken out of an income account, which is to be selected
@@@ i.e. based on the account on which the original income was posted.
38.6.3 AR and AP Vouchers
@@@ like a credit note or debit note, meant to initiate
@@@ a repayment to the customer
@@@ exists as a batch workflow only – to support separation of duties
38.7 Remarks
- Why can’t I send a draft invoice to a customer and edit it to match their expectations?
-
You can’t edit invoices any more in LedgerSMB 1.3 because it breaks the audit trail in financial accounting. But in fact there’s functionality available which is meant exactly for this purpose. It’s called “Sales order” and its details are in Chapter 36 starting at page 36. Sales orders can be converted - upon customer approval - into an invoice with a click of a button.
Chapter 39 Shop sales
39.1 Opening and closing the cash register
39.2 Shop sales invoices
Chapter 40 Manufacturing management
40.1 Producing sales orders
40.1.1 Work orders
@@ section misnomer “Work orders” is not a workflow or workflow step
Chapter 41 Managing accounts receivable and payable
41.1 Creating generic AR/AP items
41.2 Handling refunds, over-payments and advances
- this bit is about credit notes and debit notes
41.3 Handling returns
–¿ this bit is about credit (sales) and debit (vendor) invoices
Chapter 42 Credit risk management
42.1 Introduction
A company runs credit risk when it gives credit: it runs the risk of the creditor not paying off its debts. LedgerSMB features two ways to manage the risks involved:
-
1.
Limit management
-
2.
Arrears management
The former tries to limit the risk involved by making sure no customer receives more credit than a certain limit while the latter tries to make sure any over due payments get cashed.
42.2 Limit management
Limit management should prevent a company on one hand from delivering too much to its customers at once and on the other from taking (and delivering) new orders to customers with too high amount of unpaid invoices.
@@@ Where to set up limits
@@@ How to monitor limits
42.3 Granting payment terms
42.4 Managing arrears
As mentioned before, the process of managing arrears is directed toward detecting arrears positions with customers early and taking appropriate action.
42.4.1 Monitoring AR aging
In order to find out about over due invoices, a company should run the AR aging report available under AR Reports AR Aging. The initial screen presents parameters for the aging report to be generated.
@@@ discuss parameters
This report shows customers and their outstanding invoices categorized as:
- Current
-
Invoices not over due
- 30
-
Invoice amounts over due by 30 days or less
- 60
-
Invoice amounts over due by 60 days or less (but more than 30)
- 90
-
Invoice amounts over due by 90 days or less (but more than 60)
@@@ Printing / mailing aging reports to customers
42.4.2 Tracking invoice history
After an invoice becomes over due a process will be started to remind the customer of the outstanding amount requiring payment.
In order to keep records of actions taken to chase customer payment, the invoice screen has an “Internal Notes” field which can be edited after the invoice has been posted.
In order to save any edits to that field, hit the “Save Info” button.
Note that the “Save Info” button also saves any changes to the “TaxForm” column or rather, any information that’s not accounting information (posted to the books and thereby fixed) nor information which appears on the invoice - which also should remain unedited in order to be able to generate an exact copy at a later date.
42.4.3 Special treatment of invoices
There may be good reasons to treat some over due invoices differently. E.g. in case payment arrangements have been made with the customer and further standard arrears management would not be appropriate any more.
In this case, you can put an invoice “On Hold”. The opposite of being on hold is being active. The AR Aging report allows selection of all invoices, only active invoices (those not on hold) or only invoices on hold.
42.5 Interest on arrears
42.6 Allowance for doubtful accounts
42.7 Writing off bad debt
42.7.1 Direct write-off
42.7.2 Allowed-for write-off
Chapter 43 Receipts and payment processing
43.1 Introduction
Receipt (incoming payments for sales invoices) and payments (outgoing payments for purchase invoices) use the same process. This chapter describes the steps using receipts only for brevity but be equally applied to payments - except when explicitly stated.
43.2 Single receipts or payments
LedgerSMB provides two ways to process receipts (and payments). One for single transactions, the other for batches. The next section discusses the steps to do batch processing.
To record an amount received from a customer as an invoice payment, go through the menus Cash Receipt and fill out the search criteria to find the customer from whom the payment has been received. After clicking “Continue” the application lists all matching customers.
Remark The customers listed may not have open invoices. The list only serves to select the customer the user is looking for. To find customers with outstanding balances, please refer to Section 42.4.1 on page 42.4.1.
After selecting a customer, the cash entry screen as depicted in ¡figure reference¿ is shown. This screen looks the same for single receipts or payments. This screen consists of three parts. The upper block lists customer details on the left and transaction details on the right. The middle block lists any (partially) unpaid invoices. The lower block handles over payments.
Note that the cash transaction amount isn’t being entered explicitly in this screen: the total is shown on the right of last line above the buttons.
The receipt entry screen can be used to register payment of any outstanding invoices. This is the normal scenario. However, if there are no outstanding invoices, or the amount paid is too high, the transaction should be (partially) recorded as over payment. Over payments can be used to pay off invoices at a later date.
@@@ Discuss the single receipt screen
43.3 Batch receipts and payments
43.4 Check payments
43.5 Using over payments
Currently, it is not recommended to use the over payment functionality.
If over payments are used, the ”stored” amounts for later use are not tracked in the normal places. Once over payments have been applied to AR/AP transactions they will be visible, and the totals will show up in balance sheets under the correct asset/liability, but running AR/AP reports for individual vendors/customers will not flag that there are over payments outstanding. The only place to find them is in the specific ”Use [AR] Over payments” screen.
To work around the current limitations use transactions and debit/credit notes as follows.
For AR:
-
1.
Create an AR transaction for the overpaid amount
-
2.
Create a credit note for the same overpaid amount
-
3.
Receive the extra payment with the AR transaction, and the credit note shows up on the payment screen where you can apply it to another invoice
For AP:
-
1.
Create an AP transaction for the overpaid amount
-
2.
Create a debit note for the same overpaid amount
-
3.
Receive the extra payment with the AP transaction, and the debit note shows up on the receipt screen where you can apply it to another invoice
43.6 Receipt and payment reversal
43.7 Over payment reversal
Currently, it is not recommended to use the over payment functionality.
Reversal of over payments is a weak spot in LedgerSMB 1.3: there’s no way to reverse or “undo” an over payment incorrectly entered. By consequence this section describes the workaround that’s required to achieve the same effect.
This workaround needs an account which can be used to temporarily book income on.
Please note that the income will immediately be reversed, so technically any account can be used. To be able to assert that the entire process has been executed correctly, it’s advisable to create a separate account, however, since it can be checked to be zero at the end.
With the prerequisites in place, you should execute the following steps - assuming the amount of the over payment needs to be placed back into a cash account.
-
1.
Create an AR transaction for the company the over payment has been entered on
-
2.
Add a single line to the transaction, with the selected account
-
3.
Put the over payment amount to be canceled out in the Amount field for the line
-
4.
Save and post the transaction
-
5.
Pay the transaction from the over payment
-
6.
Create a “General Journal” transaction debiting the income account and crediting the cash account the over payment was entered from
Steps 1 trough 4 prepare the Accounts Receivable module with a transaction which allows the over payment to be used. After step 5, the over payment has been cleared, but the amount is in the wrong place, since it sits in the income account instead of the cash account, which is what step 6 corrects.
The side-effect from this workaround is an AR transaction registered against a customer which can’t be reversed: doing so, would result in the reversed amount ending up in the AR summary account. Using a dummy company isn’t an option, because over payments are registered to a specific customer. An over payment can only be used to clear open items on that specific customer.
Note that the above procedure applies to an AR over payment. However, the same steps apply to AP over payments, replacing “customer” with “vendor”, “AR” with “AP”, “Income” with “Expense” and “debit” with “credit”.
43.8 Receipts and payments in foreign currencies
Chapter 44 Accounting
44.1 Separation of duties: Transaction approval
44.2 Entering non sales transactions
44.2.1 Corrections
44.2.2 Transfer of money between bank accounts
44.2.3 Wages
44.2.4 Entering other general accounting documents
Even though the application handles many general ledger postings as consequences from work flows elsewhere in the system - thus not requiring separate postings - sometimes the need may occur to create manual postings not resulting from AR or AP transactions or till and inventory adjustments.
One example of a case like that is the calculation, and posting of corporate taxes presumably at the end of each accounting period but at least at the end of the book year.
44.3 Bank reconciliation
44.3.1 Importing bank transactions - OFX
@@@ TODO - Quick capture of chat info, needs to be revised and maybe moved to customization chapter.
44.3.2 Importing bank transactions - CAMT.053
@@@ TODO - Quick capture of chat info, needs to be revised and maybe moved to customization chapter.
44.3.3 Importing bank transactions - CSV
Cash Reconciliation
@@@ TODO - Quick capture of chat info, needs to be revised and maybe moved to customization chapter.
Custom formats can be handled by creating an import file like https://github.com/ledgersmb/LedgerSMB/blob/master/doc/reconciliation/recon_csv.pl
The file should reside in LedgerSMB/Reconciliation/CSV/Formats/
A perl sub must exist which is named:
parse_<name-of-your-company-database>_<id-of-account-to-reconcile>
With a company database name of testdb and an account id of 255 the parse code might look like the following:
sub parse_testdb_255 {
    parse_n(@_);
}
default format is:
cleared_date,amount,scn,type
2021-09-01,25.25,224435,CHECK
2021-09-01,-30.31,44351,CHECK
2021-09-02,100,,
2021-09-02,-425,3321435,
scn = Source Coding Number
44.4 Period closing
Period closing is a concept used by accountants to ensure that audited and known-correct accounting data stays correct by “freezing” it: by closing an accounting period no modifications can be made to the accounting data before a certain date.
LedgerSMB supports this concept through the System Audit Control menu, where you’ll find the “Close Books up to” item. By filling out a date in the input field and hitting Continue posting to dates before the entered date will be disallowed.
Note that due to a design limitation in LedgerSMB 1.3 - to be lifted with the general AR/AP redesign - invoices in foreign currencies can’t be reversed on other dates than their original posting date. That is: they can, but their reversal will result in P&L and balance sheet effects which presumably isn’t desirable. Since period closing disables posting before a certain date this functionality may have negative side effects in some set ups.
Also note that this pertains exclusively to invoices and transactions in foreign currencies and has no effect in case of invoices and transactions in the default currency.
44.5 Year-end processing
Year end closing is a concept which prepares the accounting books for the next accounting year. Note that this is unrelated to the calendar year but to the accounting year of the company instead. To muddy the waters even more: there’s no inherent requirement for this process to be run at least once a year. If the first book year of the company spans more than a year, then this procedure will be run more than a year after starting up the company.
This procedure freezes the accounting data in the year to be closed as described in the previous section. Additionally it clears out the profit and loss accounts: setting all the account balances to zero by posting their balance to the retained earnings account. Some businesses prefer to create a retained earnings account for each book year they close. LedgerSMB supports that use-case by allowing the user to select which retained earnings account the balance should be posted to.
Some companies want may to include additional transactions related to dividend payment regarding the current year: reduce the equity by the amount paid as dividends in transactions marked as “year-end transaction”. Support for this use case isn’t available in LedgerSMB 1.3.
44.6 Fixed asset accounting
44.7 Reporting
44.7.1 Tax reporting
-
•
1099 (cash based)
-
•
EU VAT (accrual based)
44.7.2 Tax reporting using tax forms
Collecting taxes in tax forms
Linking companies to tax forms
Running tax form reports
44.7.3 Income statement
44.7.4 Balance sheet
44.7.5 Trial balance
Part VI General Operation
Chapter 45 User Interface
Description of the general operation of LedgerSMB that appears across multiple views in the application and that are not described elsewhere.
45.1 Reports
At the bottom of most report views there is a ’[permalink]’. The idea of a permalink is that you get a link which you can share with your colleagues and when inserted into the browser, returns exactly the same report (or at least a search with exactly the same parameters as you used). To copy a permalink the user can right-click and select ”Copy link” from the drop down menu and pass it to a colleague by pasting into an email or other messaging App.
Part VII Customization
Chapter 46 Batch data import methods
LedgerSMB 1.3 doesn’t have batch data imports built in out of the box, except for bank statement imports for reconciliation purposes. This chapter starts to explain how to use the one import that is supported out of the box. It then goes on to highlight some often-used customizations: It is quite easy to customize a LedgerSMB 1.3 instance using the LedgerSMB 1.4-built-in data import routines to create a variety of file-upload based data imports.
46.1 Custom bank statement import
46.2 Data imports back port from 1.4
46.2.1 Chart of Accounts import
This function allows bulk import of an entire chart of accounts using a single Comma Separated Values (CSV) file.
The first line of the file contains the headers of the columns. The import routine expects the columns as presented in (table name).
- accno
-
Number of the account or header
- desc
-
Description for the account or header
- charttype
-
“H” for heading record
“A” for account record - category
-
“I” for Income
“E” for Expense
“A” for Asset
“L” for Liability - contra
- tax
-
“0” not a tax account
“1” is a tax account. - link
- heading
-
Id of the heading to group the account (or heading) under
- gifi
-
GIFI account number
All lines after the first one are considered to be data lines.
Chapter 47 Add-ons and plug-ins
Chapter 48 Company creation
48.1 Template sets
Part VIII Workflows
Chapter 49 Overview
Workflows control certain LedgerSMB internal processes and can be created and edited by technical staff using the XML files in the directory LedgerSMB/workflows.
@@@TODO Need more info.
Part IX Appendices
Appendix A Differences between version 1.2 and 1.3
A.1 Users
The way users are defined and used differs greatly between LedgerSMB 1.3 and older versions. In version 1.3 user access to the database is enforced by the database itself. This means that users logging in to the LedgerSMB web application are in reality logging into the PostgreSQL database. In older versions, the web app would verify the user’s credentials (using a common database connection used for all users).
The difference between these approaches is that security is no longer (solely) maintained by the web application - with all inherent risks. Instead, the database now plays an important role as well. The effect is that the LedgerSMB team now leverages the experience of the PostgreSQL community - a highly respected community well known for its security focus - to make sure your data stays secure.
This structure also enables LedgerSMB 1.3 to offer separation of duties and authorizations throughout the application without being required to do a full rewrite of the application.
It’s this shift in paradigm that makes it impossible to meaningfully migrate users from older LedgerSMB and SQL-Ledger versions to LedgerSMB 1.3.
Appendix B Why deleting invoices is not supported
B.1 Invoices are debt claims
B.2 Cost Of Goods Sold become ambiguous
From a mail by Chris Travers on the LedgerSMB mailing list:
Suppose I buy 10 widgets for $1 each and then 1 more widget for $10 each. My FIFO cost queue looks like this:
$1 $1 $1 $1 $1 $1 $1 $1 $1 $1 $10
My inventory account shows $20 in debits and I have credited my AP account to compensate.
I then sell the 11 parts to 11 different people.
The first 10 invoice show a $1 credit against inventory and a $1 debit against COGS
The 11th invoice shows a $10 credit against inventory and a $10 credit against COGS
and now inventory is down to 0.
Now the 5th customer invoice turns out to be in error. We never shipped this one. The customer never ordered it. it was a data entry error. Translation, we now have one in stock.
If we void the invoice properly, we will reverse the last sale, and put $10 back in inventory.
If we delete the invoice, we will just remove the $1 removed. But we don’t really know which one was sold and so we de-allocate the $10 sale.
So now our books are $9 off of what they should be. They show a balance of $1 in inventory, and $19 in cogs. They should show $10 in each. The worse is still to come however.
Now we sell the item we had in stock. This brings our (empty!) inventory value to -$9 and our COGS value to $29. Our books are still $9 off and we now have impossible, nonsensical values. Delete and re-enter a few more invoices and you can inflate the COGS as far as you’d like. This doesn’t work.
Worse, this can’t be fixed. You can’t make a deletion behave just like a reversal and still keep your books transparent auditability-wise. Even if it could be fixed mathematically (which it can’t), there isn’t any agreement as to what the proper behavior should be (except ’don’t do that’). So it isn’t possible to support the workflow ”properly” because ”properly” can’t be defined.
So unless someone can show that the above issues are incorrect, I don’t see how we can support deleting invoices after they are posted to the books.
The alternative is the draft/voucher system which is supported in 1.3 for all non-inventory transactions and will be supported for inventory transactions in 1.4. In this system, in the paper world, the clerk fills out a piece of paper with the information that will be entered as an invoice, and this is eventually gets entered and checked by someone else. Both papers are kept in paper systems for reconciliation purposes but typically we tend to assume they are the same (this may be changing and we may be keeping both copies if they are changed in the future). In this model, the voucher is not an invoice. It is simply a piece of paper that represents what will be on the invoice. It is subject to review, and may ultimately be denied.
So in this system we do *not* calculate extrinsic financial movements for documents until they post. This includes COGS. If a draft invoice or invoice voucher is deleted before it is approved it has none of the problems above. Once approved though, it is a part of the permanent record. This guards against data entry errors because a second person can review the data before it is posted (either in bulk or individually). Additionally this guards against theft by ensuring that a single individual cannot individually enter everything necessary to cover for theft, etc.
Appendix C Migration
C.1 Introduction
There are plenty of reasons to want to migrate to LedgerSMB 1.3:
-
1.
Separation of duties
-
2.
Security better integrated into the application
-
3.
Better, more strict data model
-
4.
Some important sources of user error eliminated
-
5.
Better workflows for cash reconciliation
-
6.
@@@ others?
Yet, while item 3 is a good reason to want to switch, it’s also a reason why migration from older versions to 1.3 can be harder than earlier migrations: when the data in your older version is not consistent, it won’t fit into the new data model and will need to be fixed first.
Especially if your database has a very long line of history, being migrated trough lots of SQL-Ledger and LedgerSMB versions, you may want to consider asking for help from a professional party. It could save you a lot of time.
However, don’t be discouraged and have a go yourself first. Just be sure to run your upgrade on a backup database: the migration process is non-destructive, but in case accounting data is involved: better safe than sorry!
Also it is worth noting that a number of automatic checks are performed on your data prior to migration, and to the extent possible, you are given an opportunity to fix those issues identified. Because these checks are pre-migration checks, they are written to your old data and will persist after backing out of a migration to 1.3.
C.2 From older LedgerSMB versions
C.3 From SQL-Ledger 2.8
C.4 From older SQL-Ledger versions
C.5 From other accounting packages
C.5.1 Overview
While accounting and ERP solution have wildly differing structures to record their data, this sections uses data with a relatively simple structure as a show case of how this problem may be dealt with.
Note that the encoding you use to transfer to the database depends on the settings used to create the PostgreSQL database with. A migration is a good moment to think about encodings an solve older encoding issues. Now would be a good moment to anticipate the requirement for accented characters and non-western alphabets: set up a UTF-8 encoded database and recode your data accordingly.
C.5.2 Migrating customers
The source system for this section uses a structure where every company has one contact person, one address, one phone number and e-mail.
In order to understand how to migrate this data structure to LedgerSMB, it’s important to understand that:
-
1.
The company from the source maps to the Company and Entity entities
-
2.
The contact person maps to the Entity Credit Account entity
-
3.
The address maps to the Location entity - and requires a location class: Sales, Billing or Shipping
-
4.
The phone number, fax number and e-mail map to Contact items
The reason behind the separation between the Company and Entity entities is that every customer is an Entity, but not all entities are companies, since some entities are Persons - natural persons.
@@@ How to
C.5.3 Migrating parts, services, …
C.5.4 Migrating the balance
The strategy that I used when migrating to LedgerSMB is the following:
-
•
create customers and vendors as needed
-
•
create at least the parts and services for which there are open AR or AP items in the closing balance
-
•
create the open AR/AP items in the closing balance by posting them on the original opening date (this allows you to do your aging management in LSMB from day 1)
-
•
create in addition the parts for which you have stock in the closing balance
-
•
import your stock by posting invoices against the inventory entity
-
•
make sure you ”pay” the invoices - e.g. by paying them from equity
-
•
draw up the incomplete balance you have so far
-
•
calculate the delta of the partially imported balance against the closing balance
-
•
import the delta balance on top of what you already had to make a full balance
What I did is post the transaction from the last step on the day before I wanted to start my books; say you want to start your books on 2014-01-01, then you’d post it on 2013-12-31. That way, the opening balance of your books on the starting date is exactly what you had on the closing balance of the books you left behind.
Migrating open AR and AP items
Migrating your ledger
C.6 Migrating between PostgreSQL versions
If you’re migrating between PostgreSQL versions, there are a few things to take into account.
Notes on migration from 8.3 (or earlier) to 8.4 (or later)
LedgerSMB 1.3 uses some extension modules for versions 8.3 and before for functionality that has been built into 8.4 and later. To make use of the (faster) built in version of that functionality, the following restore procedure should be used.
-
1.
Migrate the database to the new function as described in section @@@ TODO
-
2.
If you’re using 9.1 and up, issue the command “CREATE EXTENSION tablefunc FROM UNPACKAGED” from a psql prompt when connected to the company database
-
3.
Run ’setup.pl’ from your browser to upgrade the database’s routines; this command will install routines optimized for your version of PostgreSQL
-
4.
Run the command
- 8.4 or 9.0
-
$ psql … -f uninstall_tablefunc.sql
- 9.1 and up
-
“DROP EXTENSION tablefunc;” from a psql session connected to the company database
to clean up functions and procedures in the database which are no longer used
Appendix D Listing of application roles
Application roles specify the right (privilege) to execute one or more tasks in the application. LedgerSMB enforces these roles by allowing a user to select (list, read) data from or to insert (create), update (edit) or delete (delete) data in the tables holding the data related to the execution of these tasks.
These roles definitions are generated directly from a running database using gather-db-info.pl.
Auto generated using LedgerSMB version 1.12.0-dev on November 21, 16:06:05 2023 CST.
- account_all
-
This role combines all General Ledger (GL) account and GIFI code rights.
- account_create
-
This role allows creation of new GL accounts.
- account_delete
- account_edit
-
This role allows modification of GL accounts.
- account_link_description_create
-
This role allows creating new use-cases for GL accounts (so called ”account link descriptions”).
- ap_all
-
This role combines all (batches of) purchase transaction and invoices permissions.
- ap_invoice_create
-
This role allows creation of new purchase invoices (not purchase transactions).
- ap_invoice_create_voucher
-
This role allows creation of batches of new purchase invoices (not purchase transactions).
- ap_transaction_all
-
This role allows creating and viewing purchase transactions and accounts as well as creating attachments.
- ap_transaction_create
-
This role allows creation of purchase transactions (not invoices).
- ap_transaction_create_voucher
-
This role allows creation of batches of new purchase transactions (not invoices).
- ap_transaction_list
-
This role allows viewing of purchase transactions and invoices.
- ap_voucher_all
-
This role allows creation of batches of both purchase transactions and invoices.
- ar_all
-
This role combines all (batches of) sales transaction and invoices permissions.
- ar_invoice_create
-
This role allows creation of new sales invoices (not sales transactions).
- ar_invoice_create_voucher
-
This role allows creation of batches of new sales invoices (not sales transactions).
- ar_transaction_all
-
This role allows creating and viewing sales transactions and accounts as well as creating attachments.
- ar_transaction_create
-
This role allows creation of new sales transactions (not nvoices).
- ar_transaction_create_voucher
-
This role allows creation of batches of new sales transactions (not invoices).
- ar_transaction_list
-
This role allows viewing of sales transactions and invoices.
- ar_voucher_all
-
This role allows creation of batches of both sales transactions and invoices.
- assembly_stock
-
This role allows triggering a stocking action on assemblies.
Stocking assemblies means converting labor and parts to stocked assemblies.
- assets_administer
-
This role combines all assets rights.
- assets_approve
-
This role allows approving the output of the depreciation procedure.
- assets_depreciate
-
This role allows running the asset depreciation procedure.
- assets_enter
-
This role allows creation of new assets.
- audit_trail_maintenance
-
This role grants delete access to the audit trail table.
- auditor
-
This role grants read access to the audit trail table.
- base_user
-
Users need to be given this role in order to be granted access to the database schema which holds all LedgerSMB objects.
This role only allows access to menu items Preferences, Logout, and New Window. The user basically cannot do anything without added additional roles.
- batch_create
-
This role allows creation of new batches and vouchers.
- batch_list
-
This role allows listing existing batches.
- batch_post
-
This role allows posting batches of e.g. transactions, payments and invoices.
- budget_approve
-
This role allows searching, viewing and approving of budgets.
- budget_enter
-
This role allows creation and updating of budgets.
- budget_obsolete
-
This role allows searching and viewing budgets as well as marking them obsolete (=no longer applicable).
- budget_view
-
This role allows searching and viewing of budgets.
- business_type_all
-
This role combines the create and edit righs for ’type of business’ classes.
- business_type_create
-
This role allows creation of new ’type of business’ classes.
- business_type_edit
-
This role allows modification of ’type of business’ classes.
- business_units_manage
-
This role allows searching, viewing, creation and editing of business (reporting) classes and their members.
- cash_all
-
This role combines the all reconciliation rights with the rights to enter payments and receipts.
- contact_all_rights
-
This role combines all ’contact_class_’ and ’contact_’ roles and grants all access rights to all contact classes.
- contact_class_cold_lead
-
This role allows access to cold sales lead contact data. Combine with ’contact_read’, ’contact_create’, ’contact_edit’ and/or ’contact_delete’ to determine the type of access granted.
- contact_class_contact
-
This role allows access to contact data (e-mail, phone, etc) of all kinds of contacts (customer/vendor/…). Combine with ’contact_read’, ’contact_create’, ’contact_edit’ and/or ’contact_delete’ to determine the type of access granted.
- contact_class_customer
-
This role allows access to customer contact data. Combine with ’contact_read’, ’contact_create’, ’contact_edit’ and/or ’contact_delete’ to determine the type of access granted.
- contact_class_employee
-
This role allows access to employee contact data. Combine with ’contact_read’, ’contact_create’, ’contact_edit’ and/or ’contact_delete’ to determine the type of access granted.
- contact_class_hot_lead
-
This role allows access to hot sales lead contact data. Combine with ’contact_read’, ’contact_create’, ’contact_edit’ and/or ’contact_delete’ to determine the type of access granted.
- contact_class_lead
-
This role allows access to sales lead contact data. Combine with ’contact_read’, ’contact_create’, ’contact_edit’ and/or ’contact_delete’ to determine the type of access granted.
- contact_class_referral
-
This role allows access to referral contact data. Combine with ’contact_read’, ’contact_create’, ’contact_edit’ and/or ’contact_delete’ to determine the type of access granted.
- contact_class_robot
-
This role allows access to robot (automated process, acting on behalf of…) contact data. Combine with ’contact_read’, ’contact_create’, ’contact_edit’ and/or ’contact_delete’ to determine the type of access granted.
- contact_class_sub_contractor
-
This role allows access to subcontractor contact data. Combine with ’contact_read’, ’contact_create’, ’contact_edit’ and/or ’contact_delete’ to determine the type of access granted.
- contact_class_vendor
-
This role allows access to vendor contact data. Combine with ’contact_read’, ’contact_create’, ’contact_edit’ and/or ’contact_delete’ to determine the type of access granted.
- contact_create
-
When paired with one or more ’contact_class_’ role/-s, this role allows creation of new entities, persons and companies (contacts).
Each contact_class_<resource> role, when paired with contact_read, enables this access for the specific <resource>. On it’s own, the contact_create-role does not provide any rights.
- contact_delete
-
When paired with one or more ’contact_class_’ role/-s, this role allows removal of existing entities, persons and companies (contacts).
Note that in order to be able to search for contacts to be deleted, the user needs to be assigned the ’contact_read’ role.
Each contact_class_<resource> role, when paired with contact_read, enables this access for the specific <resource>. On it’s own, the contact_delete-role does not provide any rights.
- contact_edit
-
When paired with one or more ’contact_class_’ role/-s, this role allows editing of existing entities, persons and companies (contacts).
Each contact_class_<resource> role, when paired with contact_read, enables this access for the specific <resource>. On it’s own, the contact_edit-role does not provide any rights.
- contact_read
-
When paired with one or more ’contact_class_’ role/-s, this role allows searching and viewing entities, persons and companies (contacts).
Each contact_class_<resource> role, when paired with contact_read, enables this access for the specific <resource>. On it’s own, the contact_read-role does not provide any rights.
- country_all
-
This role combines all rights for countries.
- country_create
-
This role allows creation of new countries.
- country_edit
-
This role allows modification of countries.
- draft_modify
-
This role allows modification of existing draft (= saved) transactions.
- draft_post
-
This role allows posting of saved transactions to the ledger.
- employees_manage
-
This role allows creation, updating and searching of employees.
- exchangerate_edit
-
This role allows searching, viewing and editing of currencies, exchange rates and exchange rate types.
- file_attach_eca
-
This role allows attaching files to entity credit accounts (customers/vendors).
- file_attach_entity
-
This role allows attaching files to entities (contacts).
- file_attach_order
-
This role allows attaching files to orders and quotes.
- file_attach_part
-
This role allows attaching files to goods and services.
- file_attach_tx
-
This role allows attaching files to transactions and invoices.
- file_read
-
This role allows reading of files attachments and files uploaded through the system menu.
- file_upload
-
This role allows uploading of files through the system menu.
- financial_reports
-
This role allows running of financial reports: Income Statement, Balance Sheet, Trial Balance and Inventory & COGS.
- gifi_create
-
This role allows creation of new GIFI codes.
- gifi_edit
-
This role allows modification of GIFI codes.
- gl_all
- gl_reports
-
This role allows searching transactions in the general ledger.
- gl_transaction_create
-
This role allows creation of new and updating of saved GL transactions.
- gl_voucher_create
-
This role allows creation of batches of GL transactions.
- inventory_adjust
-
This role allows adjusting inventory by creating inventory adjustment reports.
- inventory_all
-
This role grants all rights to manage warehouse configuration, stock receipt, shipping and transfer.
- inventory_approve
-
This role allows confirmation of inventory adjustments by approval of inventory adjustment reports.
- inventory_receive
-
This role allows receiving of parts into stock.
- inventory_reports
-
This role allows searching for and reading existing inventory adjustment reports.
- inventory_ship
-
This role allows shipping of stocked parts.
- inventory_transfer
-
This role allows moving stock between warehouses.
- language_create
-
This role allows creation of new languages.
- language_edit
-
This role allows modification of languages.
- orders_generate
-
This role combines the rights to generate orders from time cards, purchase orders from sales orders and consolidate (purchase and sales) orders.
- orders_manage
-
This role combines all order generation and consolidation rights.
- orders_purchase_consolidate
-
This role allows generating consolidated purchase orders from multiple outstanding purchase orders.
- orders_sales_consolidate
-
This role allows generating consolidated sales orders from multiple outstanding sales orders.
- orders_sales_to_purchase
-
This role allows generating purchase orders from sales orders.
- part_create
-
This role allows creation of new parts.
So as to let the user of this role see/manage pricing per customer, this role includes the ability to read contacts.
- part_delete
-
This role allows deletion of existing parts.
- part_edit
-
This role allows changing existing parts.
- payment_process
-
This role allows entry of payments to vendors.
- pricegroup_create
-
This role allows creation of new price groups.
- pricegroup_edit
-
This role allows changing existing price groups.
- purchase_order_create
-
This role allows creating purchase orders.
- purchase_order_delete
-
This role allows (searching for and) deleting existing purchase orders.
- purchase_order_edit
-
This role allows (searching for and) modifying existing purchase orders.
- purchase_order_list
-
This role allows searching and viewing sales orders.
- receipt_process
-
This role allows entry of receipts from customers.
- reconciliation_all
-
This role combines creation, updating and approval rights for reconciliation reports.
- reconciliation_approve
-
This role allows approval of reconciliation reports.
- reconciliation_enter
-
This role allows creation and updating of reconciliation reports.
- recurring
-
This role allows access to the Recurring Transactions menu; it does not grant rights to list or create transactions.
- rfq_create
-
This role allows creating (purchase) requests for quotation.
- rfq_delete
-
This role allows (searching for and) deleting existing requests for quotation.
- rfq_list
-
This role allows searching and viewing (purchase) requests for quotation.
- sales_order_create
-
This role allows creating sales orders.
- sales_order_delete
-
This role allows (searching for and) deleting existing sales orders.
- sales_order_edit
-
This role allows (searching for and) modifying existing sales orders.
- sales_order_list
-
This role allows searching and viewing sales orders.
- sales_quotation_create
-
This role allows creating sales quotations.
- sales_quotation_delete
-
This role allows (searching for and) deleting existing sales quotations.
- sales_quotation_list
-
This role allows searching and viewing sales quotations.
- sic_all
-
This role combines all rights for Standardized Industry Codes (SIC).
- sic_create
-
This role allows creation of new Standardized Industry Codes (SIC).
- sic_edit
-
This role allows modification of Standardized Industry Codes (SIC).
- system_admin
-
This role combines the rights to manage settings, GL accounts, types of business, SIC, users and tax forms.
- system_settings_change
-
This role allow changing items in the System > Defaults menu.
- system_settings_list
-
This role allows viewing items in the System > Defaults menu.
- tax_form_save
-
This role allows modification of tax forms.
- taxes_set
-
This role allows changing tax rates on tax accounts.
- template_edit
-
This role allows modification of document (e.g. invoice) templates.
- timecard_add
-
This role allows adding time cards for which it needs read access to customers.
- timecard_list
-
This role allows viewing the list of time cards; for which it needs read access to customers.
- timecard_order_generate
-
This role allows generating orders from time cards.
- transaction_template_delete
-
This role allows deletion of template (i.e. unposted) transactions.
- translation_create
-
This role allows creation of translations for parts, parts groups and reporting units.
- users_manage
-
This role allows addition and removal of users to the current company.
- voucher_delete
-
This role allows deletion of vouchers (i.e. groups of e.g. payments).
- warehouse_create
-
This role allows creation of (configuration of) new warehouses.
- warehouse_edit
-
This role allows updating of (configuration of) existing warehouses.
- yearend_reopen
-
This role allows undoing a prior year-end run by reversing the year-end transaction.
- yearend_run
-
This role allows running the year-end process, i.e. clearing the P&L.
Appendix E Deprecated Content
E.1 ledgersmb.conf
The use of ledgersmb.conf is deprecated as of 1 Jan 2023 in favor of ledgersmb.yaml and only remains here for historical reasons.
The environment variable for controlling the configuration is LSMB_CONFIG_FILE.
By default it pointed to /etc/ledgersmb/ledgersmb.conf and can be set to an alternate location.
[main] Section
- language
-
Set language for login and admin pages.
- date_format
-
Set the date format for the admin pages. The default is yyyy-mm-dd. Unset means detected from the browser)
- log_level
-
Specifies the logging level to be used. This setting is ignored when the log_config setting is supplied and indicates an existing file. Available values are OFF, FATAL, ERROR, WARN, INFO, DEBUG, TRACE.
- log_config
-
Set the name of the extended logging configuration file. This file uses the log4j/Log::Log4perl syntax described at https://metacpan.org/pod/Log::Log4perl#Configuration-files
- dojo_theme
-
This is the Dojo theme that is used by default when no other theme has been selected. The default if unset is claro. Other values can be nihilo, soria, and tundra.
- auth
-
Indicates which authentication module is to be used; default is DB, referring to LedgerSMB::Auth::DB.
- cache_templates
-
Determines if HTML templates used for the LedgerSMB UI will be stored in precompiled form for improved performance. The value 0 (zero) means no caching; the value 1 means caching in the directory $(tempdir)/lsmb_templates; systems running multiple LedgerSMB instances with customized UIs should use separate values for tempdir for that reason
[environment] Section
Sets shell environment variables when starting up.
- PATH
-
If the server can’t find applications, append to the path. For example: PATH=/bin:/usr/bin:/usr/local/bin:/usr/local/pgsql/bin
- PERL5LIB
-
On some operating systems like macOS the perl path may need to be set. For example, on macOS using Fink’s Perl libs it might be set like: PERL5LIB=/sw/lib/perl5
[paths] Section
- templates
-
Templates base directory. Typically set to templates.
- images
-
Images base directory. Typically set to UI/images.
- localepath
-
Path to locale files. Defaults to locale/po.
- templates_cache
-
Location where compiled templates are stored. When relative, appended to the directory specified by File::Spec->tmpdir().
Defaults to lsmb_templates.
- workflows
-
Directory where workflow files are stored. Defaults to workflows
- custom_workflows
-
Directory where custom workflow files are stored. Custom workflows are used to override behavior of the default workflows by providing actions, conditions, etc. with the same name and type or by providing workflows of the same type with additional states and actions. Defaults to custom_workflows.
[programs] Section
Setup the various helper programs that can be used with LedgerSMB.
[mail] Section
- smtphost
-
The host name of the smtp server. If provided, then do not use local sendmail. Note that one of sendmail or smtphost has to be provided for email to work.
- sendmail
-
Path the local sendmail executable. If provided then do not use an smtp server. Note that one of sendmail or smtphost has to be provided for email to work.
- smtpport
-
The port number of the smtp server. Note this might vary depending on whether TLS or SSL is used.
- smtpuser
-
The smpt server account name
- smtpauthmech
-
The smtp server authentication method
- smtppass
-
The smtp server password
- backup_email_from
-
Set to enable e-mail delivery of backups. For example: backup_email_from = backups@lsmb_hosting.com
- smtptimeout
-
The timeout value in seconds.
- smtptls
-
If unset or ’no’ then do not use either TLS or SSL. If ’yes’ then use TLS and if ’tls’ use SSL for the smtp connection.
- smtpsender_hostname
-
Override the default host name for helo.
[printers] Section
This section contains a list of printers and the commands to be executed in order for the output to be sent to the given printer with the document to be printed fed to the program through standard input.
The example below shows how to send standard input data to a printer called “laser” when selecting the item “Laser” in the LedgerSMB printer selection drop down.
Laser = lpr -Plaser
Or to an Epson Printer.
Epson = lpr -PEpson
[database] Section
- host
-
Name of the host to connect to. See the documentation of the -h command line option at https://www.postgresql.org/docs/current/static/app-psql.html for more information (documentation unchanged since before 8.3, so applies to older versions as well)
- port
-
Port number to be used to connect to. See the documentation of the -p option at the same URL as the previous item
- default_db
-
Database to connect to when the “Company” entry field in the login screen is left blank
- db_namespace
-
The name space the company resides in; expert setting – should not be used (default is “public”)
- sslmode
-
Selects whether to use Secure Sockets Layer (SSL) over TCP connections or not; can be “require”, “allow”, “prefer” or “disable”. Default is “prefer”.
Appendix F Open source explained
F.1 An open source application
F.2 An open source book
Appendix G Project history
The project started out as a fork of SQL-Ledger (SL)- the open source ERP system developed by Dieter Simader - somewhere between SQL-Ledger versions 2.6 and 2.8. A fork happens when a group of developers can’t - for whatever reason - continue to work as one group on a project. At that time, the project splits into two or more projects and the fork is in effect.
LedgerSMB split off from the SQL-Ledger project (i.e. forked) because there was disagreement between developers about how to go forward both with respect to handling of security vulnerability reports as well as the general state of the code base.
After the fork, between versions 1.0 and 1.2 most energy was spent on making LedgerSMB more secure (i.e. less vulnerable to security attacks). In technical terms, measures were taken to fend off (amongst other things):
-
•
Cross site scripting attacks
-
•
Replay attacks
-
•
SQL injection attacks
Come version 1.3 the development directed toward improvement of the overall quality of the code base as the old SL code was in very poor state: looking very much like web programs as they were written in 1998, the code had grown largely outdated in style and was no longer maintainable by 2007.
The 1.3 effort focused on bringing relief with a new application structure. Modern and important features were realized: separation of duties (for the accounting part of the application) and authorizations to allow distinguishing different roles in a company.
Unfortunately, by the beginning of 2011 the project looked mostly dead from an outside perspective: the team had not brought forward any releases since 2007, there were no signs of development and the mailing lists (a measure of community activity) were completely silent. Subversion Version Control (SVN) commits were continuing, but were being made by ever fewer committers and contributors.
Fortunately development activity was increasing in the first half year of 2011, leading to the release of version 1.3 by September. Between September and the year end in total 10 small bug fixes were released, showing active commitment of the developers to maintain the application.
New committers showed up, indicating revived community interest. Other signs of increased interest are the higher number of bug reports and the creation of the Linux package for Debian 7, which has been included in Ubuntu 12.04 as of October 2012.
Appendix H Copyright and license
Copyright (c) 2011, 2012 Erik Hülsmann.
This work is licensed under the Creative Commons Attribution License. To view a copy of this license, visit https://creativecommons.org/licenses/by/3.0/ or send a letter to Creative Commons, 559 Nathan Abbott Way, Stanford, California 94305, USA.
A summary of the license is given below, followed by the full legal text.
H.1 License summary
You are free:
  * to share -- to copy, distribute and transmit the work
  * to remix -- to adapt the work


Under the following condition:
  You must attribute the work in the manner specified by
  the author or licensor (but in a way that suggests that
  they endorse you or your use of the work).


With the understanding that:
  Waiver -- Any of the above conditions can be waived if
            you get permission from the copyright holder.

  Other rights -- In no way are any of the following
                  rights affected by the license:
     * Your fair dealing or fair use rights, or other
         applicable copyright exceptions and limitations;
     * The author’s moral rights;
     * Rights other persons may have either in the work
         itself or in how the work is used, such as
         publicity or privacy rights.
H.2 Legal full text
License

THE WORK (AS DEFINED BELOW) IS PROVIDED UNDER THE TERMS
OF THIS CREATIVE COMMONS PUBLIC LICENSE ("CCPL" OR
"LICENSE"). THE WORK IS PROTECTED BY COPYRIGHT AND/OR
OTHER APPLICABLE LAW. ANY USE OF THE WORK OTHER THAN AS
AUTHORIZED UNDER THIS LICENSE OR COPYRIGHT LAW IS
PROHIBITED.

BY EXERCISING ANY RIGHTS TO THE WORK PROVIDED HERE, YOU
ACCEPT AND AGREE TO BE BOUND BY THE TERMS OF THIS
LICENSE. TO THE EXTENT THIS LICENSE MAY BE CONSIDERED TO
BE A CONTRACT, THE LICENSOR GRANTS YOU THE RIGHTS
CONTAINED HERE IN CONSIDERATION OF YOUR ACCEPTANCE OF
SUCH TERMS AND CONDITIONS.

1. Definitions

"Adaptation" means a work based upon the Work, or upon
the Work and other pre-existing works, such as a
translation, adaptation, derivative work, arrangement of
music or other alterations of a literary or artistic
work, or phonogram or performance and includes cinemato-
graphic adaptations or any other form in which the Work
may be recast, transformed, or adapted including in any
form recognizably derived from the original, except that
a work that constitutes a Collection will not be
considered an Adaptation for the purpose of this License.
For the avoidance of doubt, where the Work is a musical
work, performance or phonogram, the synchronization of
the Work in timed-relation with a moving image
("synching") will be considered an Adaptation for the
purpose of this License.

"Collection" means a collection of literary or artistic
works, such as encyclopedias and anthologies, or
performances, phonograms or broadcasts, or other works or
subject matter other than works listed in Section 1(f)
below, which, by reason of the selection and arrangement
of their contents, constitute intellectual creations, in
which the Work is included in its entirety in unmodified
form along with one or more other contributions, each
constituting separate and independent works in
themselves, which together are assembled into a
collective whole. A work that constitutes a Collection
will not be considered an Adaptation (as defined above)
for the purposes of this License.

"Distribute" means to make available to the public the
original and copies of the Work or Adaptation, as
appropriate, through sale or other transfer of ownership.

"Licensor" means the individual, individuals, entity or
entities that offer(s) the Work under the terms of this
License.

"Original Author" means, in the case of a literary or
artistic work, the individual, individuals, entity or
entities who created the Work or if no individual or
entity can be identified, the publisher; and in addition
(i) in the case of a performance the actors, singers,
musicians, dancers, and other persons who act, sing,
deliver, declaim, play in, interpret or otherwise perform
literary or artistic works or expressions of folklore;
(ii) in the case of a phonogram the producer being the
person or legal entity who first fixes the sounds of a
performance or other sounds; and,
(iii) in the case of broadcasts, the organization that
transmits the broadcast.

"Work" means the literary and/or artistic work offered
under the terms of this License including without
limitation any production in the literary, scientific
and artistic domain, whatever may be the mode or form
of its expression including digital form, such as a
book, pamphlet and other writing; a lecture, address,
sermon or other work of the same nature; a dramatic or
dramatico-musical work; a choreographic work or
entertainment in dumb show; a musical composition with
or without words; a cinematographic work to which are
assimilated works expressed by a process analogous to
cinematography; a work of drawing, painting,
architecture, sculpture, engraving or lithography; a
photographic work to which are assimilated works
expressed by a process analogous to photography; a work
of applied art; an illustration, map, plan, sketch or
three-dimensional work relative to geography, topography,
architecture or science; a performance; a broadcast; a
phonogram; a compilation of data to the extent it is
protected as a copyrightable work; or a work performed
by a variety or circus performer to the extent it is not
otherwise considered a literary or artistic work.

"You" means an individual or entity exercising rights
under this License who has not previously violated the
terms of this License with respect to the Work, or who
has received express permission from the Licensor to
exercise rights under this License despite a previous
violation.

"Publicly Perform" means to perform public recitations
of the Work and to communicate to the public those public
recitations, by any means or process, including by wire
or wireless means or public digital performances; to make
available to the public Works in such a way that members
of the public may access these Works from a place and at
a place individually chosen by them; to perform the Work
to the public by any means or process and the
communication to the public of the performances of the
Work, including by public digital performance; to
broadcast and rebroadcast the Work by any means including
signs, sounds or images.

"Reproduce" means to make copies of the Work by any means
including without limitation by sound or visual
recordings and the right of fixation and reproducing
fixations of the Work, including storage of a protected
performance or phonogram in digital form or other
electronic medium.

2. Fair Dealing Rights. Nothing in this License is
intended to reduce, limit, or restrict any uses free
from copyright or rights arising from limitations or
exceptions that are provided for in connection with the
copyright protection under copyright law or other
applicable laws.

3. License Grant. Subject to the terms and conditions of
this License, Licensor hereby grants You a worldwide,
royalty-free, non-exclusive, perpetual (for the duration
of the applicable copyright) license to exercise the
rights in the Work as stated below:

to Reproduce the Work, to incorporate the Work into one
or more Collections, and to Reproduce the Work as
incorporated in the Collections;
to create and Reproduce Adaptations provided that any
such Adaptation, including any translation in any medium,
takes reasonable steps to clearly label, demarcate or
otherwise identify that changes were made to the original
Work. For example, a translation could be marked "The
original work was translated from English to Spanish,"
or a modification could indicate "The original work has
been modified.";
to Distribute and Publicly Perform the Work including as
incorporated in Collections; and, to Distribute and
Publicly Perform Adaptations.

For the avoidance of doubt:

Non-waivable Compulsory License Schemes. In those
jurisdictions in which the right to collect royalties
through any statutory or compulsory licensing scheme
cannot be waived, the Licensor reserves the exclusive
right to collect such royalties for any exercise by You
of the rights granted under this License; Waivable
Compulsory License Schemes. In those jurisdictions in
which the right to collect royalties through any
statutory or compulsory licensing scheme can be waived,
the Licensor waives the exclusive right to collect such
royalties for any exercise by You of the rights granted
under this License; and, Voluntary License Schemes.
The Licensor waives the right to collect royalties,
whether individually or, in the event that the Licensor
is a member of a collecting society that administers
voluntary licensing schemes, via that society, from any
exercise by You of the rights granted under this License.
The above rights may be exercised in all media and
formats whether now known or hereafter devised. The
above rights include the right to make such modifications
as are technically necessary to exercise the rights in
other media and formats. Subject to Section 8(f), all
rights not expressly granted by Licensor are hereby
reserved.

4. Restrictions. The license granted in Section 3 above
is expressly made subject to and limited by the
following restrictions:

You may Distribute or Publicly Perform the Work only
under the terms of this License. You must include a copy
of, or the Uniform Resource Identifier (URI) for, this
License with every copy of the Work You Distribute or
Publicly Perform. You may not offer or impose any terms
on the Work that restrict the terms of this License or
the ability of the recipient of the Work to exercise the
rights granted to that recipient under the terms of the
License. You may not sublicense the Work. You must keep
intact all notices that refer to this License and to the
disclaimer of warranties with every copy of the Work You
Distribute or Publicly Perform. When You Distribute or
Publicly Perform the Work, You may not impose any
effective technological measures on the Work that
restrict the ability of a recipient of the Work from You
to exercise the rights granted to that recipient under
the terms of the License. This Section 4(a) applies to
the Work as incorporated in a Collection, but this does
not require the Collection apart from the Work itself to
be made subject to the terms of this License. If You
create a Collection, upon notice from any Licensor You
must, to the extent practicable, remove from the
Collection any credit as required by Section 4(b), as
requested. If You create an Adaptation, upon notice from
any Licensor You must, to the extent practicable, remove
from the Adaptation any credit as required by
Section 4(b), as requested.
If You Distribute, or Publicly Perform the Work or any
Adaptations or Collections, You must, unless a request
has been made pursuant to Section 4(a), keep intact all
copyright notices for the Work and provide, reasonable
to the medium or means You are utilizing: (i) the name
of the Original Author (or pseudonym, if applicable) if
supplied, and/or if the Original Author and/or Licensor
designate another party or parties (e.g., a sponsor
institute, publishing entity, journal) for attribution
("Attribution Parties") in Licensor’s copyright notice,
terms of service or by other reasonable means, the name
of such party or parties; (ii) the title of the Work if
supplied; (iii) to the extent reasonably practicable,
the URI, if any, that Licensor specifies to be associated
with the Work, unless such URI does not refer to the
copyright notice or licensing information for the Work;
and (iv), consistent with Section 3(b), in the case of an
Adaptation, a credit identifying the use of the Work in
the Adaptation (e.g., "French translation of the Work by
Original Author," or "Screenplay based on original Work
by Original Author"). The credit required by this
Section 4 (b) may be implemented in any reasonable
manner; provided, however, that in the case of a
Adaptation or Collection, at a minimum such credit will
appear, if a credit for all contributing authors of the
Adaptation or Collection appears, then as part of these
credits and in a manner at least as prominent as the
credits for the other contributing authors. For the
avoidance of doubt, You may only use the credit required
by this Section for the purpose of attribution in the
manner set out above and, by exercising Your rights under
this License, You may not implicitly or explicitly assert
or imply any connection with, sponsorship or endorsement
by the Original Author, Licensor and/or Attribution
Parties, as appropriate, of You or Your use of the Work,
without the separate, express prior written permission
of the Original Author, Licensor and/or Attribution
Parties.
Except as otherwise agreed in writing by the Licensor
or as may be otherwise permitted by applicable law,
if You Reproduce, Distribute or Publicly Perform the
Work either by itself or as part of any Adaptations or
Collections, You must not distort, mutilate, modify or
take other derogatory action in relation to the Work
which would be prejudicial to the Original Author’s
honor or reputation. Licensor agrees that in those
jurisdictions (e.g. Japan), in which any exercise of the
right granted in Section 3(b) of this License (the right
to make Adaptations) would be deemed to be a distortion,
mutilation, modification or other derogatory action
prejudicial to the Original Author’s honor and
reputation, the Licensor will waive or not assert, as
appropriate, this Section, to the fullest extent
permitted by the applicable national law, to enable You
to reasonably exercise Your right under Section 3(b) of
this License (right to make Adaptations) but not
otherwise.

5. Representations, Warranties and Disclaimer

UNLESS OTHERWISE MUTUALLY AGREED TO BY THE PARTIES IN
WRITING, LICENSOR OFFERS THE WORK AS-IS AND MAKES NO
REPRESENTATIONS OR WARRANTIES OF ANY KIND CONCERNING
THE WORK, EXPRESS, IMPLIED, STATUTORY OR OTHERWISE,
INCLUDING, WITHOUT LIMITATION, WARRANTIES OF TITLE,
MERCHANTIBILITY, FITNESS FOR A PARTICULAR PURPOSE,
NONINFRINGEMENT, OR THE ABSENCE OF LATENT OR OTHER
DEFECTS, ACCURACY, OR THE PRESENCE OF ABSENCE OF ERRORS,
WHETHER OR NOT DISCOVERABLE. SOME JURISDICTIONS DO NOT
ALLOW THE EXCLUSION OF IMPLIED WARRANTIES, SO SUCH
EXCLUSION MAY NOT APPLY TO YOU.

6. Limitation on Liability.

EXCEPT TO THE EXTENT REQUIRED BY APPLICABLE LAW, IN NO
EVENT WILL LICENSOR BE LIABLE TO YOU ON ANY LEGAL THEORY
FOR ANY SPECIAL, INCIDENTAL, CONSEQUENTIAL, PUNITIVE OR
EXEMPLARY DAMAGES ARISING OUT OF THIS LICENSE OR THE USE
OF THE WORK, EVEN IF LICENSOR HAS BEEN ADVISED OF THE
POSSIBILITY OF SUCH DAMAGES.

7. Termination

This License and the rights granted hereunder will
terminate automatically upon any breach by You of the
terms of this License. Individuals or entities who have
received Adaptations or Collections from You under this
License, however, will not have their licenses terminated
provided such individuals or entities remain in full
compliance with those licenses.
Sections 1, 2, 5, 6, 7, and 8 will survive any
termination of this License. Subject to the above terms
and conditions, the license granted here is perpetual
(for the duration of the applicable copyright in the
Work). Notwithstanding the above, Licensor reserves the
right to release the Work under different license terms
or to stop distributing the Work at any time; provided,
however that any such election will not serve to
withdraw this License (or any other license that has
been, or is required to be, granted under the terms of
this License), and this License will continue in full
force and effect unless terminated as stated above.

8. Miscellaneous

Each time You Distribute or Publicly Perform the
Work or a Collection, the Licensor offers
to the recipient a license to the Work on the same terms
and conditions as the license granted to You under this
License. Each time You Distribute or Publicly Perform an
Adaptation, Licensor offers to the recipient a license
to the original Work on the same terms and conditions
as the license granted to You under this License.
If any provision of this License is invalid
or unenforceable under applicable law, it shall not
affect the validity or enforceability of the remainder
of the terms of this License, and without further
action by the parties to this agreement, such provision
shall be reformed to the minimum extent necessary
to make such provision valid and enforceable. No term or
provision of this License shall be deemed waived and no
breach consented to unless such waiver or consent shall
be in writing and signed by the party to be charged with
such waiver or consent.
This License constitutes the entire agreement between the
parties with respect to the Work licensed here. There
are no understandings, agreements or representations
with respect to the Work not specified here. Licensor
shall not be bound by any additional provisions that may
appear in any communication from You. This License may
not be modified without the mutual written agreement of
the Licensor and You. The rights granted under, and the
subject matter referenced, in this License were drafted
utilizing the terminology of the Berne Convention for the
Protection of Literary and Artistic Works (as amended
on September 28, 1979), the Rome Convention of 1961,
the WIPO Copyright Treaty of 1996, the WIPO Performances
and Phonograms Treaty of 1996 and the Universal Copyright
Convention (as revised on July 24, 1971). These
rights and subject matter take effect in the relevant
jurisdiction in which the License terms are sought to be
enforced according to the corresponding provisions
of the implementation of those treaty provisions
in the applicable national law. If the standard
suite of rights granted under applicable copyright
law includes additional rights not granted under
this License, such additional rights are deemed to be
included in the License; this License is not intended to
restrict the license of any rights under applicable law.
Acronyms
- AP
- Accounts payable
- API
- Application Programmer Interface
- AR
- Accounts receivable
- CoA
- chart of accounts
- COGS
- cost of goods sold
- CSV
- Comma Separated Values
- ERP system
- Enterprise Resource Planning system
- ERP
- Enterprise Resource Planning
- FIFO
- First in, first out
- GL
- General Ledger
- IAS
- International Accounting Standards
- IFRS
- International Financial Reporting Standards
- LIFO
- Last in, first out
- PSGI
- Perl Web Server Gateway Interface
- REST
- Representational State Transfer
- RFQ
- Request for quotation
- SL
- SQL-Ledger
- SSL
- Secure Sockets Layer
- SSN
- Social Security Number
- SVN
- Subversion Version Control
- VAT
- Value Added Tax
- VPS
- Virtual Private Server
Glossary
- accrual basis
- Income is deemed earned when the customer invoice is prepared and sent, and the expenses are deemed incurred when the purchase order is prepared and sent
- add-on
- Extension to the base LedgerSMB system to add new functionality
- cash basis
- Income is deemed earned when the customer pays it, and the expenses are deemed incurred when the business pays them
- company
- A company is a contact initially setup as a company and usually has further configuration as a vendor or customer
- contact
- A contact is primarily a company or person. The contact can be further idenified as employee, vendor, customer, contact, lead, referral, hot lead, cold lead, sub-contractor, etc. The contact’s setup determines how it is used in LedgerSMB
- contra
- A contra account is used in a general ledger to reduce the value of a related account when the two are netted together. A contra account’s natural balance is the opposite of the associated account. If a debit is the natural balance recorded in the related account, the contra account records a credit
- credit account
- The link between contacts and the accounting system. Credit accounts can be setup to identify contacts as vendors, customers, or both. When setup as both there may be different identifying numbers for the customer and vendor. The term “credit account” is a generalization of the customer and vendor accounts
- customer
- Is a contact initially setup as a company or person and further configured with at least one customer credit account
- expense
- A cost incurred by the company. Expenses are not payments. The most prominent example is where products are sold and the cost of inventory is recognized as expense (Cost Of Goods Sold) at the time of the sale while the products could have been bought months before
- GIFI
- Stands for Generalized Index for Financial Information, a system used by the Canada Revenue Agency for filing coporate tax returns (see http://www.cra-arc.gc.ca/tx/bsnss/tpcs/crprtns/rtrn/wht/gifi-ogrf/menu-eng.html)
- permalink
- A permalink is a link which you can share with your colleagues and when inserted into the browser, returns exactly the same report (or at least a search with exactly the same parameters as you used). To access the link the user can use the browsers ”Copy link” function to copy the link and pass it to a colleague
- PL/SQL
- Procedural Language for SQL, a programming language from Oracle for building database functionality. LedgerSMB uses a variant supported by PostgreSQL called PL/pgSQL
- Single Page Application
- Single Page (web) Applications are a type of web applications; they employ JavaScript and HTML5 techniques to retrieve data, code and layout fragments from the server as the UI needs them. They are called “single page” because they use JavaScript to update the current page instead of loading a completely new page
- vendor
- Is a contact initially setup as a company or person and further configured with at least one vendor credit account
Index
- account all item account_all
- account create item account_create
- account delete item account_delete
- account edit item account_edit
- account link description create item account_link_description_create
- accrual basis Running your business with LedgerSMB 1.10 DRAFT / WORK IN PROGRESS
- ap all item ap_all
- ap invoice create item ap_invoice_create
- ap invoice create voucher item ap_invoice_create_voucher
- ap transaction all item ap_transaction_all
- ap transaction create item ap_transaction_create
- ap transaction create voucher item ap_transaction_create_voucher
- ap transaction list item ap_transaction_list
- ap voucher all item ap_voucher_all
- apache §17.1
- API item Minor
- application roles §18.1
- ar all item ar_all
- ar invoice create item ar_invoice_create
- ar invoice create voucher item ar_invoice_create_voucher
- ar transaction all item ar_transaction_all
- ar transaction create item ar_transaction_create
- ar transaction create voucher item ar_transaction_create_voucher
- ar transaction list item ar_transaction_list
- ar voucher all item ar_voucher_all
- assembly stock item assembly_stock
- assets administer item assets_administer
- assets approve item assets_approve
- assets depreciate item assets_depreciate
- assets enter item assets_enter
- audit trail maintenance item audit_trail_maintenance
- auditor item auditor
- base user item base_user
- batch create item batch_create
- batch list item batch_list
- batch post item batch_post
- budget approve item budget_approve
- budget enter item budget_enter
- budget obsolete item budget_obsolete
- budget view item budget_view
- business type all item business_type_all
- business type create item business_type_create
- business type edit item business_type_edit
- business units manage item business_units_manage
- cash all item cash_all
- cash basis Running your business with LedgerSMB 1.10 DRAFT / WORK IN PROGRESS
- chart of accounts §5.1.3, §5.1.3, §5.1.3
- COGS §18.1
- configuration §16.1
- contact all rights item contact_all_rights
- contact class cold lead item contact_class_cold_lead
- contact class contact item contact_class_contact
- contact class customer item contact_class_customer
- contact class employee item contact_class_employee
- contact class hot lead item contact_class_hot_lead
- contact class lead item contact_class_lead
- contact class referral item contact_class_referral
- contact class robot item contact_class_robot
- contact class sub contractor item contact_class_sub_contractor
- contact class vendor item contact_class_vendor
- contact create item contact_create
- contact delete item contact_delete
- contact edit item contact_edit
- contact read item contact_read
- contra Running your business with LedgerSMB 1.10 DRAFT / WORK IN PROGRESS
- country all item country_all
- country create item country_create
- country edit item country_edit
- createuser §5.1.1
- customer Running your business with LedgerSMB 1.10 DRAFT / WORK IN PROGRESS
- database load path item
- draft modify item draft_modify
- draft post item draft_post
- email item, §18.4.3, §38.2.3, Table 6.3
- employees manage item employees_manage
- exchangerate edit item exchangerate_edit
- FIFO §18.1
- file attach eca item file_attach_eca
- file attach entity item file_attach_entity
- file attach order item file_attach_order
- file attach part item file_attach_part
- file attach tx item file_attach_tx
- file read item file_read
- file upload item file_upload
- financial reports item financial_reports
- General Ledger item account_all, item system_admin, item account_create, item account_delete, item account_edit, item account_link_description_create, item gl_all, item gl_transaction_create, item gl_voucher_create
- GIFI Running your business with LedgerSMB 1.10 DRAFT / WORK IN PROGRESS
- gifi create item gifi_create
- gifi edit item gifi_edit
- GL item account_all, item system_admin, item account_create, item account_delete, item account_edit, item account_link_description_create, item gl_all, item gl_transaction_create, item gl_voucher_create
- gl all item gl_all
- gl reports item gl_reports
- gl transaction create item gl_transaction_create
- gl voucher create item gl_voucher_create
- HTML path item
- inventory §18.1
- inventory adjust item inventory_adjust
- inventory all item inventory_all
- inventory approve item inventory_approve
- inventory receive item inventory_receive
- inventory reports item inventory_reports
- inventory ship item inventory_ship
- inventory transfer item inventory_transfer
- invoice §18.1, §38.2.1, §38.2.3
- language create item language_create
- language edit item language_edit
- ledgersmb-admin footnote 1
- ledgersmb.conf §17.4
- ledgersmb.yaml §E.1, §17.4, §17.4.1
- locale path item
- mail §17.4.1
- orders generate item orders_generate
- orders manage item orders_manage
- orders purchase consolidate item orders_purchase_consolidate
- orders sales consolidate item orders_sales_consolidate
- orders sales to purchase item orders_sales_to_purchase
- over payment §43.5, §43.7
- part create item part_create
- part delete item part_delete
- part edit item part_edit
- part group §25.1.2, §7.3
- password §5.1.5
- payment process item payment_process
- pg_hba.conf item pg_hba.conf
- picking §18.1
- Postgres item security
- Postgres Security item security
- pricegroup create item pricegroup_create
- pricegroup edit item pricegroup_edit
- printer configuration §17.4.1
- printing §17.4.1
- psql §5.1.1
- purchase order create item purchase_order_create
- purchase order delete item purchase_order_delete
- purchase order edit item purchase_order_edit
- purchase order list item purchase_order_list
- receipt process item receipt_process
- reconciliation all item reconciliation_all
- reconciliation approve item reconciliation_approve
- reconciliation enter item reconciliation_enter
- recurring item recurring
- release number item Major
- rfq create item rfq_create
- rfq delete item rfq_delete
- rfq list item rfq_list
- roles Appendix D
- sales order create item sales_order_create
- sales order delete item sales_order_delete
- sales order edit item sales_order_edit
- sales order list item sales_order_list
- sales quotation create item sales_quotation_create
- sales quotation delete item sales_quotation_delete
- sales quotation list item sales_quotation_list
- sendmail item
- separation of duties §18.1, §18.4.3
- sequence numbers §18.4.3
- setup.pl §5.1, §5.1.1
- shipping §18.1
- sic all item sic_all
- sic create item sic_create
- sic edit item sic_edit
- SMTP item, item
- SQL schema path item
- system admin item system_admin
- system settings change item system_settings_change
- system settings list item system_settings_list
- tax form save item tax_form_save
- taxes set item taxes_set
- template cache path item
- template edit item template_edit
- template path item
- templates §48.1, §5.1.4
- timecard add item timecard_add
- timecard list item timecard_list
- timecard order generate item timecard_order_generate
- transaction template delete item transaction_template_delete
- translation create item translation_create
- user creation §5.1.5
- users manage item users_manage
- vendor Running your business with LedgerSMB 1.10 DRAFT / WORK IN PROGRESS
- version number §17.3
- voucher delete item voucher_delete
- warehouse create item warehouse_create
- warehouse edit item warehouse_edit
- workflow Chapter 49
- workflow path item
- workflows §18.1
- yearend reopen item yearend_reopen
- yearend run item yearend_run