7.4 Defining vendors
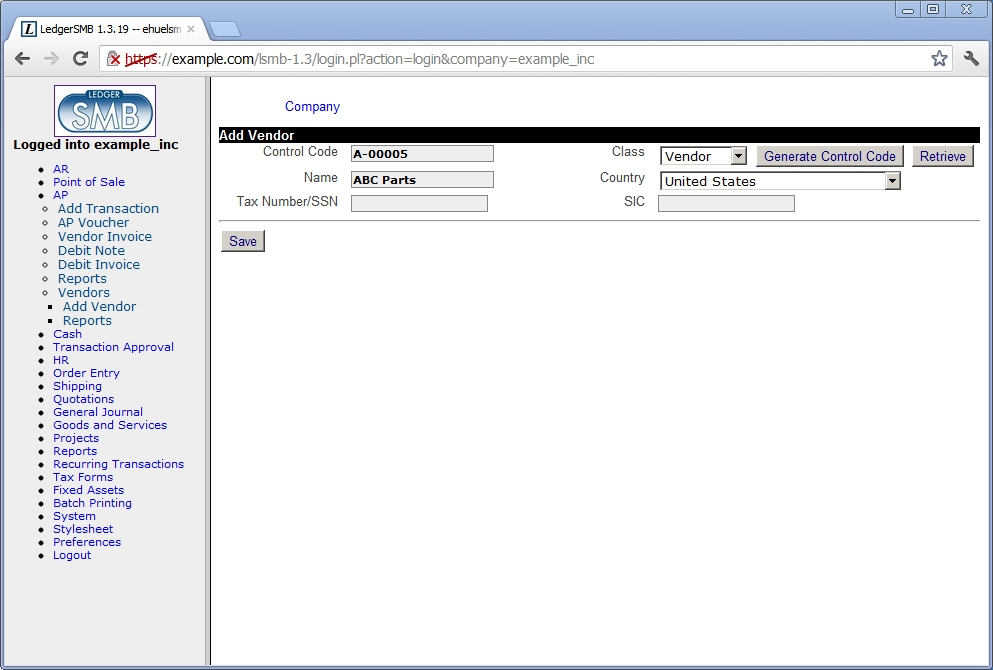
Jack selects “ABC Parts” to purchase the inventory he needs to run his company. In order to start buying inventory, ABC Parts needs to be entered as a Vendor to LedgerSMB.
Using the work flow detailed in Section 29.2 on page 29.2 Jack starts to do so by going through the menu AP ![]() Vendors
Vendors ![]() Add Vendor.
He fills out the Company creation form by clicking the Generate control code
button and adding the data as shown in Figure 7.1 on page 7.1.
Add Vendor.
He fills out the Company creation form by clicking the Generate control code
button and adding the data as shown in Figure 7.1 on page 7.1.
After saving the company data, Jack is presented the account data screen which he fills out as shown in Figure 7.2 on page 7.2.
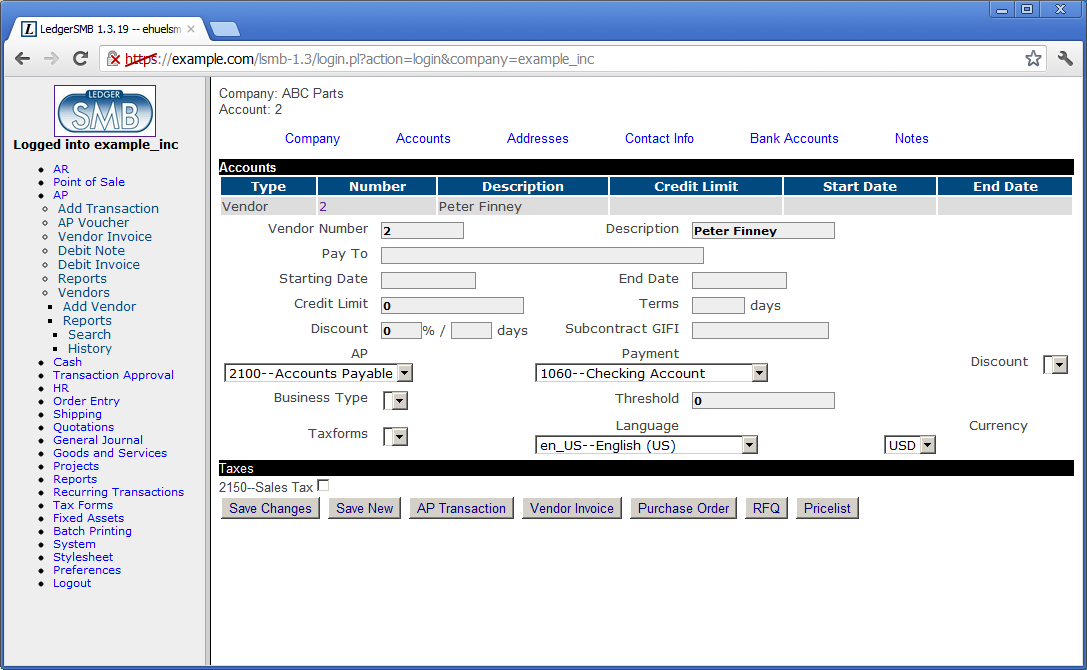
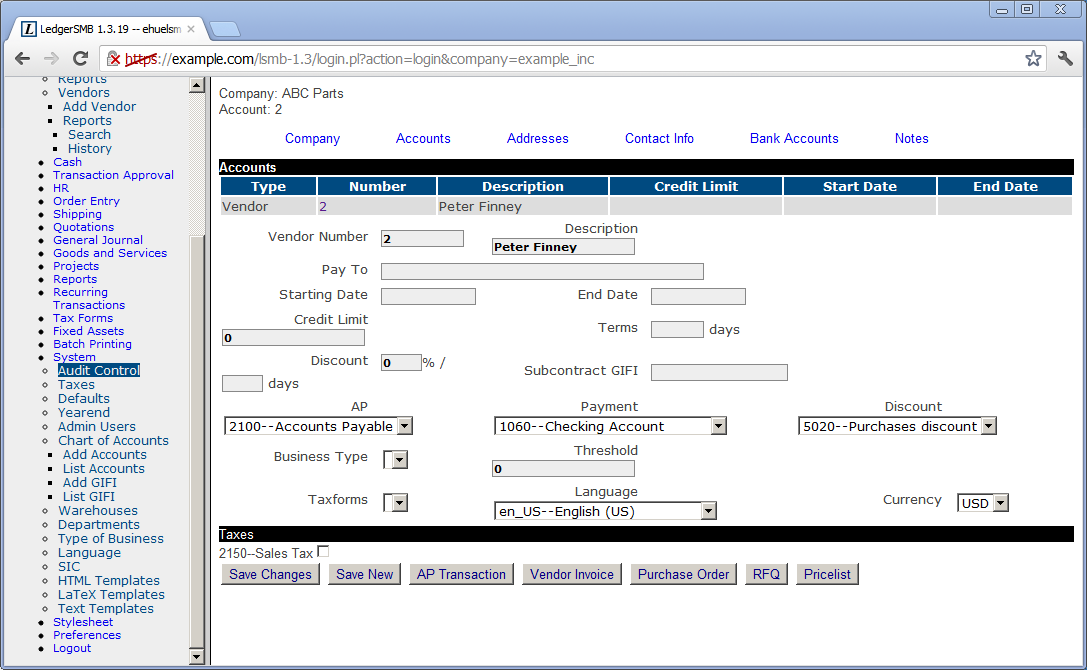
When he’s done filling out and saving the form, he notices the empty “Discount” drop down. Reading more about account configuration check marks in Section 22.2.3 on page 22.2.3 and going back to the checks on his chart of accounts (Section 6.4 on page 6.4), he finds he’s missing the purchase and sales discount accounts. He adds two accounts as listed in Table LABEL:tbl:special-purpose-account-config-summary on page LABEL:tbl:special-purpose-account-config-summary:
-
4020
Sales discount
-
5020
Purchase discount
Note the top-left corner stating “Company: ABC Parts” and “Account: 2”. The information entered on the “Addresses”, “Contact Info” and “Bank Accounts” tabs will be attached to the account listed, i.e. account number 2 in this case.
![[LOGO]](data:image/png;base64,iVBORw0KGgoAAAANSUhEUgAAAAsAAAAOCAYAAAD5YeaVAAAAAXNSR0IArs4c6QAAAAZiS0dEAP8A/wD/oL2nkwAAAAlwSFlzAAALEwAACxMBAJqcGAAAAAd0SU1FB9wKExQZLWTEaOUAAAAddEVYdENvbW1lbnQAQ3JlYXRlZCB3aXRoIFRoZSBHSU1Q72QlbgAAAdpJREFUKM9tkL+L2nAARz9fPZNCKFapUn8kyI0e4iRHSR1Kb8ng0lJw6FYHFwv2LwhOpcWxTjeUunYqOmqd6hEoRDhtDWdA8ApRYsSUCDHNt5ul13vz4w0vWCgUnnEc975arX6ORqN3VqtVZbfbTQC4uEHANM3jSqXymFI6yWazP2KxWAXAL9zCUa1Wy2tXVxheKA9YNoR8Pt+aTqe4FVVVvz05O6MBhqUIBGk8Hn8HAOVy+T+XLJfLS4ZhTiRJgqIoVBRFIoric47jPnmeB1mW/9rr9ZpSSn3Lsmir1fJZlqWlUonKsvwWwD8ymc/nXwVBeLjf7xEKhdBut9Hr9WgmkyGEkJwsy5eHG5vN5g0AKIoCAEgkEkin0wQAfN9/cXPdheu6P33fBwB4ngcAcByHJpPJl+fn54mD3Gg0NrquXxeLRQAAwzAYj8cwTZPwPH9/sVg8PXweDAauqqr2cDjEer1GJBLBZDJBs9mE4zjwfZ85lAGg2+06hmGgXq+j3+/DsixYlgVN03a9Xu8jgCNCyIegIAgx13Vfd7vdu+FweG8YRkjXdWy329+dTgeSJD3ieZ7RNO0VAXAPwDEAO5VKndi2fWrb9jWl9Esul6PZbDY9Go1OZ7PZ9z/lyuD3OozU2wAAAABJRU5ErkJggg==)